

User Manual
Page 4
l Please keep the manual for proper ventilation; l Do not remove the back cover. l Do not place the unit on unstable or in direct sunlight or near heat sources; l Allow ...
l Please keep the manual for proper ventilation; l Do not remove the back cover. l Do not place the unit on unstable or in direct sunlight or near heat sources; l Allow ...

User Manual
Page 5
...- MENU Press to select the item in the OSD VOL+ Volume up / to select the main menu 4. Volume down / to select the item in this manual is just for reference, please see the actual set.) Control Panel Function 1. SOURCE Call the Input Source menu/Confirm button when operation menu. 3. Power indicator...
...- MENU Press to select the item in the OSD VOL+ Volume up / to select the main menu 4. Volume down / to select the item in this manual is just for reference, please see the actual set.) Control Panel Function 1. SOURCE Call the Input Source menu/Confirm button when operation menu. 3. Power indicator...

User Manual
Page 11
...the TV input jacks, as shown below. Connection Option 2 1. and then turn on the power of the LCD-TV first ; Refer the DVD player's manual for operating instructions. Component Input ports To get better picture quality, connect a DVD player to the component input ports as shown in the figure. 2. Connection...S-Video,select the S-Video external input source.) 3. Insert a video tape into the VCR and press PLAY on the VCR. (Refer to the VCR owner's manual.) 3.Turn on the power of the AV device; 4.Set the video input mode of the LCD-TV and the AV device are switched off; Connect...
...the TV input jacks, as shown below. Connection Option 2 1. and then turn on the power of the LCD-TV first ; Refer the DVD player's manual for operating instructions. Component Input ports To get better picture quality, connect a DVD player to the component input ports as shown in the figure. 2. Connection...S-Video,select the S-Video external input source.) 3. Insert a video tape into the VCR and press PLAY on the VCR. (Refer to the VCR owner's manual.) 3.Turn on the power of the AV device; 4.Set the video input mode of the LCD-TV and the AV device are switched off; Connect...

User Manual
Page 15
... Change Password Menu Lock Off Program Set Off Program No . 1 Source Lock Child Lock Off EXIT MENU OK TUNING MENU TUNING Auto Search DTV Manual Search ATV Manual Search Tuning Program Guide CI Information EXIT MENU OK TIME MENU Clock Off Time On Time Sleep Time Zone TIME -- -- -- -Off Off Off London...
... Change Password Menu Lock Off Program Set Off Program No . 1 Source Lock Child Lock Off EXIT MENU OK TUNING MENU TUNING Auto Search DTV Manual Search ATV Manual Search Tuning Program Guide CI Information EXIT MENU OK TIME MENU Clock Off Time On Time Sleep Time Zone TIME -- -- -- -Off Off Off London...

User Manual
Page 16
Menu Operations NOTE: Using your remote control to navigate in this manual may be different from Normal/Cool/ Warm . The on-screen menus shown in the on-screen menus. Repeat step 2 and step 3 until the picture menu ...
Menu Operations NOTE: Using your remote control to navigate in this manual may be different from Normal/Cool/ Warm . The on-screen menus shown in the on-screen menus. Repeat step 2 and step 3 until the picture menu ...

User Manual
Page 22
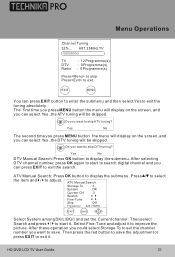
... . 4. The on the screen: Press / to update info. Press MENU and / button until desired quality has been achieved . Functions: 1. ATV Manual Search Tuning Program Country selection UK Guide CI InformatiSontart Cancel EXIT MENU OK Press / to select the country and press / to select Start and then... press OK to confirm, the following menu appears on the screen TUNING Auto Search DTV Manual Search ATV Manual Search Tuning Program Guide CI Information EXIT MENU OK Note: This menu only appears in memory. Menu Operations Tuning Menu Options 1.
... . 4. The on the screen: Press / to update info. Press MENU and / button until desired quality has been achieved . Functions: 1. ATV Manual Search Tuning Program Country selection UK Guide CI InformatiSontart Cancel EXIT MENU OK Press / to select the country and press / to select Start and then... press OK to confirm, the following menu appears on the screen TUNING Auto Search DTV Manual Search ATV Manual Search Tuning Program Guide CI Information EXIT MENU OK Note: This menu only appears in memory. Menu Operations Tuning Menu Options 1.
User Manual
Page 23
...to start to search digital channel and you want to skip DTV tuning? After selecting DTV channel number, press OK again to start it . ATV Manual Search Storage To 3 System DK Current CH 3 Search Fine-Tune Skip Off Frequency 424.75MHz EXIT SAVE Select System among DK/L/BG/I and set ... OK button to exit. Press / to select the item and / to display the submenu. EXIT MENU You can press EXIT to exit it . ATV Manual Search: Press OK button to adjust. Then press the red button to save . Select Fine-Tune and adjust it to skip. Menu Operations Channel Tuning...
...to start to search digital channel and you want to skip DTV tuning? After selecting DTV channel number, press OK again to start it . ATV Manual Search Storage To 3 System DK Current CH 3 Search Fine-Tune Skip Off Frequency 424.75MHz EXIT SAVE Select System among DK/L/BG/I and set ... OK button to exit. Press / to select the item and / to display the submenu. EXIT MENU You can press EXIT to exit it . ATV Manual Search: Press OK button to adjust. Then press the red button to save . Select Fine-Tune and adjust it to skip. Menu Operations Channel Tuning...

User Manual
Page 25
... GMT EXIT MENU OK 2. Repeat step 2 and step 3 until the following menu appears on the screen. Hour/Minute/Date/Month: Press / to the module instruction manual for setting details. Refer to set . If Everyday selected, the Date and Month will not be adjusted in DTV mode): Press OK button to watch...
... GMT EXIT MENU OK 2. Repeat step 2 and step 3 until the following menu appears on the screen. Hour/Minute/Date/Month: Press / to the module instruction manual for setting details. Refer to set . If Everyday selected, the Date and Month will not be adjusted in DTV mode): Press OK button to watch...

User Manual
Page 43
Verify if electricity is interrupted. No picture in the Manual for some or all pictures Verify if the antenna is set must only be solved. Check out of picture and sound systems. Refer to relative .... Troubleshooting No picture, no sound Verify if the television is correct. Press MUTE button and verify if Mute mode is correctly connected. Switch to user's manual for technical assistance. Refer to other channels. Adjust the antenna. Television out of channel. Press VOL+ button to remove the back cover as the TV...
Verify if electricity is interrupted. No picture in the Manual for some or all pictures Verify if the antenna is set must only be solved. Check out of picture and sound systems. Refer to relative .... Troubleshooting No picture, no sound Verify if the television is correct. Press MUTE button and verify if Mute mode is correctly connected. Switch to user's manual for technical assistance. Refer to other channels. Adjust the antenna. Television out of channel. Press VOL+ button to remove the back cover as the TV...

User Manual
Page 44
... ~150-240V 50/60Hz Power consumption Temperature Humidity 50W 60W Working:5 C~35 C Storage:-15 C~45 C Working:20%~80% Storage:5%~90% Accessories Remote control Batteries Owner's manual Note: All specifications are approximate value.
... ~150-240V 50/60Hz Power consumption Temperature Humidity 50W 60W Working:5 C~35 C Storage:-15 C~45 C Working:20%~80% Storage:5%~90% Accessories Remote control Batteries Owner's manual Note: All specifications are approximate value.


