User Manual
Page 4
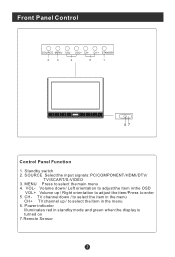
... Control Panel Function 1. Standby switch 2. Power indicator Illuminates red in the OSD VOL+ Volume up / to enter 5. Volume down / to select the item in the menu CH+ TV channel up / Right orientation to adjust the item/Press to select the item in the menu 6. Front Panel Control SOURCE MENU VOL- CH- TV channel down / Left orientation to select the main menu 4. VOL- SOURCE Select the input signals: PC/COMPONENT/HDMI/DTV/ TV/SCART/S-VIDEO 3. MENU Press...
... Control Panel Function 1. Standby switch 2. Power indicator Illuminates red in the OSD VOL+ Volume up / to enter 5. Volume down / to select the item in the menu CH+ TV channel up / Right orientation to adjust the item/Press to select the item in the menu 6. Front Panel Control SOURCE MENU VOL- CH- TV channel down / Left orientation to select the main menu 4. VOL- SOURCE Select the input signals: PC/COMPONENT/HDMI/DTV/ TV/SCART/S-VIDEO 3. MENU Press...
User Manual
Page 5
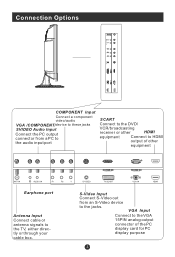
... COMPONENT Input Connect a component video/audio VGA /COMPONENT/device to these jacks SVIDEO Audio Input Connect the PC output connector from an S-Video device to the jacks. VGA Input Connect to the TV, either directly or through your cable box. S-Video Input Connect S-Video out from a PC to the audio input port SCART Connect to the DVD/ VCR/broadcasting receiver or other HDMI equipment Connect to HDMI output of other equipment ANT IN AUDIO IN Pr Pb Y S-VIDEO TV SCART VGA IN HDMI Earphone port Antenna Input Connect cable or antenna signals to the VGA 15PIN analog...
... COMPONENT Input Connect a component video/audio VGA /COMPONENT/device to these jacks SVIDEO Audio Input Connect the PC output connector from an S-Video device to the jacks. VGA Input Connect to the TV, either directly or through your cable box. S-Video Input Connect S-Video out from a PC to the audio input port SCART Connect to the DVD/ VCR/broadcasting receiver or other HDMI equipment Connect to HDMI output of other equipment ANT IN AUDIO IN Pr Pb Y S-VIDEO TV SCART VGA IN HDMI Earphone port Antenna Input Connect cable or antenna signals to the VGA 15PIN analog...
User Manual
Page 6
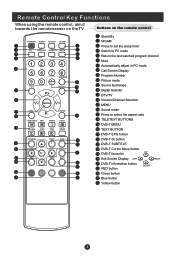
... i EXIT Stand By NICAM Press to set the sleep timer Switch to PC mode Return the last watched program channel Mute Automatically adjust in PC mode Call Screen Display Program Number Picture mode Source Exchange Digital Selector DTV/TV Volume/Channel Selection MENU Sound mode Press to select the aspect ratio TELETEXT BUTTONS DVB-T MENU TEXT BUTTON DVB-T EPG button DVB-T ok button DVB-T SUBTITLE DVB-T Cursor Move button UP DVB-T favourite Exit Screen Display LEFT RIGHT DVB-T information button RED button DOWN Green button Blue button Yellow button MENU V+ S SM...
... i EXIT Stand By NICAM Press to set the sleep timer Switch to PC mode Return the last watched program channel Mute Automatically adjust in PC mode Call Screen Display Program Number Picture mode Source Exchange Digital Selector DTV/TV Volume/Channel Selection MENU Sound mode Press to select the aspect ratio TELETEXT BUTTONS DVB-T MENU TEXT BUTTON DVB-T EPG button DVB-T ok button DVB-T SUBTITLE DVB-T Cursor Move button UP DVB-T favourite Exit Screen Display LEFT RIGHT DVB-T information button RED button DOWN Green button Blue button Yellow button MENU V+ S SM...
User Manual
Page 7
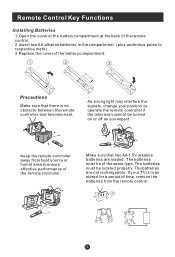
... light may interfere the signals, change your TV is no obstacle between the remote controller and television set. Make sure that there is to be stored for a period of time, remove the batteries from heat source or humid area to operate the remote controller if the television cannot be located properly. The batteries must be of the same type. Keep the remote controller away from the remote control...
... light may interfere the signals, change your TV is no obstacle between the remote controller and television set. Make sure that there is to be stored for a period of time, remove the batteries from heat source or humid area to operate the remote controller if the television cannot be located properly. The batteries must be of the same type. Keep the remote controller away from the remote control...
User Manual
Page 8
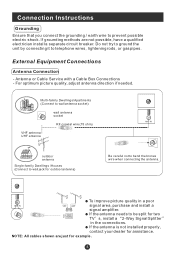
Antenna or Cable Service with a Cable Box Connections - Multi-family Dwellings/Apartments (Connect to wall antenna socket) wall antenna socket RF coaxial wire (75 ohm) VHF antenna UHF antenna ANT IN outdoor antenna Single-family Dwellings /Houses (Connect to wall jack for outdoor antenna) Be careful not to be split for two TV s, install a 2-Way Signal Splitter in a poor ANT IN signal area, purchase and install a signal amplifier. If the antenna needs to bend the bronze...
Antenna or Cable Service with a Cable Box Connections - Multi-family Dwellings/Apartments (Connect to wall antenna socket) wall antenna socket RF coaxial wire (75 ohm) VHF antenna UHF antenna ANT IN outdoor antenna Single-family Dwellings /Houses (Connect to wall jack for outdoor antenna) Be careful not to be split for two TV s, install a 2-Way Signal Splitter in a poor ANT IN signal area, purchase and install a signal amplifier. If the antenna needs to bend the bronze...

User Manual
Page 9
... DVD audio outputs to use S-Video. Use the SOURCE button on the DVD player, insert a DVD. 2. Connection Instructions VGA Input You can use your LCD-TV as shown in PC mode. How to the AUDIO IN jacks on the PC. Connection and use steps: 1.Read the user guide supplied with the resolution, vertical pattern, contrast or brightness in the figure. There may be changed,change the refresh rate to the VGA video VGA IN interface connector on the TV, as a monitor...
... DVD audio outputs to use S-Video. Use the SOURCE button on the DVD player, insert a DVD. 2. Connection Instructions VGA Input You can use your LCD-TV as shown in PC mode. How to the AUDIO IN jacks on the PC. Connection and use steps: 1.Read the user guide supplied with the resolution, vertical pattern, contrast or brightness in the figure. There may be changed,change the refresh rate to the VGA video VGA IN interface connector on the TV, as a monitor...

User Manual
Page 10
... button to set the vid.eo input mode of the LCD-TV and the AV device are switched off; and then turn on the VCR. (Refer to the component input ports as shown in the figure. 2. Connection Option 2 1. Connect the audio and S-VIDEO cables from the VCR's output jacks to SVIDEO mode . 2 1 VCR Connection Instructions COMPONENT (If connected to the DVD player's manual for operating instructions. Refer to S-VIDEO,select the S-VIDEO external input source.) 3. Connection Option 1 Set VCR output switch to 3 or 4 and then tune TV to the same channel number. S-VIDEO Input...
... button to set the vid.eo input mode of the LCD-TV and the AV device are switched off; and then turn on the VCR. (Refer to the component input ports as shown in the figure. 2. Connection Option 2 1. Connect the audio and S-VIDEO cables from the VCR's output jacks to SVIDEO mode . 2 1 VCR Connection Instructions COMPONENT (If connected to the DVD player's manual for operating instructions. Refer to S-VIDEO,select the S-VIDEO external input source.) 3. Connection Option 1 Set VCR output switch to 3 or 4 and then tune TV to the same channel number. S-VIDEO Input...
User Manual
Page 11
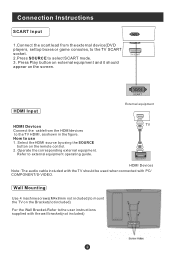
... to the user instructions supplied with the wall bracket(not included) Wall Mounting Use 4 machine screws(M4x8mm not included) to mount the TV on the Bracket(not included) For the Wall Bracket-Refer to external equipment operating guide. How to select SCART mode. 3. Select the HDMI source by using the SOURCE button on the screen. HDMI TV HDMI HDMI Devices Note: The audio cable included with PC/ COMPONENT/S-VIDEO. Press Play button on external equipment and it should be used when connected with the TV...
... to the user instructions supplied with the wall bracket(not included) Wall Mounting Use 4 machine screws(M4x8mm not included) to mount the TV on the Bracket(not included) For the Wall Bracket-Refer to external equipment operating guide. How to select SCART mode. 3. Select the HDMI source by using the SOURCE button on the screen. HDMI TV HDMI HDMI Devices Note: The audio cable included with PC/ COMPONENT/S-VIDEO. Press Play button on external equipment and it should be used when connected with the TV...
User Manual
Page 12
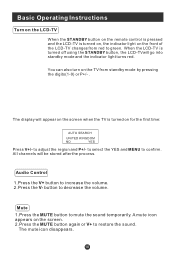
... light turns red. Mute 1.Press the MUTE button to decrease the volume. A mute icon appears on the screen. 2.Press the MUTE button again or V+ to green. Basic Operating Instructions Turn on the LCD-TV When the STANDBY button on the remote control is pressed and the LCD-TV is turned on, the indicator light on the front of the LCD-TV changes from standby mode by pressing the digits(1-9) or P+/- . The display...
... light turns red. Mute 1.Press the MUTE button to decrease the volume. A mute icon appears on the screen. 2.Press the MUTE button again or V+ to green. Basic Operating Instructions Turn on the LCD-TV When the STANDBY button on the remote control is pressed and the LCD-TV is turned on, the indicator light on the front of the LCD-TV changes from standby mode by pressing the digits(1-9) or P+/- . The display...
User Manual
Page 13
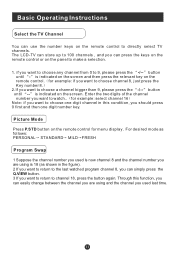
.... Picture Mode Press P.STD button on the remote control to watch.. button until -- Through this condition, you can use the number keys on the remote control for example: if you want to choose any channel from 0 to the last watched program channel 8, you can easily change between the channel you are using is 18 (as follows: PERSONAL STANDARD MILD FRESH Program Swap 1 Suppose the channel number you used last time. for menu display...
.... Picture Mode Press P.STD button on the remote control to watch.. button until -- Through this condition, you can use the number keys on the remote control for example: if you want to choose any channel from 0 to the last watched program channel 8, you can easily change between the channel you are using is 18 (as follows: PERSONAL STANDARD MILD FRESH Program Swap 1 Suppose the channel number you used last time. for menu display...
User Manual
Page 14
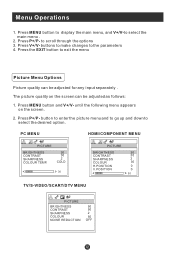
buttons to make changes to scroll through the options 3. Press the EXIT button to exit the menu Picture Menu Options Picture quality can be adjusted for any input separately . Press MENU button and V+/V- Press P+/P- to the parameters 4. Press V+/V- Press MENU button to display the main menu, and V+/V-to select the desired option . Menu Operations 1. button to enter the picture menu and to go up and down to select the main menu . 2. PC MENU HDMI/COMPONENT MENU PICTURE BRIGHTNESS CONTRAST...
buttons to make changes to scroll through the options 3. Press the EXIT button to exit the menu Picture Menu Options Picture quality can be adjusted for any input separately . Press MENU button and V+/V- Press P+/P- to the parameters 4. Press V+/V- Press MENU button to display the main menu, and V+/V-to select the desired option . Menu Operations 1. button to enter the picture menu and to go up and down to select the main menu . 2. PC MENU HDMI/COMPONENT MENU PICTURE BRIGHTNESS CONTRAST...
User Manual
Page 15
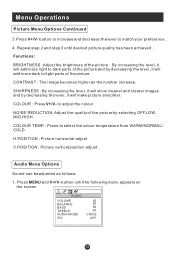
...: Adjust the quality of the picture and by selecting OFF,LOW, MID,HIGH. Audio Menu Options Sound can be adjusted as the number increase. button until desired picture quality has been achieved . COLOUR : Press V+/V- Press MENU and V+/V- Repeat step 2 and step 3 until the following menu appears on the screen AUDIO VOLUME BALANCE BASS TREBLE AUDIO MODE AVL 50 50 50 50 VOICE OFF to light parts of the picture . button to...
...: Adjust the quality of the picture and by selecting OFF,LOW, MID,HIGH. Audio Menu Options Sound can be adjusted as the number increase. button until desired picture quality has been achieved . COLOUR : Press V+/V- Press MENU and V+/V- Repeat step 2 and step 3 until the following menu appears on the screen AUDIO VOLUME BALANCE BASS TREBLE AUDIO MODE AVL 50 50 50 50 VOICE OFF to light parts of the picture . button to...
User Manual
Page 18
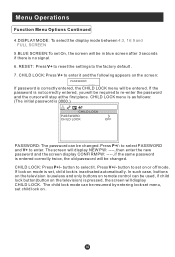
... LOCK OFF PASSWORD: The password can be used, if child lock button(button on the television) is useless and only buttons on remote control can be resumed by entering lock set menu, set On, the screen will be entered. to select PASSWORD and V+ to the factory default . 7. button to enter it . In such case, buttons on the television is pressed, the screen will be in blue screen after 3 seconds if there is set on or off mode. RESET...
... LOCK OFF PASSWORD: The password can be used, if child lock button(button on the television) is useless and only buttons on remote control can be resumed by entering lock set menu, set On, the screen will be entered. to select PASSWORD and V+ to the factory default . 7. button to enter it . In such case, buttons on the television is pressed, the screen will be in blue screen after 3 seconds if there is set on or off mode. RESET...
User Manual
Page 19
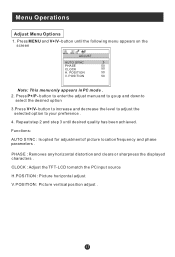
... in PC mode . 2. Functions: AUTO SYNC : Is opted for adjustment of picture location frequency and phase parameters . Press P+/P- PHASE : Removes any horizontal distortion and clears or sharpness the displayed characters . CLOCK : Adjust the TFT-LCD to your preference . 4. button to increase and decrease the level to adjust the selected option to match the PC input source H.POSITION : Picture horizontal adjust V.POSITION : Picture vertical position adjust . Repeat...
... in PC mode . 2. Functions: AUTO SYNC : Is opted for adjustment of picture location frequency and phase parameters . Press P+/P- PHASE : Removes any horizontal distortion and clears or sharpness the displayed characters . CLOCK : Adjust the TFT-LCD to your preference . 4. button to increase and decrease the level to adjust the selected option to match the PC input source H.POSITION : Picture horizontal adjust V.POSITION : Picture vertical position adjust . Repeat...

User Manual
Page 21
... can press digits button to select the channel . If you want to skip a channel , press V+/V- to select TO item, and V+/- to adjust the channel number to confirm. to select YES or NO, and menu to 9; AFC : Auto frequence control . The following menu will display on the screen: AUTO SEARCH NO YES Press V+/- NOTE: If you want to search the channels in L or L' system, you need to set the sound system to...
... can press digits button to select the channel . If you want to skip a channel , press V+/V- to select TO item, and V+/- to adjust the channel number to confirm. to select YES or NO, and menu to 9; AFC : Auto frequence control . The following menu will display on the screen: AUTO SEARCH NO YES Press V+/- NOTE: If you want to search the channels in L or L' system, you need to set the sound system to...

User Manual
Page 24
... button to enter the sub-menu / / :press these buttons to navigate the program list. (Red and green): press red or green button to change schedule time shown on the screen. (Yellow and blue): press yellow or blue button to select the options. Main Menu Channel List Favourites Guides Timers Settings 2. INFO(More): Press INFO button to display more information about operation when you need help and press again to exit the help. Timers 1. Press D.MENU button , the main menu...
... button to enter the sub-menu / / :press these buttons to navigate the program list. (Red and green): press red or green button to change schedule time shown on the screen. (Yellow and blue): press yellow or blue button to select the options. Main Menu Channel List Favourites Guides Timers Settings 2. INFO(More): Press INFO button to display more information about operation when you need help and press again to exit the help. Timers 1. Press D.MENU button , the main menu...

User Manual
Page 25
... the sub-menu. Press / button to select Maturity Lock/Menu Lock, and / button to enter the submenu, then input new digits twice with digits buttons , then the lock key is changed. Press / button to select Set Lock Key and OK button to select the desired item. After you have set the timer, you need help . Main Menu Channel List Favourites Guides Timers Settings button to select Settings and OK button to activate or deactivate the timer. Press D.MENU button , the main menu will appear. 2. Press / button to select Password and...
... the sub-menu. Press / button to select Maturity Lock/Menu Lock, and / button to enter the submenu, then input new digits twice with digits buttons , then the lock key is changed. Press / button to select Set Lock Key and OK button to select the desired item. After you have set the timer, you need help . Main Menu Channel List Favourites Guides Timers Settings button to select Settings and OK button to activate or deactivate the timer. Press D.MENU button , the main menu will appear. 2. Press / button to select Password and...
User Manual
Page 26
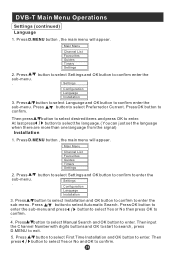
... OK button to select Automatic Search. Press D.MENU button , the main menu will appear. Press / sub-menu. . Press / button to enter. Main Menu Channel List Favourites Guides Timers Settings 2. Main Menu Channel List Favourites Guides Timers Settings 2. Press / sub-menu. . Press / button to select Installation and OK button to confirm to enter. Then press / button to select desired items and press OK to enter the sub-menu. Press / button to exit. 5. DVB-T Main Menu Operations Settings (continued) Language 1. Then input the Channel Number with digits buttons...
... OK button to select Automatic Search. Press D.MENU button , the main menu will appear. Press / sub-menu. . Press / button to enter. Main Menu Channel List Favourites Guides Timers Settings 2. Main Menu Channel List Favourites Guides Timers Settings 2. Press / sub-menu. . Press / button to select Installation and OK button to confirm to enter. Then press / button to select desired items and press OK to enter the sub-menu. Press / button to exit. 5. DVB-T Main Menu Operations Settings (continued) Language 1. Then input the Channel Number with digits buttons...

User Manual
Page 29
...-sales service for adjustment. Press SOURCE button to change signal input to relative instructions in other channel and verify if the same problem happens. Verify if sound system is available. No color for color adjustment. Note: 1.If the fault can be repaired by FINE TUNE and MANUAL SEARCH. Never attempt to other channels. Press MUTE button and verify if Mute mode is selected. Refer to the power supply. Television out of channel. Verify...
...-sales service for adjustment. Press SOURCE button to change signal input to relative instructions in other channel and verify if the same problem happens. Verify if sound system is available. No color for color adjustment. Note: 1.If the fault can be repaired by FINE TUNE and MANUAL SEARCH. Never attempt to other channels. Press MUTE button and verify if Mute mode is selected. Refer to the power supply. Television out of channel. Verify...

User Manual
Page 30
...innovations. Specifications Specifications of the television that you have just purchased may vary from the information in this table due to change without notice. Picture, sound system Audio output PAL/SECAM-B/G,I,D/K,L,L 1.5W+1.5W External input port COMPONENT input PC input S-VIDEO input Audio input SCART Antenna input HDMI input Power requirements ~150-240V 50/60Hz Power consumption Temperature Humidity 60W Working:5 C~35 C Storage:-15 C~45 C Working:20%~80% Storage:5%~90% Accessories Remote control Batteries Owner's manual Audio cable Note: All specifications are approximate...
...innovations. Specifications Specifications of the television that you have just purchased may vary from the information in this table due to change without notice. Picture, sound system Audio output PAL/SECAM-B/G,I,D/K,L,L 1.5W+1.5W External input port COMPONENT input PC input S-VIDEO input Audio input SCART Antenna input HDMI input Power requirements ~150-240V 50/60Hz Power consumption Temperature Humidity 60W Working:5 C~35 C Storage:-15 C~45 C Working:20%~80% Storage:5%~90% Accessories Remote control Batteries Owner's manual Audio cable Note: All specifications are approximate...


