
User Manual
Page 3
... User's manual Alkaline battery (AAA) 2 Power cable CONTENT BEFORE OPERATING Warning...1 Important Safety Instructions 2 Buttons and interface location 4 Remote controller 6 keys of Remote control 7 External equipment connections 8 BASIC OPERATING Switching on/off the TV set 13 Choose the Menu language 13 Choose the Input Source 13 Searching Channel 14 Watching TV Program 17 Picture Control Functions 18 Sound Control Functions 20 Timer Functions 22 Function Menu 23 Adjust Menu...26 Lock Setup ...27 OTHERS Others functions 29 Maintenance...30 Troubleshooting 31 Specifications...
... User's manual Alkaline battery (AAA) 2 Power cable CONTENT BEFORE OPERATING Warning...1 Important Safety Instructions 2 Buttons and interface location 4 Remote controller 6 keys of Remote control 7 External equipment connections 8 BASIC OPERATING Switching on/off the TV set 13 Choose the Menu language 13 Choose the Input Source 13 Searching Channel 14 Watching TV Program 17 Picture Control Functions 18 Sound Control Functions 20 Timer Functions 22 Function Menu 23 Adjust Menu...26 Lock Setup ...27 OTHERS Others functions 29 Maintenance...30 Troubleshooting 31 Specifications...
User Manual
Page 4
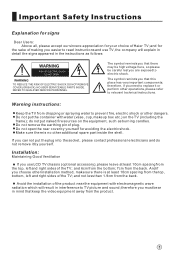
... appreciation for your choice of plug. NO USER SERVICEABLE PARTS INSIDE. Do not put the plug into the socket, please contact professional electricians and do not put naked fire sources on the TV (including the frame); Avoid the installation of the TV; Installation: Maintaining Good Ventilation If you need to TV picture and sound; Warning instructions: Keep the TV from the...
... appreciation for your choice of plug. NO USER SERVICEABLE PARTS INSIDE. Do not put the plug into the socket, please contact professional electricians and do not put naked fire sources on the TV (including the frame); Avoid the installation of the TV; Installation: Maintaining Good Ventilation If you need to TV picture and sound; Warning instructions: Keep the TV from the...

User Manual
Page 9
... Rear panel Control 1 HDMI Input Connnect a signal to HDMI/DVI 2 PC Input Connect the monitor output connector from a PC to the jack 3 Component Input Connect a component video/audiodevice to these jacks. 4 AV1 Input Connect audio/video out from an audio/video device to these jacks. 5 S-Video Input Connect S-Video out from a S-Video device to these jacks. 6 Earphone jack Earphone Audio output terminal 7 Video/Audio output terminal Connect ordinary video/audio or other appliance audio input terminals. 8 AV2 Input Connect audio/video out from an audio/video device to these jacks. 9 Antenna Input...
... Rear panel Control 1 HDMI Input Connnect a signal to HDMI/DVI 2 PC Input Connect the monitor output connector from a PC to the jack 3 Component Input Connect a component video/audiodevice to these jacks. 4 AV1 Input Connect audio/video out from an audio/video device to these jacks. 5 S-Video Input Connect S-Video out from a S-Video device to these jacks. 6 Earphone jack Earphone Audio output terminal 7 Video/Audio output terminal Connect ordinary video/audio or other appliance audio input terminals. 8 AV2 Input Connect audio/video out from an audio/video device to these jacks. 9 Antenna Input...
User Manual
Page 11
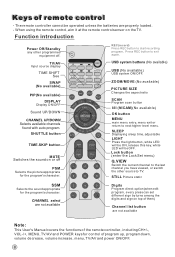
... level menu. Function introduction Power Off/Standby any other source to exit again. ZOOM/MOVE (No available) PICTURE SIZE Changes the aspect ratio SCAN Program scan button I /II SCAN DISPLAY CH+ O K VOL- CHANNEL select are not available Digits Program direct option(when edit CH.EDIT program, every press can set different sign by turns among the digits and sign on top of remote control - Keys of them) Channel list button are properly loaded. - TIME.SKIP H.LOCK SLEEP TIME.SKIP button MUTE Switches the sound...
... level menu. Function introduction Power Off/Standby any other source to exit again. ZOOM/MOVE (No available) PICTURE SIZE Changes the aspect ratio SCAN Program scan button I /II SCAN DISPLAY CH+ O K VOL- CHANNEL select are not available Digits Program direct option(when edit CH.EDIT program, every press can set different sign by turns among the digits and sign on top of remote control - Keys of them) Channel list button are properly loaded. - TIME.SKIP H.LOCK SLEEP TIME.SKIP button MUTE Switches the sound...
User Manual
Page 12
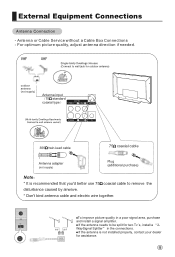
... for two Tv`s, install a 2WaySignal Splitter in a poor signal area, purchase and install a signal amplifier. If the antenna is recommended that you'd better use 75 coaxial cable to be split for assistance. 9 To improve picture quality in the connections. If the antenna needs to remove the disturbance caused by airwave. * Don't bind antenna cable and electric wire together. For optimum picture quality, adjust antenna direction if needed. Antenna or Cable Service without a Cable Box Connections -
... for two Tv`s, install a 2WaySignal Splitter in a poor signal area, purchase and install a signal amplifier. If the antenna is recommended that you'd better use 75 coaxial cable to be split for assistance. 9 To improve picture quality in the connections. If the antenna needs to remove the disturbance caused by airwave. * Don't bind antenna cable and electric wire together. For optimum picture quality, adjust antenna direction if needed. Antenna or Cable Service without a Cable Box Connections -

User Manual
Page 13
... VCR, match the jack colors (Video = yellow, Audio Left = white, and Audio Right = red). Select the input source with the TV. The following are examples of some ways to connect your television, depending on the components you want to connect and the quality of the signal you . button to select the source, press the VOL+ button to the same channel number. Connect the audio and video cables from VCR to the S-VIDEO input, the picture quality is best...
... VCR, match the jack colors (Video = yellow, Audio Left = white, and Audio Right = red). Select the input source with the TV. The following are examples of some ways to connect your television, depending on the components you want to connect and the quality of the signal you . button to select the source, press the VOL+ button to the same channel number. Connect the audio and video cables from VCR to the S-VIDEO input, the picture quality is best...
User Manual
Page 14
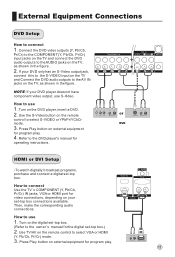
HDMI or DVI Setup -To watch digitally broadcast programs, purchase and connect a digital set -top box connections available. How to the owner`s manual for the digital set -top box. (Refer to connect Use the TV`s COMPONENT (Y, Pb/Cb, Pr/Cr) IN jacks, VGA or HDMI port for video connections, depending on the remote control to use 1. Turn on the digital set -top box.) 2. Press Play button on external equipment for program play . 4. Press Play button on external equipment for program play . 11 How to select VGA or HDMI (Y, Pb/Cb, Pr/Cr) mode. 3. DVD 3. Use TV/AV on...
HDMI or DVI Setup -To watch digitally broadcast programs, purchase and connect a digital set -top box connections available. How to the owner`s manual for the digital set -top box. (Refer to connect Use the TV`s COMPONENT (Y, Pb/Cb, Pr/Cr) IN jacks, VGA or HDMI port for video connections, depending on the remote control to use 1. Turn on the digital set -top box.) 2. Press Play button on external equipment for program play . 4. Press Play button on external equipment for program play . 11 How to select VGA or HDMI (Y, Pb/Cb, Pr/Cr) mode. 3. DVD 3. Use TV/AV on...
User Manual
Page 15
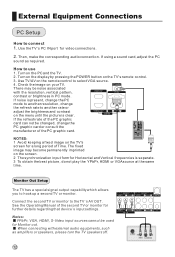
... the best picture, do not play the YPbPr, HDMI or VGA source at the same time. Turn on the TV's remote control. 3. The fixed image may be noise associated with external audio equipments, such as required. Then, make the corresponding audio connection. Turn on the display by pressing the POWER button on the PC and the TV. 2. If noise is clear. If using a sound card, adjust the PC sound as amplifers or speakers, please turn...
... the best picture, do not play the YPbPr, HDMI or VGA source at the same time. Turn on the TV's remote control. 3. The fixed image may be noise associated with external audio equipments, such as required. Then, make the corresponding audio connection. Turn on the display by pressing the POWER button on the PC and the TV. 2. If noise is clear. If using a sound card, adjust the PC sound as amplifers or speakers, please turn...

User Manual
Page 16
... not attempt to file or cut the blade. Plug a set of headphones into the 3.5mm mini-jack socket on AC. Polarized AC Cord Plug NOTES: Never connect the AC line cord plug to other people in . Power source Wider Hole and Blade AC Outlet TO USE AC POWER SOURCE Use the AC polarized line cord provided for operation on the rear panel of the set if you wish to...
... not attempt to file or cut the blade. Plug a set of headphones into the 3.5mm mini-jack socket on AC. Polarized AC Cord Plug NOTES: Never connect the AC line cord plug to other people in . Power source Wider Hole and Blade AC Outlet TO USE AC POWER SOURCE Use the AC polarized line cord provided for operation on the rear panel of the set if you wish to...

User Manual
Page 17
... set In the manual, the OSD (on the remote controller. 4 Disconnect the power supply or unplug the television if it is just an example to help you with your TV in TV mode. 14 Source Before watching TV program, you want to exchange to standing by pressing VOL+/- Switching ON/OFF the TV set 1 first, connect power cord correctly and the power indicator will appears on the screen...
... set In the manual, the OSD (on the remote controller. 4 Disconnect the power supply or unplug the television if it is just an example to help you with your TV in TV mode. 14 Source Before watching TV program, you want to exchange to standing by pressing VOL+/- Switching ON/OFF the TV set 1 first, connect power cord correctly and the power indicator will appears on the screen...

User Manual
Page 20
... watched program channel 8, you may operate other, then if you scan over program, you can watch TV program in three second. 2 Using CH+/- Directly enter the channel number with the numeric keypad on the screen, at the time, you may press again shuttle button to return to the setting program. When the volume button are pressed the volume level is Volume displayed automatically on the remote or the front of double-digit...
... watched program channel 8, you may operate other, then if you scan over program, you can watch TV program in three second. 2 Using CH+/- Directly enter the channel number with the numeric keypad on the screen, at the time, you may press again shuttle button to return to the setting program. When the volume button are pressed the volume level is Volume displayed automatically on the remote or the front of double-digit...
User Manual
Page 21
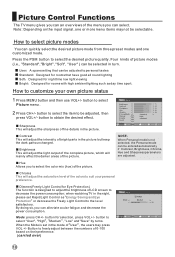
... function is set Rapid Light Control as day time sport; How to select "User", "High", "Medium", "Low" and "Save" by turns. button to menu decrease the power consumption; Brightness This will adjust the light output of the complete picture, which will adjust the saturation level of the colors to select menu Picture menu . 2 Press CH+/- By doing so, you to select picture modes You can select. When the Mode is designed to adjust the brightness of LCD screen to...
... function is set Rapid Light Control as day time sport; How to select "User", "High", "Medium", "Low" and "Save" by turns. button to menu decrease the power consumption; Brightness This will adjust the light output of the complete picture, which will adjust the saturation level of the colors to select menu Picture menu . 2 Press CH+/- By doing so, you to select picture modes You can select. When the Mode is designed to adjust the brightness of LCD screen to...
User Manual
Page 23
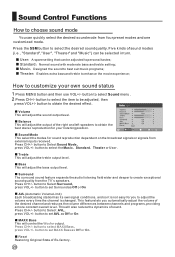
... channels and programs, providing a more constant overall level. menu Volume This will adjust the treble output level. This feature lets you to obtain the OK best stereo reproduction for sound reproduction dependent on the broadcast signals or signals from the TV`s speakers. User A spare setting that can be adjusted to create exceptional sound quality from external inputs received. button to select Sound menu . 2 Press CH+/- Surround The surround sound feature expands the audio...
... channels and programs, providing a more constant overall level. menu Volume This will adjust the treble output level. This feature lets you to obtain the OK best stereo reproduction for sound reproduction dependent on the broadcast signals or signals from the TV`s speakers. User A spare setting that can be adjusted to create exceptional sound quality from external inputs received. button to select Sound menu . 2 Press CH+/- Surround The surround sound feature expands the audio...
User Manual
Page 29
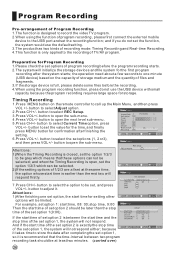
... using the function of program recording, please first connect the external mobile device to the USB port and set at least two minutes. (carried over) OK OK OK menu 26 button to select Adjust option. stop time of the set , and press VOL+/- OK 5.Press CH+/- and when the Timing Recording is open the next level sub-menu. button to select the option to be selected. 2)If the setting...
... using the function of program recording, please first connect the external mobile device to the USB port and set at least two minutes. (carried over) OK OK OK menu 26 button to select Adjust option. stop time of the set , and press VOL+/- OK 5.Press CH+/- and when the Timing Recording is open the next level sub-menu. button to select the option to be selected. 2)If the setting...

User Manual
Page 30
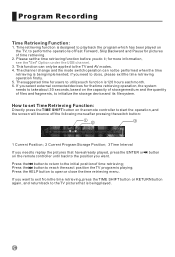
... use these garbage files can be garbage files in the disk's boot sector, so please format the disk and then start to start the recording. 3.If you turn on the remote controller directly to start program recording. and if you want to the normal state. Stop Time: the time to start recording the current TV program you are not available in black screen state...
... use these garbage files can be garbage files in the disk's boot sector, so please format the disk and then start to start the recording. 3.If you turn on the remote controller directly to start program recording. and if you want to the normal state. Stop Time: the time to start recording the current TV program you are not available in black screen state...
User Manual
Page 31
...: Directly press the TIME SHIFT button on the remote controller to start the operation, and the screen will bounce off the following menu after pressing the switch button: 1 Current Position; 2 Current Program Storage Position; 3 Time Interval If you need to open or close the time retrieving menu. if you do so, please exit the time retrieving operation firstly. 5. The suggested time for more information, see the "Set" Option under the USB channel...
...: Directly press the TIME SHIFT button on the remote controller to start the operation, and the screen will bounce off the following menu after pressing the switch button: 1 Current Position; 2 Current Program Storage Position; 3 Time Interval If you need to open or close the time retrieving menu. if you do so, please exit the time retrieving operation firstly. 5. The suggested time for more information, see the "Set" Option under the USB channel...
User Manual
Page 32
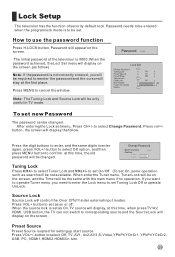
... set new Password The password can not switch to set menu, Press CH+/- When enter the Tuner menu, Tuner Lock will be on the screen.(as On,TV source will display, at this time, when press TV/AV, HDMI, USB button, the TV can be set Tuning Lock Off or operate UnLock. Press VOL+ button to corresponding source and the Source Lock will be changed . to confirm. Lock Setup The television has the function of the television...
... set new Password The password can not switch to set menu, Press CH+/- When enter the Tuner menu, Tuner Lock will be on the screen.(as On,TV source will display, at this time, when press TV/AV, HDMI, USB button, the TV can be set Tuning Lock Off or operate UnLock. Press VOL+ button to corresponding source and the Source Lock will be changed . to confirm. Lock Setup The television has the function of the television...
User Manual
Page 34
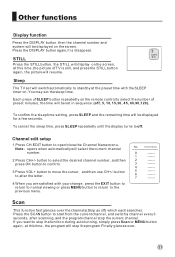
... time, the picture of preset minutes, the time will resume. If you are satisfied with the SLEEP timer on the remote control to off. Each press of SLEEP button repeatedly on . No Channel Name 0 ------ 1 ------ 2 ------ 3 ------ 4 ------ 5 ------ 6 ------ 7 ------ Channel edit setup 1 Press CH.EDIT button to move the cursor, and then use CH+/- button to select the desired channel number, and then press OK button to confirm. 3 Press VOL+ button to open/close the Channel Name menu...
... time, the picture of preset minutes, the time will resume. If you are satisfied with the SLEEP timer on the remote control to off. Each press of SLEEP button repeatedly on . No Channel Name 0 ------ 1 ------ 2 ------ 3 ------ 4 ------ 5 ------ 6 ------ 7 ------ Channel edit setup 1 Press CH.EDIT button to move the cursor, and then use CH+/- button to select the desired channel number, and then press OK button to confirm. 3 Press VOL+ button to open/close the Channel Name menu...
User Manual
Page 35
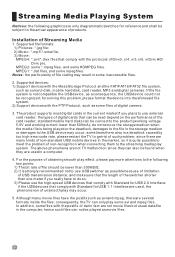
... the file system is not compatible the USB device, as some files of digital camera. 3. standard mobile hard disks can be connect to the product (working voltage 5.0V and working current lower than one meter if you plans to use the high-speed USB devices that comply with Standard for solving this problem, please format the device into the aforesaid file system; 2) Support devices...
... the file system is not compatible the USB device, as some files of digital camera. 3. standard mobile hard disks can be connect to the product (working voltage 5.0V and working current lower than one meter if you plans to use the high-speed USB devices that comply with Standard for solving this problem, please format the device into the aforesaid file system; 2) Support devices...

User Manual
Page 41
... and turned on the power supply; Activate some anomalistic stripes or spots. Make sure that you check out the problem by yourself according to the instructions listed hereunder before contacting the after-sales service for technical assistance. Slight sound from display It is resulted from the Picture menu and depress the volume button; Note: Production of sizes. These phenomena might be produced. No color, weak color...
... and turned on the power supply; Activate some anomalistic stripes or spots. Make sure that you check out the problem by yourself according to the instructions listed hereunder before contacting the after-sales service for technical assistance. Slight sound from display It is resulted from the Picture menu and depress the volume button; Note: Production of sizes. These phenomena might be produced. No color, weak color...


