
User Manual
Page 1
01 009050**** LV-2610P LV-3210P LCD COLOR TELEVISION OPERATING INSTRUCTIONS ◆Wide view-angle display, high contrast ◆MTS ◆HDMI
01 009050**** LV-2610P LV-3210P LCD COLOR TELEVISION OPERATING INSTRUCTIONS ◆Wide view-angle display, high contrast ◆MTS ◆HDMI
User Manual
Page 2
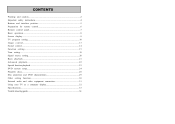
... safety instructions 4 Buttons and interface position 5 Preparation for remote control 6 Remote control panel 7 Basic operation 8 Screen display 9 TV program setting 10 Image control 13 Sound control 14 Function setting 15 Time setting...19 Signal source setting 20 Basic playback 21 Advanced playback 22 Special function playback 23 DVD system setup 24 Playable discs 28 Disc protection and DVD characteristics 29 Other setting function 30 External audio and video equipment connection 31 Using your TV as a computer display 32 Specifications 33 Trouble shooting guide 34
... safety instructions 4 Buttons and interface position 5 Preparation for remote control 6 Remote control panel 7 Basic operation 8 Screen display 9 TV program setting 10 Image control 13 Sound control 14 Function setting 15 Time setting...19 Signal source setting 20 Basic playback 21 Advanced playback 22 Special function playback 23 DVD system setup 24 Playable discs 28 Disc protection and DVD characteristics 29 Other setting function 30 External audio and video equipment connection 31 Using your TV as a computer display 32 Specifications 33 Trouble shooting guide 34
User Manual
Page 3
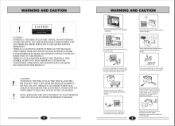
...LCD SCREEN. WARNING AND CAUTICIII Please ensure that the set or try to service. Do not put the power supply wire near a heat source or it from the unit, unplug immediately and contact an authorized service provider. Do not remove the cover of the set has adequate ventilation. NO USER SERVICEABLE PARTS INSIDE. NOTE: SERVICING.... DO NOT USE ANY ABRASIVE CLEANSERS WHICH MAY SCRATCH OR DAMAGE THE LCD SCREEN. Do not place the set on a level surface to prevent damage. During thunderstorms, unplug both the antenna and power plug to prevent it may result in direct sunlight.
...LCD SCREEN. WARNING AND CAUTICIII Please ensure that the set or try to service. Do not put the power supply wire near a heat source or it from the unit, unplug immediately and contact an authorized service provider. Do not remove the cover of the set has adequate ventilation. NO USER SERVICEABLE PARTS INSIDE. NOTE: SERVICING.... DO NOT USE ANY ABRASIVE CLEANSERS WHICH MAY SCRATCH OR DAMAGE THE LCD SCREEN. Do not place the set on a level surface to prevent damage. During thunderstorms, unplug both the antenna and power plug to prevent it may result in direct sunlight.
User Manual
Page 4
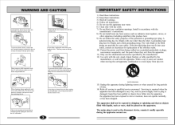
... as power-supply cord or plug is not going to the outside antenna. When cleaning, please unplug the unit. Para carig.d. 13) Unplug this apparatus near any power lines. A grounding type plug has two blades and a third grounding prong. Do not plug / unplug the unit while your safety. Please ensure a solid connection with he AC wall socket in accordance with the manufacturer' s instructions...
... as power-supply cord or plug is not going to the outside antenna. When cleaning, please unplug the unit. Para carig.d. 13) Unplug this apparatus near any power lines. A grounding type plug has two blades and a third grounding prong. Do not plug / unplug the unit while your safety. Please ensure a solid connection with he AC wall socket in accordance with the manufacturer' s instructions...
User Manual
Page 5
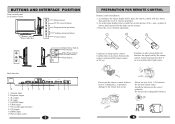
... the signal sent by the remote control. AV output 4. VGA audio input interface 8. HDMI input 10.Power input socket 65 4 5 3 21 PREPARATION FOR REMOTE CONTROL Remote control installation 1. As in direct heat or a damp place, or potential damage to avoid the direct light source. Install the batteries as the correct polarities. YPbPr input 7. In this situation turn the TV set . Do not use two AAA 1.5V batteries. BUTTONS AND INTERFACE POSITION Front control panel LV-2610P/LV-3210P Remote sensor Power indicator MENU Menu button INPUT...
... the signal sent by the remote control. AV output 4. VGA audio input interface 8. HDMI input 10.Power input socket 65 4 5 3 21 PREPARATION FOR REMOTE CONTROL Remote control installation 1. As in direct heat or a damp place, or potential damage to avoid the direct light source. Install the batteries as the correct polarities. YPbPr input 7. In this situation turn the TV set . Do not use two AAA 1.5V batteries. BUTTONS AND INTERFACE POSITION Front control panel LV-2610P/LV-3210P Remote sensor Power indicator MENU Menu button INPUT...

User Manual
Page 6
... and adjust the system settings to your preference. 19 Exit button 20 Zoom button (in TV mode) 21 21 Mono/Stereo/SAP switch button 22 Sleep timer button 23 Mute button 24 Light button 26 25 Volume up/down button 26 Channel up/down button 27 Number button 28 Above ten program selection button 29 (in DVD mode) 29 Recall button 7 POWER BASIC OPERATION POWER ON/OFF TV Standby set: connecting the power supply wire, the TV set is in standby status, pressing power button can...
... and adjust the system settings to your preference. 19 Exit button 20 Zoom button (in TV mode) 21 21 Mono/Stereo/SAP switch button 22 Sleep timer button 23 Mute button 24 Light button 26 25 Volume up/down button 26 Channel up/down button 27 Number button 28 Above ten program selection button 29 (in DVD mode) 29 Recall button 7 POWER BASIC OPERATION POWER ON/OFF TV Standby set: connecting the power supply wire, the TV set is in standby status, pressing power button can...
User Manual
Page 7
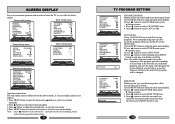
... FINE TUNE AUTO SCAN EDIT PROGRAM FAVORITE CABLE 11 OFF CHANNEL SOURCE Manual search can search all receiving programs. We recommend using auto search to search the program when you obtain the best picture and sound, then loose the button, press MENU button to exit. 10 OFF 0 SOUND Function setting menu LANGUAGE ENGLISH BLUE SCREEN OFF OSD SETTING IMAGE POSITION ADVANCE SAVE MODE AUTO CLOSED CAPTION OFF PARENT CONTROL TIMER FUNCTION Operation instructions The real display may be changed. Note: "press button to select the menu "operation in...
... FINE TUNE AUTO SCAN EDIT PROGRAM FAVORITE CABLE 11 OFF CHANNEL SOURCE Manual search can search all receiving programs. We recommend using auto search to search the program when you obtain the best picture and sound, then loose the button, press MENU button to exit. 10 OFF 0 SOUND Function setting menu LANGUAGE ENGLISH BLUE SCREEN OFF OSD SETTING IMAGE POSITION ADVANCE SAVE MODE AUTO CLOSED CAPTION OFF PARENT CONTROL TIMER FUNCTION Operation instructions The real display may be changed. Note: "press button to select the menu "operation in...

User Manual
Page 8
... deleted channel will display before channel number on the top right corner of channel name, press CH+/- button to select the channel you need operate, press red button to select FAVORITE item. 4. button to enter rename mode. 2.Press VOL+/- button to select the channel you can't use CH+/- SKIP FINE TUNE AUTO SCAN EDIT PROGRAM FAVORITE CABLE 11 OFF RENAME 1.Press CH+/- NUM. During operating press VOL- Press VOL+/- COPY [ ] SELECT [AUDIO] PAGEUP [PICTURE] PAGEDOWN MENU RETURN 001...
... deleted channel will display before channel number on the top right corner of channel name, press CH+/- button to select the channel you need operate, press red button to select FAVORITE item. 4. button to enter rename mode. 2.Press VOL+/- button to select the channel you can't use CH+/- SKIP FINE TUNE AUTO SCAN EDIT PROGRAM FAVORITE CABLE 11 OFF RENAME 1.Press CH+/- NUM. During operating press VOL- Press VOL+/- COPY [ ] SELECT [AUDIO] PAGEUP [PICTURE] PAGEDOWN MENU RETURN 001...

User Manual
Page 9
... menu display. 2.Press button to select SOUND menu. 3.Press button to select AVC item. 4.Press button to select the sound modes. item. 4.Press button to select STANDARD, SOFT, USER or BRIGHT. Note: You can also press SIZE button on the remote control to select ON or OFF. The table of picture item adjustment effect PICTURE CONTRAST BRIGHTNESS TINT COLOR SHARPNESS COLOR TEMP. AUTOMATIC VOLUME CONTROL 1.Press MENU button to make the main menu display. 2.Press button to select PICTURE menu. 3.Press button to select PICTURE item. 4.Press button to select...
... menu display. 2.Press button to select SOUND menu. 3.Press button to select AVC item. 4.Press button to select the sound modes. item. 4.Press button to select STANDARD, SOFT, USER or BRIGHT. Note: You can also press SIZE button on the remote control to select ON or OFF. The table of picture item adjustment effect PICTURE CONTRAST BRIGHTNESS TINT COLOR SHARPNESS COLOR TEMP. AUTOMATIC VOLUME CONTROL 1.Press MENU button to make the main menu display. 2.Press button to select PICTURE menu. 3.Press button to select PICTURE item. 4.Press button to select...

User Manual
Page 10
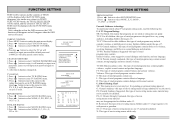
... vertical direction. 5.Press button to restrain the image noise, in TEXT1 mode, the 16 AAA: using this function can improve the brightness, contrast and arrangement of image according to make the main menu display. 2.Press button to select FUNCTION menu. 3.Press button to select CLOSED CAPTION item. 4.Press button to adjust. LTI: opening this function can reduce the power consumption of OSD, and you can restrain the different color from...
... vertical direction. 5.Press button to restrain the image noise, in TEXT1 mode, the 16 AAA: using this function can improve the brightness, contrast and arrangement of image according to make the main menu display. 2.Press button to select FUNCTION menu. 3.Press button to select CLOSED CAPTION item. 4.Press button to adjust. LTI: opening this function can reduce the power consumption of OSD, and you can restrain the different color from...
User Manual
Page 11
... button to select CHANGE PASSWORD item. 2.Press button to be started , and the contents of TEXT1 will reappear when the OSD moves off screen. TV-Y7: Directed for children under the age of 7. PG-13: Parents Strongly Cautioned- D: This type of rated programs contain dialogue with parent or guardian. G: General Audience- Later you will remind you input password(the default password is TEXT2/ TEXT3/TEXT4 mode...
... button to select CHANGE PASSWORD item. 2.Press button to be started , and the contents of TEXT1 will reappear when the OSD moves off screen. TV-Y7: Directed for children under the age of 7. PG-13: Parents Strongly Cautioned- D: This type of rated programs contain dialogue with parent or guardian. G: General Audience- Later you will remind you input password(the default password is TEXT2/ TEXT3/TEXT4 mode...
User Manual
Page 12
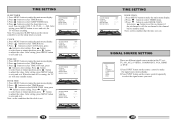
... adjust the value. After setting, press MENU button to save and exit. SLEEP TIMER CLOCK TIME OFF BOOK TIME BOOK CHAN. OFF 0 TIMER BOOK CHAN. 1.Press MENU button to make the main menu display. 2.Press button to select TIMER menu. 3.Press button to select CLOCK item, press button to enter setting. Note: on the condition that the clock is set : TV, AV1,AV2, S-VIDEO, COMPONENT, VGA, HDMI or DVD . 1.Press INPUT button on the remote control to make the signal source menu display. 2.Press INPUT button...
... adjust the value. After setting, press MENU button to save and exit. SLEEP TIMER CLOCK TIME OFF BOOK TIME BOOK CHAN. OFF 0 TIMER BOOK CHAN. 1.Press MENU button to make the main menu display. 2.Press button to select TIMER menu. 3.Press button to select CLOCK item, press button to enter setting. Note: on the condition that the clock is set : TV, AV1,AV2, S-VIDEO, COMPONENT, VGA, HDMI or DVD . 1.Press INPUT button on the remote control to make the signal source menu display. 2.Press INPUT button...
User Manual
Page 13
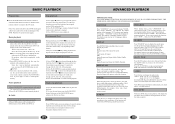
... YOU PLAY OTHER FORMAT DISC, THE OPERATION AND DISPLAY ON SCREEN MAY DIFFERENT. Press the digit buttons to select the item). Press PLAY/ENTER to confirm (DIVX, CD, and MP3 press the search button several times to select the program number that you can recall the location where stopped, such as : Audio 1/2: AC 3 2 CH English Audio 2/2: AC 3 5.1 CH English If you want . SLOW PLAY Press SLOW to close the disc...
... YOU PLAY OTHER FORMAT DISC, THE OPERATION AND DISPLAY ON SCREEN MAY DIFFERENT. Press the digit buttons to select the item). Press PLAY/ENTER to confirm (DIVX, CD, and MP3 press the search button several times to select the program number that you can recall the location where stopped, such as : Audio 1/2: AC 3 2 CH English Audio 2/2: AC 3 5.1 CH English If you want . SLOW PLAY Press SLOW to close the disc...
User Manual
Page 14
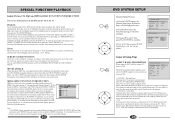
.... 4:3/LB (LB = Letter Box) You may still appear above and below the picture even if using the DVD with screen saver on front panel to sleep mode with the internal TV, select 4:3/LB. In this player bec2au0se of the original film picture. In PS mode, widescreen material will be viewed without any key on remote control or on . Customer can 't be played well in AV field...
.... 4:3/LB (LB = Letter Box) You may still appear above and below the picture even if using the DVD with screen saver on front panel to sleep mode with the internal TV, select 4:3/LB. In this player bec2au0se of the original film picture. In PS mode, widescreen material will be viewed without any key on remote control or on . Customer can 't be played well in AV field...
User Manual
Page 15
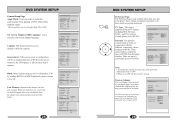
... ON or OFF. ..General Setup Page.. classes help to regain control. ..Preference Page.. TV Type Parental Password Default Auto Change Old Password New Password Confirm Pwd OK 20 26 These settings are up to DVDs. Tv Display 4:3 LB Angle Mark On On Osd Lang ENG Off Caption On Screen Saver Off Hdcd Off Last Memory On On Screen Display (OSD) Language: Users can change this setting you turn off , it will be...
... ON or OFF. ..General Setup Page.. classes help to regain control. ..Preference Page.. TV Type Parental Password Default Auto Change Old Password New Password Confirm Pwd OK 20 26 These settings are up to DVDs. Tv Display 4:3 LB Angle Mark On On Osd Lang ENG Off Caption On Screen Saver Off Hdcd Off Last Memory On On Screen Display (OSD) Language: Users can change this setting you turn off , it will be...
User Manual
Page 16
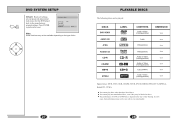
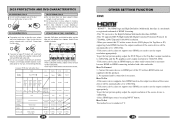
... Support discs: DVD, VCD, CD-R, CD-RW, SVCD, DVCD, HDCD, JPEG,CD+G, MPEG-4, Kodak CD , W MA. OK PLAYABLE DISCS The following discs can be very well or even not playable. 28 Press ENTER RECALL to the manufacturers SETUP original settings. You cannot play discs other than those listed above . DVD SYSTEM SETUP Default: Resets all settings (except password and parental lock status) for this DVD player...
... Support discs: DVD, VCD, CD-R, CD-RW, SVCD, DVCD, HDCD, JPEG,CD+G, MPEG-4, Kodak CD , W MA. OK PLAYABLE DISCS The following discs can be very well or even not playable. 28 Press ENTER RECALL to the manufacturers SETUP original settings. You cannot play discs other than those listed above . DVD SYSTEM SETUP Default: Resets all settings (except password and parental lock status) for this DVD player...
User Manual
Page 17
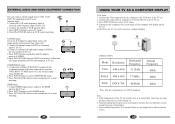
... HDMI cable (not supplied with other audio connection is necessary because HDMI-to TV. 30 Connect the source device to HDMI port of the source device will be automatically set to 1280x720p. -If the source device does not support Auto HDMI, you need to set to 1280x720p. -If the source device does not support Auto HDMI, you need to 1280x720p. -Select HDMI input source by using INPUT button. To get the best picture quality, adjust the DVD Player or Set Top Box's output resolution...
... HDMI cable (not supplied with other audio connection is necessary because HDMI-to TV. 30 Connect the source device to HDMI port of the source device will be automatically set to 1280x720p. -If the source device does not support Auto HDMI, you need to set to 1280x720p. -If the source device does not support Auto HDMI, you need to 1280x720p. -Select HDMI input source by using INPUT button. To get the best picture quality, adjust the DVD Player or Set Top Box's output resolution...
User Manual
Page 18
...DVD, HDTV TUNER and so on ), the sound is input from AUDIO IN: 2.Press INPUT button to DVD the relevant port in TV set. 3.Press INPUT button repeatedly until the display mode is S-VIDEO. 4.Press PLAY/PAUSE button in TV set. 3. Connect the antenna to select VGA mode. 4. COMPONENT input 1. Connect the audio cable in computer to VGA AUDIO IN port in DVD to broadcast. Press INPUT button to VCR antenna input. Note: 1. Component terminal (Y/PbCb/PrCr) connect to the component output of picture output device (such as a computer display. VGA VGA-AUDIO IN RESOLUTION...
...DVD, HDTV TUNER and so on ), the sound is input from AUDIO IN: 2.Press INPUT button to DVD the relevant port in TV set. 3.Press INPUT button repeatedly until the display mode is S-VIDEO. 4.Press PLAY/PAUSE button in TV set. 3. Connect the antenna to select VGA mode. 4. COMPONENT input 1. Connect the audio cable in computer to VGA AUDIO IN port in DVD to broadcast. Press INPUT button to VCR antenna input. Note: 1. Component terminal (Y/PbCb/PrCr) connect to the component output of picture output device (such as a computer display. VGA VGA-AUDIO IN RESOLUTION...
User Manual
Page 19
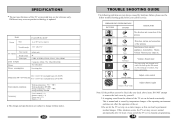
.... SPECIFICATIONS The part specifications of this can lead to change without notice. 33 TROUBLE SHOOTING GUIDE The following problems are not always caused by temperature changes of the operating environment and does not affect the operation of the set. 3.Do not let the TV set stay on . Model Screen Type LV-2610P/LV-3210P A-si TFT active matrix Viewable angle 176°(H)/176° TV/VIDEO Color system Sound system Video input DTV...
.... SPECIFICATIONS The part specifications of this can lead to change without notice. 33 TROUBLE SHOOTING GUIDE The following problems are not always caused by temperature changes of the operating environment and does not affect the operation of the set. 3.Do not let the TV set stay on . Model Screen Type LV-2610P/LV-3210P A-si TFT active matrix Viewable angle 176°(H)/176° TV/VIDEO Color system Sound system Video input DTV...


