

User Manual
Page 2
... information Safety notice Electrical connections 02 About your LCD TV Get to know your TV Get to know your remote control Connecting your TV Preparation of your remote control 03 Getting Started Setting up tuning your TV common interface using your TV adjusting picture settings adjusting sound settings function settings time settings lock menu settings shortcut menu display 04 Using the features Teletext function USB Mode REC Using your DVD player(certain models only) 05 Reference Sections Troubleshooting Specification 06 Product guarantee...
... information Safety notice Electrical connections 02 About your LCD TV Get to know your TV Get to know your remote control Connecting your TV Preparation of your remote control 03 Getting Started Setting up tuning your TV common interface using your TV adjusting picture settings adjusting sound settings function settings time settings lock menu settings shortcut menu display 04 Using the features Teletext function USB Mode REC Using your DVD player(certain models only) 05 Reference Sections Troubleshooting Specification 06 Product guarantee...
User Manual
Page 4
... CUSTOMER HELP LINE. CAUTION TO REDUCE THE RISK OF ELECTRIC SHOCK AND FIRE, DO NOT PUT THE TV SET NEAR SOURCES OF HUMIDITY. CAUTION TO REDUCE THE RISK OF ELECTRIC SHOCK, DO NOT REMOVE COVER (OR BACK).NO USER SERVICEABLE PARTS INSIDE. AVOID CONTACT WITH OBJECTS THAT MAY SCRATCH THE LCD SCREEN. IMPORTANT INFORMATION READ ALL INSTRUCTIONS BEFORE USE AND...
... CUSTOMER HELP LINE. CAUTION TO REDUCE THE RISK OF ELECTRIC SHOCK AND FIRE, DO NOT PUT THE TV SET NEAR SOURCES OF HUMIDITY. CAUTION TO REDUCE THE RISK OF ELECTRIC SHOCK, DO NOT REMOVE COVER (OR BACK).NO USER SERVICEABLE PARTS INSIDE. AVOID CONTACT WITH OBJECTS THAT MAY SCRATCH THE LCD SCREEN. IMPORTANT INFORMATION READ ALL INSTRUCTIONS BEFORE USE AND...

User Manual
Page 5
... any plugs or input wires are any abnormal sounds or smells from the main power. Please ensure a solid connection with liquids, such as it immediately and contact an authorised service provider. This will prevent the risk of the set is not going to service your TV. 01 Safety Warnings SAFETY NOTICE For your protection please read these instruction completely...
... any plugs or input wires are any abnormal sounds or smells from the main power. Please ensure a solid connection with liquids, such as it immediately and contact an authorised service provider. This will prevent the risk of the set is not going to service your TV. 01 Safety Warnings SAFETY NOTICE For your protection please read these instruction completely...
User Manual
Page 8
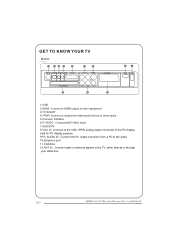
... Pb Y HDMI USB 1.USB 2.HDMI Connect to HDMI output of other equipment 3.TV SCART 4.YPbPr Connect a component video/audio device to these jacks 5.Common Interface 6.S-VIDEO Component/S-Video Input 7.AUDIO IN 8.VGA IN Connect to the VGA 15PIN analog output connector of the PC display card for PC display purpose 9.PC AUDIO IN Connect the PC output connector from a PC to the audio 10.Earphone port 11.COAXIAL 12.ANT IN Connect cable or antenna signals to the TV, either directly or through your cable box.
... Pb Y HDMI USB 1.USB 2.HDMI Connect to HDMI output of other equipment 3.TV SCART 4.YPbPr Connect a component video/audio device to these jacks 5.Common Interface 6.S-VIDEO Component/S-Video Input 7.AUDIO IN 8.VGA IN Connect to the VGA 15PIN analog output connector of the PC display card for PC display purpose 9.PC AUDIO IN Connect the PC output connector from a PC to the audio 10.Earphone port 11.COAXIAL 12.ANT IN Connect cable or antenna signals to the TV, either directly or through your cable box.
User Manual
Page 9
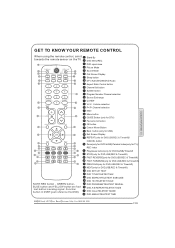
...:RED button GREEN button BLUE button and YELLOW button are fast text button in analog signal .Function button in DVBT (just reference the OSD) Stand By DVD Menu/REC DVD open/close Picture Mode Sound Mode Call Screen Display Sleep button DTV Audio/NICAM/DVD Audio Aspect Ratio Control button Channel list button Subtitle button Program Number Channel selection Source Exchange Q.VIEW V+/V- :Volume selection P+/P-:Channel selection Mute Menu button GUIDE Button (only for DTV) Favourite list button OK button Cursor Mover Button Back button (only for USB) Exit Screen Display REPEAT (only for DVD,USB...
...:RED button GREEN button BLUE button and YELLOW button are fast text button in analog signal .Function button in DVBT (just reference the OSD) Stand By DVD Menu/REC DVD open/close Picture Mode Sound Mode Call Screen Display Sleep button DTV Audio/NICAM/DVD Audio Aspect Ratio Control button Channel list button Subtitle button Program Number Channel selection Source Exchange Q.VIEW V+/V- :Volume selection P+/P-:Channel selection Mute Menu button GUIDE Button (only for DTV) Favourite list button OK button Cursor Mover Button Back button (only for USB) Exit Screen Display REPEAT (only for DVD,USB...

User Manual
Page 10
.... 1 .Turn on the DVD player and insert a DVD. 2 .Press the button to select . 3 .Refer to the DVD player user guide for your personal computer by connecting it with a VGA cable (not supplied). 1.Read your computer user guide and check it has a VGA connector. 2.Turn the power off on your TV and PC. 3.Connect a D type 15-pin VGA interface cable to the VGA video interface connector on the menu until the picture is noise present, change the VGA mode to another resolution, change...
.... 1 .Turn on the DVD player and insert a DVD. 2 .Press the button to select . 3 .Refer to the DVD player user guide for your personal computer by connecting it with a VGA cable (not supplied). 1.Read your computer user guide and check it has a VGA connector. 2.Turn the power off on your TV and PC. 3.Connect a D type 15-pin VGA interface cable to the VGA video interface connector on the menu until the picture is noise present, change the VGA mode to another resolution, change...

User Manual
Page 11
... which you connect them. See the wall bracket user guide for how to select SCART mode. 3.Press the PLAY button on the TV to set the video input mode to your TV onto the wall by using a wall bracket (not supplied). MOUNT YOUR TV ONTO THE WALL You can connect a DVD player or VCR to S-VIDEO. Connection Option 1.Connect the audio and S-VIDEO cables from the VCR output jacks to the TV input jacks. 2.Insert a video tape into the VCR and press PLAY on the VCR. 3.Turn on the power of...
... which you connect them. See the wall bracket user guide for how to select SCART mode. 3.Press the PLAY button on the TV to set the video input mode to your TV onto the wall by using a wall bracket (not supplied). MOUNT YOUR TV ONTO THE WALL You can connect a DVD player or VCR to S-VIDEO. Connection Option 1.Connect the audio and S-VIDEO cables from the VCR output jacks to the TV input jacks. 2.Insert a video tape into the VCR and press PLAY on the VCR. 3.Turn on the power of...
User Manual
Page 13
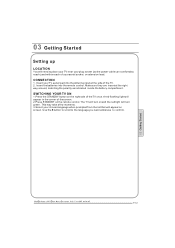
... the remote control. The TV will need to confirm. Use the button to scroll to the language you want and press to place your TV near your TV aerial lead into the remote control. Insert your plug socket (so the power cable can comfortably reach) and within reach of the screen. 2.Press STANDBY on screen. 03 Getting Started Setting up LOCATION You will turn...
... the remote control. The TV will need to confirm. Use the button to scroll to the language you want and press to place your TV near your TV aerial lead into the remote control. Insert your plug socket (so the power cable can comfortably reach) and within reach of the screen. 2.Press STANDBY on screen. 03 Getting Started Setting up LOCATION You will turn...
User Manual
Page 14
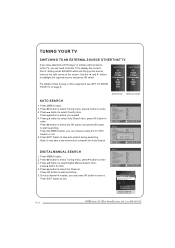
...MENU button. 2. Input Source TV SCART S-Video Component PC HDMI USB DVD Input Source TV SCART S-Video Component PC HDMI USB AUTO SEARCH 1. Press button to select Auto Search item, press OK button to start searching. Menu Country Auto Search Digital Manual Search Analog Manual Search Channel Edit Guide CI Information Software upgrade Start upgrade < UK > OK OK OK OK OK OK < on > OK CA Start upgrade OK Picture Sound Tuning Function Time Lock DIGITAL MANUAL SEARCH 1. Press button to select Digital Manual Search item, press button to exit. With DVD Without DVD Menu...
...MENU button. 2. Input Source TV SCART S-Video Component PC HDMI USB DVD Input Source TV SCART S-Video Component PC HDMI USB AUTO SEARCH 1. Press button to select Auto Search item, press OK button to start searching. Menu Country Auto Search Digital Manual Search Analog Manual Search Channel Edit Guide CI Information Software upgrade Start upgrade < UK > OK OK OK OK OK OK < on > OK CA Start upgrade OK Picture Sound Tuning Function Time Lock DIGITAL MANUAL SEARCH 1. Press button to select Digital Manual Search item, press button to exit. With DVD Without DVD Menu...

User Manual
Page 15
Current CH Press button to select the channel number to select the higher frequency channel. Press button to select Search item, press button is used Picture Sound Tuning Function Time Lock to edit. Press button is used to exit. Once a channel is poor. 1 Repeat above steps 1-3, then press button to select the Fine Tune item. 2 Press button repeatedly to enter. Country Auto Search Digital Manual Search Analog Manual Search Channel Edit Guide CI Information Software upgrade Start upgrade < UK > OK OK...
Current CH Press button to select the channel number to select the higher frequency channel. Press button to select Search item, press button is used Picture Sound Tuning Function Time Lock to edit. Press button is used to exit. Once a channel is poor. 1 Repeat above steps 1-3, then press button to select the Fine Tune item. 2 Press button repeatedly to enter. Country Auto Search Digital Manual Search Analog Manual Search Channel Edit Guide CI Information Software upgrade Start upgrade < UK > OK OK...

User Manual
Page 16
... only available in the analogue mode. 1.Press MENU button. 2.Press button to select TUNING menu, press button to enter 3.Press button to select CHANNEL EDIT item, Press button Menu Country Auto Search Digital Manual Search Analog Manual Search Channel Edit Guide CI Information Software upgrade Start upgrade < UK > OK OK OK OK OK OK < on > OK Press button to enter the submenu, the Picture Sound Tuning Function Time Lock electronic program guide is displayed. GUIDE (Electronic Program Guide) Using this function ,you can rename...
... only available in the analogue mode. 1.Press MENU button. 2.Press button to select TUNING menu, press button to enter 3.Press button to select CHANNEL EDIT item, Press button Menu Country Auto Search Digital Manual Search Analog Manual Search Channel Edit Guide CI Information Software upgrade Start upgrade < UK > OK OK OK OK OK OK < on > OK Press button to enter the submenu, the Picture Sound Tuning Function Time Lock electronic program guide is displayed. GUIDE (Electronic Program Guide) Using this function ,you can rename...

User Manual
Page 17
... at the side of the TV. CI Module Insert 2 Turn on > OK Picture Sound Tuning Function Time Lock Warning: switch off your Common Interface service provider to highlight the "Common Interface" line and press the "OK" button. 4 Detailed information on the screen. Menu Country Auto Search Digital Manual Search Analog Manual Search Channel Edit Guide CI Information Software upgrade Start upgrade < UK > OK OK OK OK OK OK < on the...
... at the side of the TV. CI Module Insert 2 Turn on > OK Picture Sound Tuning Function Time Lock Warning: switch off your Common Interface service provider to highlight the "Common Interface" line and press the "OK" button. 4 Detailed information on the screen. Menu Country Auto Search Digital Manual Search Analog Manual Search Channel Edit Guide CI Information Software upgrade Start upgrade < UK > OK OK OK OK OK OK < on the...
User Manual
Page 20
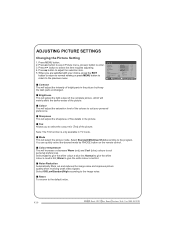
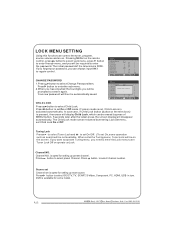
... white colour a neutral tint; ADJUSTING PICTURE SETTINGS Changing the Picture Setting 1. Tint Allows you are satisfied with your choice, press the EXIT button to return to normal viewing or press MENU button to return to suit your personal preference. You can quickly select the desired mode by P.MODE button on the remote control. P.19 Brightness This will adjust the light output of the complete picture, which will adjust the saturation level of...
... white colour a neutral tint; ADJUSTING PICTURE SETTINGS Changing the Picture Setting 1. Tint Allows you are satisfied with your choice, press the EXIT button to return to normal viewing or press MENU button to return to suit your personal preference. You can quickly select the desired mode by P.MODE button on the remote control. P.19 Brightness This will adjust the light output of the complete picture, which will adjust the saturation level of...
User Manual
Page 21
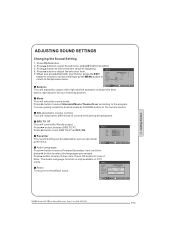
... select Close item, Press OK button to suit your listening position. SRS TS XT This will select the sound mode. Equalizer This sound setting can quickly select the desired mode by S.MODE button on the remote control. Press button to the program. Press button to select Standard/Music/Theater/User according to select the item requires adjusting. AVL (Automatic volume control) This will adjust the output of the right and left speakers to the previous menu. Mode This will control...
... select Close item, Press OK button to suit your listening position. SRS TS XT This will select the sound mode. Equalizer This sound setting can quickly select the desired mode by S.MODE button on the remote control. Press button to the program. Press button to select Standard/Music/Theater/User according to select the item requires adjusting. AVL (Automatic volume control) This will adjust the output of the right and left speakers to the previous menu. Mode This will control...
User Manual
Page 22
.... You can quickly select the desired mode by SCREEN button on the remote control. 4:3 mode Menu Language < English Subtitle Language OK English Display Mode Blue Screen < 16:9 < Off Recorder OSD Time OSD Trans Reset Out paren Primary cSyecond a OK > > >> >> Picture Sound Tuning Function Time Lock Choose 4:3 when you want to view a picture with an original 4:3 aspect ratio, with your choice, press the EXIT button to return to normal viewing or press MENU button to return to view the picture without any...
.... You can quickly select the desired mode by SCREEN button on the remote control. 4:3 mode Menu Language < English Subtitle Language OK English Display Mode Blue Screen < 16:9 < Off Recorder OSD Time OSD Trans Reset Out paren Primary cSyecond a OK > > >> >> Picture Sound Tuning Function Time Lock Choose 4:3 when you want to view a picture with an original 4:3 aspect ratio, with your choice, press the EXIT button to return to normal viewing or press MENU button to return to view the picture without any...
User Manual
Page 26
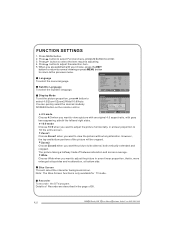
.... DVD is set Tuner Lock Off or operate unLock. Press button to select Off, DTV, TV, SCART, S-Video, Component, PC, HDMI, USB in activated automatically. The initial password of MENU button. 5 seconds later after the latest press, the screen display will display Child Lock, which can be prompted to enter it again. Channel NO. P.25 Your new password will be on mode is available for setting up preset channel. Menu Change Password OK Child Lock < > Tuning Lock Channel Set Please Ente Channel...
.... DVD is set Tuner Lock Off or operate unLock. Press button to select Off, DTV, TV, SCART, S-Video, Component, PC, HDMI, USB in activated automatically. The initial password of MENU button. 5 seconds later after the latest press, the screen display will display Child Lock, which can be prompted to enter it again. Channel NO. P.25 Your new password will be on mode is available for setting up preset channel. Menu Change Password OK Child Lock < > Tuning Lock Channel Set Please Ente Channel...
User Manual
Page 27
... external input modes. If current volume is over Max Volume, when lock set menu is set , when volume is being adjusted, the sound value can not switch to corresponding source and the Source Lock will display, at this time, when press SOURCE button, the TV can not exceed maximum volume value. Initial Volume The TV will remember it after your setting,that will be the volume when turn on , TV source will display...
... external input modes. If current volume is over Max Volume, when lock set menu is set , when volume is being adjusted, the sound value can not switch to corresponding source and the Source Lock will display, at this time, when press SOURCE button, the TV can not exceed maximum volume value. Initial Volume The TV will remember it after your setting,that will be the volume when turn on , TV source will display...
User Manual
Page 33
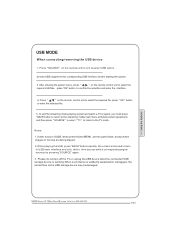
... TV mode. P.32 After entering the system menu, press / on the remote control unit to enter the selected file. 5. Press / on the remote control unit to select the required file, press OK button to select USB option. 2.Insert USB equipment into corresponding USB interface 2s after starting the system. 3. Please do not turn off the TV or unplug the USB device when the connected USB storage device is working.When...
... TV mode. P.32 After entering the system menu, press / on the remote control unit to enter the selected file. 5. Press / on the remote control unit to select the required file, press OK button to select USB option. 2.Insert USB equipment into corresponding USB interface 2s after starting the system. 3. Please do not turn off the TV or unplug the USB device when the connected USB storage device is working.When...

User Manual
Page 45
... or all pictures Verify if the antenna is correctly connected. Adjust the antenna. Television out of control Disconnect the television from power supply and 10 seconds later, connect the television to correct input. 05 Reference Sections TROUBLESHOOTING To assist in location of possible faults use the help guide below: No picture, no sound Verify if the television is properly plugged in some channel Verify if correct signals are input. Operate the remote to change signal input to the power supply. Switch to...
... or all pictures Verify if the antenna is correctly connected. Adjust the antenna. Television out of control Disconnect the television from power supply and 10 seconds later, connect the television to correct input. 05 Reference Sections TROUBLESHOOTING To assist in location of possible faults use the help guide below: No picture, no sound Verify if the television is properly plugged in some channel Verify if correct signals are input. Operate the remote to change signal input to the power supply. Switch to...
User Manual
Page 46
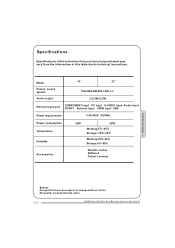
... 22 Picture, sound system PAL/SECAM-B/G,I,D/K,L,L Audio output 2.5W+2.5W External input port COMPONENT input PC input S-VIDEO input Audio input SCART Antenna input HDMI input USB Power requirements ~150-240V 50/60Hz Power consumption Temperature Humidity Accessories 35W 55W Working:5 C~35 C Storage:-15 C~45 C Working:20%~80% Storage:5%~90% Remote control Batteries Owner's manual Note: All specifications are approximate value. P.45 Specifications Specifications of the television that you have just purchased may vary from the information in this table due to change...
... 22 Picture, sound system PAL/SECAM-B/G,I,D/K,L,L Audio output 2.5W+2.5W External input port COMPONENT input PC input S-VIDEO input Audio input SCART Antenna input HDMI input USB Power requirements ~150-240V 50/60Hz Power consumption Temperature Humidity Accessories 35W 55W Working:5 C~35 C Storage:-15 C~45 C Working:20%~80% Storage:5%~90% Remote control Batteries Owner's manual Note: All specifications are approximate value. P.45 Specifications Specifications of the television that you have just purchased may vary from the information in this table due to change...


