
User Manual
Page 3
... 2 Installation 3 Aerial connection 3 Preparation of the remote control unit 3 Function buttons and external sockets 4 Front and side panel of the TV set 4 Rear panel of the TV set 4 Buttons on the remote control 5 Basic operation Switching on/off the TV set 6 Watching TV program 7 Watching TV program 7 Program swap and auto scan functions 8 Searching channel 9 Full automatic search mode 9 Semi-automatic search 10 Manual fine tune 11 Program skip 12 Convenient picture and sound control functions 13 Multiple picture modes 13 Black...
... 2 Installation 3 Aerial connection 3 Preparation of the remote control unit 3 Function buttons and external sockets 4 Front and side panel of the TV set 4 Rear panel of the TV set 4 Buttons on the remote control 5 Basic operation Switching on/off the TV set 6 Watching TV program 7 Watching TV program 7 Program swap and auto scan functions 8 Searching channel 9 Full automatic search mode 9 Semi-automatic search 10 Manual fine tune 11 Program skip 12 Convenient picture and sound control functions 13 Multiple picture modes 13 Black...
User Manual
Page 5
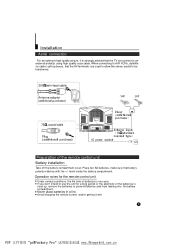
... unit for the remote control unit Under normal conditions, the life time of the remote control unit Battery installation Take off the battery compartment cover. When connecting to HiFi VCRs, satellite (or cable) set connect to an external aerial(s) using high quality coax cable. Avoid dropping the remote control and/or getting it is one year. Installation Aerial connection For an optimum high quality picture, it wet. 3 PDF pdfFactory Pro...
... unit for the remote control unit Under normal conditions, the life time of the remote control unit Battery installation Take off the battery compartment cover. When connecting to HiFi VCRs, satellite (or cable) set connect to an external aerial(s) using high quality coax cable. Avoid dropping the remote control and/or getting it is one year. Installation Aerial connection For an optimum high quality picture, it wet. 3 PDF pdfFactory Pro...
User Manual
Page 6
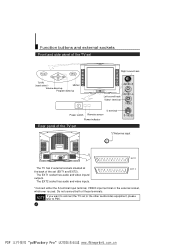
... video inputs. Function buttons and external sockets Front and side panel of the TV set to the other audio/video equipment, please refer to connect the TV set TV/AV P - VOL + P MENU TV/AV (input select) MENU Volume down/up Program down/up Right sound track AUDIO-R Left sound track Video1 terminal AU DI O- Do not connect both of the set (EXT1 and EXT2). L VIDEO Power switch Remote sensor Power indicator S terminal Rear panel of the TV set S-VIDEO Antenna input...
... video inputs. Function buttons and external sockets Front and side panel of the TV set to the other audio/video equipment, please refer to connect the TV set TV/AV P - VOL + P MENU TV/AV (input select) MENU Volume down/up Program down/up Right sound track AUDIO-R Left sound track Video1 terminal AU DI O- Do not connect both of the set (EXT1 and EXT2). L VIDEO Power switch Remote sensor Power indicator S terminal Rear panel of the TV set S-VIDEO Antenna input...
User Manual
Page 7
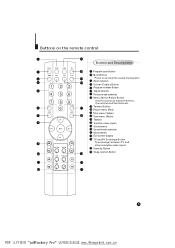
... Picture menu (Red) P.STD S.S TD 11 Time menu (Yellow) 7 16 12 Tune menu (White) CH+ 13 Teletext 8 14 Function menu (cyan) VOL- Buttons on the remote control 1 21 Buttons and Descriptions MUTE SCAN SWAP 2 20 1 Program scan Button ZOOM CALL EXIT TV/AV 2 Mut e Button 3 19 Press to conceal the sound of programs. 4 3 Zoom function 18 1 23 4 Screen Displa y Button 5 Program number Button 5 4 56 6 Digital selector 7 Picture mode selection 8 Menu Select/ A djust Button 7 89 Use this butt on to adjust t he menu, the volume...
... Picture menu (Red) P.STD S.S TD 11 Time menu (Yellow) 7 16 12 Tune menu (White) CH+ 13 Teletext 8 14 Function menu (cyan) VOL- Buttons on the remote control 1 21 Buttons and Descriptions MUTE SCAN SWAP 2 20 1 Program scan Button ZOOM CALL EXIT TV/AV 2 Mut e Button 3 19 Press to conceal the sound of programs. 4 3 Zoom function 18 1 23 4 Screen Displa y Button 5 Program number Button 5 4 56 6 Digital selector 7 Picture mode selection 8 Menu Select/ A djust Button 7 89 Use this butt on to adjust t he menu, the volume...
User Manual
Page 8
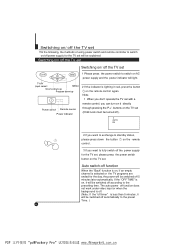
... power supply and the power indicator will be turned off). 4 AUTO DK 2 6 2 If you want to exchange to standby status, please press down /up Program down the button on the remote control again. The auto power off function does not work under video input or when the background is off. (Note: If the "off the TV set Switching on/ off timer" is lighting in red, press the button on the remote control...
... power supply and the power indicator will be turned off). 4 AUTO DK 2 6 2 If you want to exchange to standby status, please press down /up Program down the button on the remote control again. The auto power off function does not work under video input or when the background is off. (Note: If the "off the TV set Switching on/ off timer" is lighting in red, press the button on the remote control...
User Manual
Page 9
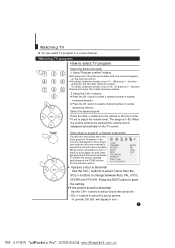
... tur n it bac k to select a channel number in turn.) 7 PDF pdfFactory Pro www.fineprint.com.cn Press the CH- The range is should be set to select the sound system. (In general, DK, BG will st ill wor k corre ctly. If the picture sound is abnormal Use the CH+/- buttons to select Sound then press the VOL-/+ buttons to adjust the volume level. MENU VOL+ CH-
... tur n it bac k to select a channel number in turn.) 7 PDF pdfFactory Pro www.fineprint.com.cn Press the CH- The range is should be set to select the sound system. (In general, DK, BG will st ill wor k corre ctly. If the picture sound is abnormal Use the CH+/- buttons to select Sound then press the VOL-/+ buttons to adjust the volume level. MENU VOL+ CH-

User Manual
Page 11
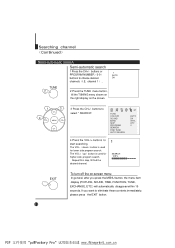
... also use the remote control to set the channel is explained. buttons to ensure automatic search function operates. All channels now playing program will be automatically preset in order . Full automatic mode Automatic search TUNE 1 2 VOL- CH+ MENU 3 VOL+ CH- 1 Press the TUNE menu button , till the TUNING menu shown on the right display on the screen. 6 AUTO SEARCH VHFL CALL Display function Press the CALL button, then the channel number and...
... also use the remote control to set the channel is explained. buttons to ensure automatic search function operates. All channels now playing program will be automatically preset in order . Full automatic mode Automatic search TUNE 1 2 VOL- CH+ MENU 3 VOL+ CH- 1 Press the TUNE menu button , till the TUNING menu shown on the right display on the screen. 6 AUTO SEARCH VHFL CALL Display function Press the CALL button, then the channel number and...
User Manual
Page 12
... find the desired channel. 1 SEARC H VHFL EXIT 10 To turn off the on the screen. 1 3 CH+ 4 VOL- buttons to start searching. TUNE COLOUR SOUND BAND SKIP PROGRAM SEARCH FINE TUNE AUTO SEARCH AU TO DK VH FL OFF 0 4 Press the VOL-/+ buttons to select " SEARCH". buttons or PROGRAM NUMBER(0-9) buttons to eliminate these contents immediately, please press the EXIT button. PDF pdfFactory Pro...
... find the desired channel. 1 SEARC H VHFL EXIT 10 To turn off the on the screen. 1 3 CH+ 4 VOL- buttons to start searching. TUNE COLOUR SOUND BAND SKIP PROGRAM SEARCH FINE TUNE AUTO SEARCH AU TO DK VH FL OFF 0 4 Press the VOL-/+ buttons to select " SEARCH". buttons or PROGRAM NUMBER(0-9) buttons to eliminate these contents immediately, please press the EXIT button. PDF pdfFactory Pro...
User Manual
Page 13
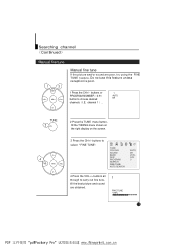
...;I.E. buttons or PROGRAM NUMBER(0-9) button to select " FINE TUNE". CH+ MENU VOL+ CH- 3 Press the CH+/- TUNE COLOUR SOUND BAND SKIP PROGRAM SEARCH FINE TUNE AUTO SEARCH AU TO DK VH FL OFF 0 4 Press the VOL-/+ buttons all through to carry out fine tune, till the best picture and sound are poo r, try using the F INE TUNE feature. Searching channel (Continued) Manual...
...;I.E. buttons or PROGRAM NUMBER(0-9) button to select " FINE TUNE". CH+ MENU VOL+ CH- 3 Press the CH+/- TUNE COLOUR SOUND BAND SKIP PROGRAM SEARCH FINE TUNE AUTO SEARCH AU TO DK VH FL OFF 0 4 Press the VOL-/+ buttons all through to carry out fine tune, till the best picture and sound are poo r, try using the F INE TUNE feature. Searching channel (Continued) Manual...
User Manual
Page 14
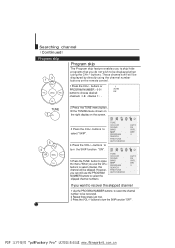
... to be displayed by directly using the CH+/- PDF pdfFactory Pro www.fineprint.com.cn buttons or PROGRAM NUMBER(0-9) button to turn the SKIP function "OFF". MENU VOL+ CH- 12 3 Press the CH+/- When you want to recover the skipped channel 1 Use the PROGRAM NUMBER buttons to select the channel number to be skipped. Searching channel (Continued) Program skip 13 CH+ VOL- TUNE COLOUR SOUND BAND SKIP...
... to be displayed by directly using the CH+/- PDF pdfFactory Pro www.fineprint.com.cn buttons or PROGRAM NUMBER(0-9) button to turn the SKIP function "OFF". MENU VOL+ CH- 12 3 Press the CH+/- When you want to recover the skipped channel 1 Use the PROGRAM NUMBER buttons to select the channel number to be skipped. Searching channel (Continued) Program skip 13 CH+ VOL- TUNE COLOUR SOUND BAND SKIP...
User Manual
Page 15
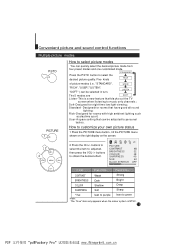
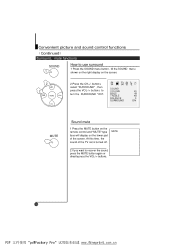
... Listen-This is NTSC. 13 PDF pdfFactory Pro www.fineprint.com.cn How to music only chan nels; Five kinds RICH of picture modes (i.e., "STANDARD", USER "RICH", "USER","LISTEN", "SOFT" ) can be adjusted to personal t a st e s . Rich-D esigned for rooms with h igh ambient lighting such as daytim e sport; buttons to PICTURE select the item to adjusted, CONTRAST 48 then press the...
... Listen-This is NTSC. 13 PDF pdfFactory Pro www.fineprint.com.cn How to music only chan nels; Five kinds RICH of picture modes (i.e., "STANDARD", USER "RICH", "USER","LISTEN", "SOFT" ) can be adjusted to personal t a st e s . Rich-D esigned for rooms with h igh ambient lighting such as daytim e sport; buttons to PICTURE select the item to adjusted, CONTRAST 48 then press the...
User Manual
Page 16
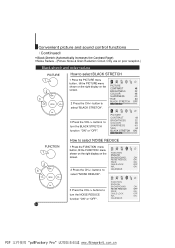
... PICTURE menu shown on the right display on the PICTURE screen. CALENDAR PDF pdfFactory Pro www.fineprint.com.cn MENU VOL+ How to select NOISE REDUCE 1 Press the FUNCTION menu button, till the FUNCTION menu shown on the right display on poor reception.) Black stretch and noise reduce PICTURE 1 2 CH+ 3 VOL- PICTURE CONTRAST 48 BRIGHTNESS 32 3 Press the VOL-/+ buttons to NOISE REDUCE FAD E OFF ON turn...
... PICTURE menu shown on the right display on the PICTURE screen. CALENDAR PDF pdfFactory Pro www.fineprint.com.cn MENU VOL+ How to select NOISE REDUCE 1 Press the FUNCTION menu button, till the FUNCTION menu shown on the right display on poor reception.) Black stretch and noise reduce PICTURE 1 2 CH+ 3 VOL- PICTURE CONTRAST 48 BRIGHTNESS 32 3 Press the VOL-/+ buttons to NOISE REDUCE FAD E OFF ON turn...
User Manual
Page 17
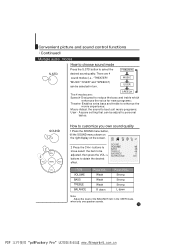
... in turn. There are : Speech-D esigned to best suit mu sic programs; MENU VOL+ CH- buttons to VOLUME BASS 45 48 move select the item to be adjust to e nhance the m ovie experience ; M usic-Adjust the soun d to reduce the bass and treble which e nhances the voi ce fo r news programs; T HEATE R MUSIC USER SPE ECH The 4 modes are 4 sound modes (i.e., "THEATER", "MUSIC","USER" and...
... in turn. There are : Speech-D esigned to best suit mu sic programs; MENU VOL+ CH- buttons to VOLUME BASS 45 48 move select the item to be adjust to e nhance the m ovie experience ; M usic-Adjust the soun d to reduce the bass and treble which e nhances the voi ce fo r news programs; T HEATE R MUSIC USER SPE ECH The 4 modes are 4 sound modes (i.e., "THEATER", "MUSIC","USER" and...
User Manual
Page 18
... button again or directly press the VOL-/+ buttons. 16 PDF pdfFactory Pro www.fineprint.com.cn MUTE 2 If you want to VOLUME 45 turn the SURROUND "ON". BASS 48 VOL- MUTE Sound mute 1 Press the MUTE button on the remote control and "MUTE" type face will display on the screen. 2 2 Press the CH+/- MENU VOL+ TREBLE 48 BALANCE 0 SURROUND ON CH- At this time, the sound...
... button again or directly press the VOL-/+ buttons. 16 PDF pdfFactory Pro www.fineprint.com.cn MUTE 2 If you want to VOLUME 45 turn the SURROUND "ON". BASS 48 VOL- MUTE Sound mute 1 Press the MUTE button on the remote control and "MUTE" type face will display on the screen. 2 2 Press the CH+/- MENU VOL+ TREBLE 48 BALANCE 0 SURROUND ON CH- At this time, the sound...

User Manual
Page 19
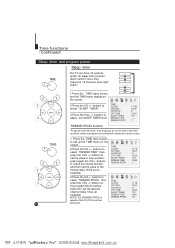
... the set if left turned on the screen. 2Press the CH+/- buttons select "CLOCK", then press the VOL /+ buttons to select your desired channel (take 18:00 as an example). buttons to select "ON PROG", then press the VOL-/+ or program direct number buttons to adjust the time in power on the front pane l, the clock loses power and will only work if the TV set is disconnect from the power supply...
... the set if left turned on the screen. 2Press the CH+/- buttons select "CLOCK", then press the VOL /+ buttons to select your desired channel (take 18:00 as an example). buttons to select "ON PROG", then press the VOL-/+ or program direct number buttons to adjust the time in power on the front pane l, the clock loses power and will only work if the TV set is disconnect from the power supply...
User Manual
Page 20
... , when a program on the screen. 2 Press the CH +/- VOL+ The TV set the desired channel (take 19:00 as an example). VOL+ 18 1 Press the TIME menu button to adjust the SLEEP TIMER level. buttons to select "SLEEP TIMER". 3 Press the VOL -/+ buttons to call up the TIME menu on a different channel is d ue to operate CHILD LOCK must be turned off. Time functions (Continued) Sleep timer and program preset Sleep timer TIME 1 2 2 3 CH+ VOL- 3 MENU CH-
... , when a program on the screen. 2 Press the CH +/- VOL+ The TV set the desired channel (take 19:00 as an example). VOL+ 18 1 Press the TIME menu button to adjust the SLEEP TIMER level. buttons to select "SLEEP TIMER". 3 Press the VOL -/+ buttons to call up the TIME menu on a different channel is d ue to operate CHILD LOCK must be turned off. Time functions (Continued) Sleep timer and program preset Sleep timer TIME 1 2 2 3 CH+ VOL- 3 MENU CH-
User Manual
Page 24
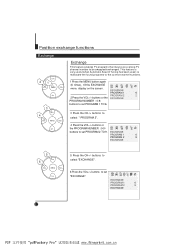
... bee n used, to reallocate the found progr ams to the correct c hannel num bers. 1 Press the MENU button again (6 times), till the EXCHANGE menu display on a wrong TV channel numb er to be swapped/exchan ged. MENU VOL+ CH- 5 Press the CH+/- MENU VOL+ CH- 3 CH+ 4 VOL- EXCHANGE PROGRAM 1 PROGRAM 2 EXCHANGE OCT 6 9 22 PDF pdfFactory Pro www.fineprint.com.cn buttons to select "EXCHANGE...
... bee n used, to reallocate the found progr ams to the correct c hannel num bers. 1 Press the MENU button again (6 times), till the EXCHANGE menu display on a wrong TV channel numb er to be swapped/exchan ged. MENU VOL+ CH- 5 Press the CH+/- MENU VOL+ CH- 3 CH+ 4 VOL- EXCHANGE PROGRAM 1 PROGRAM 2 EXCHANGE OCT 6 9 22 PDF pdfFactory Pro www.fineprint.com.cn buttons to select "EXCHANGE...
User Manual
Page 27
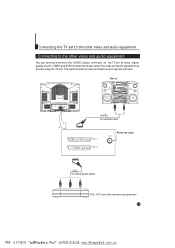
VIDEO and AUDIO output terminals output the video and audio signals being monitored by the TV set to enjoy higher quality sound. The electric levels of video and audio output signals are fixed. Connecting the TV set to the other video and audio equipment Connecting to the other reproducing equipment 25 PDF pdfFactory Pro www.fineprint.com.cn Stereo To outside input EXT 1 EXT 2 Antenna input To video/audio input DVD, VCD and other video and audio equipment You can connect a stereo to the AUDIO output terminals on the TV set .
VIDEO and AUDIO output terminals output the video and audio signals being monitored by the TV set to enjoy higher quality sound. The electric levels of video and audio output signals are fixed. Connecting the TV set to the other video and audio equipment Connecting to the other reproducing equipment 25 PDF pdfFactory Pro www.fineprint.com.cn Stereo To outside input EXT 1 EXT 2 Antenna input To video/audio input DVD, VCD and other video and audio equipment You can connect a stereo to the AUDIO output terminals on the TV set .
User Manual
Page 28
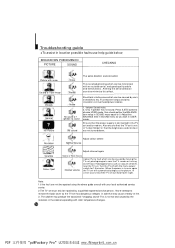
... TV set must only be repaired by the materials in location possible faults use help guide below. Never attempt to choose USER mode, then check wether the BALANCE item value in side that may produce the occasional "snapping sound" This is not in USER mode. Turn th e TV off over nig ht. Volume Sound mute. 2. Only 1 speaker has no sound No Picture No sound The aerial direction and connection...
... TV set must only be repaired by the materials in location possible faults use help guide below. Never attempt to choose USER mode, then check wether the BALANCE item value in side that may produce the occasional "snapping sound" This is not in USER mode. Turn th e TV off over nig ht. Volume Sound mute. 2. Only 1 speaker has no sound No Picture No sound The aerial direction and connection...
User Manual
Page 29
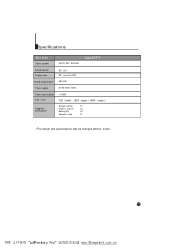
Specifications Model Colour system AUTO, PAL, SECAM SA29PFT Sound system Display tube Sound output power BG , DK 29" pure flat CRT 5W+5W Power supply AC 90-250V 50Hz Power consumption Size(mm) S uppl ied a cces sories
Specifications Model Colour system AUTO, PAL, SECAM SA29PFT Sound system Display tube Sound output power BG , DK 29" pure flat CRT 5W+5W Power supply AC 90-250V 50Hz Power consumption Size(mm) S uppl ied a cces sories


