
User Manual
Page 2
... Input Source 14 Searching Channel 15 Watching TV Program 18 Picture Control Functions 19 Sound Control Functions 21 Timer Functions...23 Function Menu...24 Adjust Menu...26 Lock Setup ...27 OTHERS Others functions 29 Maintenance...30 Troubleshooting 31 Specifications 32 Format...33 Accessories DVD SELECT RETURN ENTER ZOOM HELP HDMI TV/AV USB SWAP ZOOM/MOVE PIP PIC.SIZE I/II SCAN DISPLAY CH+ O K VOL- TIME.SKIP H.LOCK SLEEP PSM Q.VIEW SSM STILL -/-- MENU VOL+ SHUTTLE CH- Remote controller User's manual Alkaline battery (AAA) 2 Power cable...
... Input Source 14 Searching Channel 15 Watching TV Program 18 Picture Control Functions 19 Sound Control Functions 21 Timer Functions...23 Function Menu...24 Adjust Menu...26 Lock Setup ...27 OTHERS Others functions 29 Maintenance...30 Troubleshooting 31 Specifications 32 Format...33 Accessories DVD SELECT RETURN ENTER ZOOM HELP HDMI TV/AV USB SWAP ZOOM/MOVE PIP PIC.SIZE I/II SCAN DISPLAY CH+ O K VOL- TIME.SKIP H.LOCK SLEEP PSM Q.VIEW SSM STILL -/-- MENU VOL+ SHUTTLE CH- Remote controller User's manual Alkaline battery (AAA) 2 Power cable...

User Manual
Page 3
... User's Manual may vary due to avoid accidental scratches or impacts onto the screen. NO USER SERVICEABLE PARTS INSIDE. Attention should be followed if it is prohibited. 1 Caution: Unauthorized disassembly of your television, read this manual carefully before using your television ...REMOVE COVER (OR BACK). To achieve the best performance of this product is to be opened, as there is no any accessory inside the casing. *If necessary, please contact authorized after-sales services. *A lighting flash mark in a triangle: A potentially hazardous situation, which technical specifications...
... User's Manual may vary due to avoid accidental scratches or impacts onto the screen. NO USER SERVICEABLE PARTS INSIDE. Attention should be followed if it is prohibited. 1 Caution: Unauthorized disassembly of your television, read this manual carefully before using your television ...REMOVE COVER (OR BACK). To achieve the best performance of this product is to be opened, as there is no any accessory inside the casing. *If necessary, please contact authorized after-sales services. *A lighting flash mark in a triangle: A potentially hazardous situation, which technical specifications...

User Manual
Page 6
... the volume or adjusting MENU 5. Channel number decrease. 7. Menu button 3. Volume decrease for enhancing the volume or adjusting MENU. 4. Channel number increase 6. Buttons and interface location - This is a simplified representation of front panel. - TV/AV button 2. VIDEO input L-AUDIO-R left and right audio input. 4 Power for turning on or off the power supply. Here shown may be somewhat different from your TV. Front panel Control Side AV TV/AV 1 MENU 2 VOL+ Side 3 VOL- 4 CH+ 5 CH- 6 POWER 7 Remote Sensor Indicator Buttons and...
... the volume or adjusting MENU 5. Channel number decrease. 7. Menu button 3. Volume decrease for enhancing the volume or adjusting MENU. 4. Channel number increase 6. Buttons and interface location - This is a simplified representation of front panel. - TV/AV button 2. VIDEO input L-AUDIO-R left and right audio input. 4 Power for turning on or off the power supply. Here shown may be somewhat different from your TV. Front panel Control Side AV TV/AV 1 MENU 2 VOL+ Side 3 VOL- 4 CH+ 5 CH- 6 POWER 7 Remote Sensor Indicator Buttons and...

User Manual
Page 7
...location Rear panel Control 37 1 HDMI PC IN 2 PC AUDIO IN ANT. COMPONENT IN Y Pb/Cb Pr/Cr AUDIO L R VEDIO L AV OUT AV IN R S-VEDIO 8 4 56 1 HDMI Input Connnect a signal to HDMI/DVI 2 PC Input Connect the monitor output connector from a PC to the jack 3 COMPONENT Input Connect a component video/audiodevice to these jacks. 4 AV Input Connect audio/video out from an audio/video device to these jacks. 5 S-Video Input Connect S-Video out from a S-Video device to these jacks. 6 Earphone jack Earphone Audio output terminal 7 ANT IN Antenna Input Connect cable or antenna signals to...
...location Rear panel Control 37 1 HDMI PC IN 2 PC AUDIO IN ANT. COMPONENT IN Y Pb/Cb Pr/Cr AUDIO L R VEDIO L AV OUT AV IN R S-VEDIO 8 4 56 1 HDMI Input Connnect a signal to HDMI/DVI 2 PC Input Connect the monitor output connector from a PC to the jack 3 COMPONENT Input Connect a component video/audiodevice to these jacks. 4 AV Input Connect audio/video out from an audio/video device to these jacks. 5 S-Video Input Connect S-Video out from a S-Video device to these jacks. 6 Earphone jack Earphone Audio output terminal 7 ANT IN Antenna Input Connect cable or antenna signals to...
User Manual
Page 9
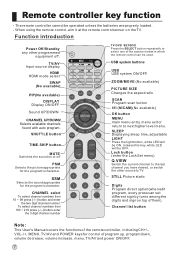
...) PICTURE SIZE Changes the aspect ratio SCAN Program scan button I /II SCAN DISPLAY CH+ O K VOL- When using the remote control, aim it at the remote control sensor on or off . TV/AV Input source display HDMI HDMI mode select SWAP (No available) PIP(No available) DISPLAY Display ON/OFF Sound UP/DOWN CHANNEL UP/DOWN Selects available channels found with auto program. SSM Selects the sound appropriate for the program's character. SLEEP Displaying sleep time, adjustable LIGHT Press the light button, white LED will be ON, release this key, white LED will be operated...
...) PICTURE SIZE Changes the aspect ratio SCAN Program scan button I /II SCAN DISPLAY CH+ O K VOL- When using the remote control, aim it at the remote control sensor on or off . TV/AV Input source display HDMI HDMI mode select SWAP (No available) PIP(No available) DISPLAY Display ON/OFF Sound UP/DOWN CHANNEL UP/DOWN Selects available channels found with auto program. SSM Selects the sound appropriate for the program's character. SLEEP Displaying sleep time, adjustable LIGHT Press the light button, white LED will be ON, release this key, white LED will be operated...

User Manual
Page 10
outdoor antenna (not supply) Antenna input 75 standard coaxial type ANT IN 300 twin-lead cable 75 coaxial cable Antenna adapter (not supply) Plug (additional purchase) Note * It is not installed properly, contact your dealer for two Tv`s, install a 2WaySignal Splitter in a poor signal area, purchase and install a signal amplifier. To improve picture quality in the connections. External Equipment Connections - Antenna or Cable Service without a Cable Box Connections - For optimum picture quality, adjust antenna direction if needed. If the antenna needs to remove the...
outdoor antenna (not supply) Antenna input 75 standard coaxial type ANT IN 300 twin-lead cable 75 coaxial cable Antenna adapter (not supply) Plug (additional purchase) Note * It is not installed properly, contact your dealer for two Tv`s, install a 2WaySignal Splitter in a poor signal area, purchase and install a signal amplifier. To improve picture quality in the connections. External Equipment Connections - Antenna or Cable Service without a Cable Box Connections - For optimum picture quality, adjust antenna direction if needed. If the antenna needs to remove the...
User Manual
Page 11
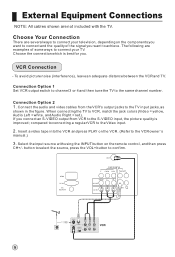
... the signal you connect an S-VIDEO output from the VCR's output jacks to the TV input jacks, as shown in the figure. When connecting the TV to connect your television, depending on the components you want to the S-VIDEO input, the picture quality is best for you. ANT. Connection Option 2 1. compared to connecting a regular VCR to the same channel number. Choose the connection which is improved; Connect the audio and video cables from VCR to achieve. Connection Option 1 Set VCR output switch to channel...
... the signal you connect an S-VIDEO output from the VCR's output jacks to the TV input jacks, as shown in the figure. When connecting the TV to connect your television, depending on the components you want to the S-VIDEO input, the picture quality is best for you. ANT. Connection Option 2 1. compared to connecting a regular VCR to the same channel number. Choose the connection which is improved; Connect the audio and video cables from VCR to achieve. Connection Option 1 Set VCR output switch to channel...
User Manual
Page 12
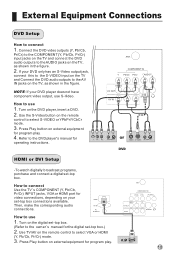
...the owner`s manual for the digital set -top box. How to connect Use the TV`s COMPONENT (Y, Pb/Cb, Pr/Cr) INPUT jacks, VGA or HDMI port for video connections, depending on the digital set-top box. (Refer to use S-Video. Turn on the remote control to select VGA or HDMI (Y, Pb/Cb, Pr/Cr) mode. 3. ANT. External Equipment Connections DVD Setup How to the DVD player's manual for operating instructions. Use the S-Video button on the DVD player, insert a DVD. 2. Press Play button on external equipment for program play . Press Play button on external equipment for program play...
...the owner`s manual for the digital set -top box. How to connect Use the TV`s COMPONENT (Y, Pb/Cb, Pr/Cr) INPUT jacks, VGA or HDMI port for video connections, depending on the digital set-top box. (Refer to use S-Video. Turn on the remote control to select VGA or HDMI (Y, Pb/Cb, Pr/Cr) mode. 3. ANT. External Equipment Connections DVD Setup How to the DVD player's manual for operating instructions. Use the S-Video button on the DVD player, insert a DVD. 2. Press Play button on external equipment for program play . Press Play button on external equipment for program play...

User Manual
Page 13
... device`s input settings. Check the image on the TV's remote control. The fixed image may be used for Horizontal and Vertical frequencies is clear. If using a sound card, adjust the PC sound as amplifers or speakers, please turn the TV speakers off. HDMI 2. Notes: YPbPr, VGA, HDMI, S-Video input sources cannot be noise associated with external audio equipments, such as required. Then, make the corresponding audio connection. Connect the second TV or monitor to hook up a second...
... device`s input settings. Check the image on the TV's remote control. The fixed image may be used for Horizontal and Vertical frequencies is clear. If using a sound card, adjust the PC sound as amplifers or speakers, please turn the TV speakers off. HDMI 2. Notes: YPbPr, VGA, HDMI, S-Video input sources cannot be noise associated with external audio equipments, such as required. Then, make the corresponding audio connection. Connect the second TV or monitor to hook up a second...
User Manual
Page 14
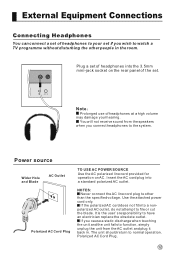
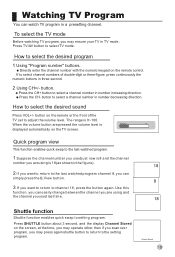
... cord plug to have an electrician replace the obsolete outlet. Power source Wider Hole and Blade AC Outlet TO USE AC POWER SOURCE Use the AC polarized line cord provided for operation on the rear panel of headphones at a high volume may damage your set . If the polarized AC cord does not fit into a standard polarized AC outlet. Polarized AC Cord Plug. 12 External Equipment Connections Connecting Headphones You can connect a set of headphones...
... cord plug to have an electrician replace the obsolete outlet. Power source Wider Hole and Blade AC Outlet TO USE AC POWER SOURCE Use the AC polarized line cord provided for operation on the rear panel of headphones at a high volume may damage your set . If the polarized AC cord does not fit into a standard polarized AC outlet. Polarized AC Cord Plug. 12 External Equipment Connections Connecting Headphones You can connect a set of headphones...

User Manual
Page 15
...+ button and use CH+/-button to select Language. OK 4 Select a particular language by status, please press down POWER button on the remote controller. 4 Disconnect the power supply or unplug the television if it is just an example to help you with your TV in TV mode. Choose the Input Source If you hope to enjoy the picture from your set 1 First, connect power cord correctly and the power indicator will light . 2 Press POWER button...
...+ button and use CH+/-button to select Language. OK 4 Select a particular language by status, please press down POWER button on the remote controller. 4 Disconnect the power supply or unplug the television if it is just an example to help you with your TV in TV mode. Choose the Input Source If you hope to enjoy the picture from your set 1 First, connect power cord correctly and the power indicator will light . 2 Press POWER button...
User Manual
Page 19
... the remote or the front of double-digit or three-figure ,press continuously the numeric buttons in number increasing direction. Use this function, you may press again shuttle button to return to select a channel number in three second. 2 Using CH+/- How to select the desired sound Press VOL+/- How to select the desired program 1 Using "Program number" buttons. The range is Volume displayed automatically on the screen, at the time, you may operate other...
... the remote or the front of double-digit or three-figure ,press continuously the numeric buttons in number increasing direction. Use this function, you may press again shuttle button to return to select a channel number in three second. 2 Using CH+/- How to select the desired sound Press VOL+/- How to select the desired program 1 Using "Program number" buttons. The range is Volume displayed automatically on the screen, at the time, you may operate other...

User Manual
Page 20
... mode can be adjusted, then press VOL+/- button to customize your own picture status 1 Press MENU button and then use VOL+/- Note: Depending on the input signal, one customized mode. Personal A spare setting that have good all round lighting Soft Designed for night time low light viewing Bright Designed for rooms that can be selectable. How to select Picture menu . 2 Press CH+/- Mode: Press VOL+/- Palette 1 Press MENU button and then use VOL+/- button...
... mode can be adjusted, then press VOL+/- button to customize your own picture status 1 Press MENU button and then use VOL+/- Note: Depending on the input signal, one customized mode. Personal A spare setting that have good all round lighting Soft Designed for night time low light viewing Bright Designed for rooms that can be selectable. How to select Picture menu . 2 Press CH+/- Mode: Press VOL+/- Palette 1 Press MENU button and then use VOL+/- button...
User Manual
Page 24
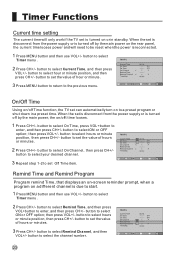
... channel. 3 Repeat step 1-2 to set the value of hour or minute. 3 Press MENU button to return to the previous menu. button to set is disconnect from the power supply or is turned off by the main power, the on or in a preset time. button to select ON or OFF option; Timer Functions Current time setting The current time will need to be reset when the power is reconnected. 1 Press MENU button and then use...
... channel. 3 Repeat step 1-2 to set the value of hour or minute. 3 Press MENU button to return to the previous menu. button to set is disconnect from the power supply or is turned off by the main power, the on or in a preset time. button to select ON or OFF option; Timer Functions Current time setting The current time will need to be reset when the power is reconnected. 1 Press MENU button and then use...
User Manual
Page 28
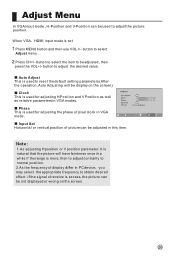
When VGA HDMI input mode is used to adjust the picture position. button to select the item to reset the default setting parameters (After the operation, Auto Adjusting will have faintness once in a while if the range is used for adjusting H Position and V Position as well as relative parameters in this item. OK Phase This is used to be used for adjusting the phase of picture can be display on the screen. 26 Note...
When VGA HDMI input mode is used to adjust the picture position. button to select the item to reset the default setting parameters (After the operation, Auto Adjusting will have faintness once in a while if the range is used for adjusting H Position and V Position as well as relative parameters in this item. OK Phase This is used to be used for adjusting the phase of picture can be display on the screen. 26 Note...

User Manual
Page 29
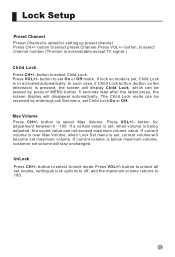
... screen. How to select Off, TV, AV1,AV2,S-Video,YPbPr/YCbCr, VGA, HDM1, USB in TV mode. After entering the Lock set Tuning Lock Off or operate UnLock. to be entered when the program lock mode is 0000. Press VOL+/-button to use the password function Press H.LOCK button, Password will display on the screen, at the first place. Lock Set Change Password OK Tuning Lock Off Source Lock Off Preset Source Off Preset Channel Off Child Lock Off Max Volume UnLock...
... screen. How to select Off, TV, AV1,AV2,S-Video,YPbPr/YCbCr, VGA, HDM1, USB in TV mode. After entering the Lock set Tuning Lock Off or operate UnLock. to be entered when the program lock mode is 0000. Press VOL+/-button to use the password function Press H.LOCK button, Password will display on the screen, at the first place. Lock Set Change Password OK Tuning Lock Off Source Lock Off Preset Source Off Preset Channel Off Child Lock Off Max Volume UnLock...
User Manual
Page 30
... except TV signal.) Child Lock Press CH+/- button, to select channel number.(The item is opted for adjustment between 0 100. The Child Lock mode can be erased by entering Lock Set menu, set , when volume is being adjusted, the sound value can be resumed by press of MENU button. 5 seconds later after the latest press, the screen display will become set , current volume will disappear automatically. UnLock Press CH+/- button to set modes, setting all lock options to...
... except TV signal.) Child Lock Press CH+/- button, to select channel number.(The item is opted for adjustment between 0 100. The Child Lock mode can be erased by entering Lock Set menu, set , when volume is being adjusted, the sound value can be resumed by press of MENU button. 5 seconds later after the latest press, the screen display will become set , current volume will disappear automatically. UnLock Press CH+/- button to set modes, setting all lock options to...
User Manual
Page 31
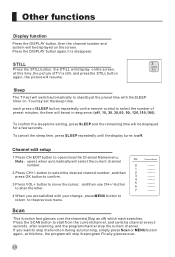
... sleep time. each press of SLEEP button repeatedly on . To cancel the sleep time, press SLEEP repeatedly until the display turns to select the number of TV is disappear. If you are satisfied with the SLEEP timer on the remote control to off ) which each searches. No Channel Name 0 ------ 1 ------ 2 ------ 3 ------ 4 ------ 5 ------ 6 ------ 7 ------ Channel edit setup 1 Press CH.EDIT button to stop the function during auto tunning, simply press Scan or MENU button again, at this time, the program...
... sleep time. each press of SLEEP button repeatedly on . To cancel the sleep time, press SLEEP repeatedly until the display turns to select the number of TV is disappear. If you are satisfied with the SLEEP timer on the remote control to off ) which each searches. No Channel Name 0 ------ 1 ------ 2 ------ 3 ------ 4 ------ 5 ------ 6 ------ 7 ------ Channel edit setup 1 Press CH.EDIT button to stop the function during auto tunning, simply press Scan or MENU button again, at this time, the program...
User Manual
Page 33
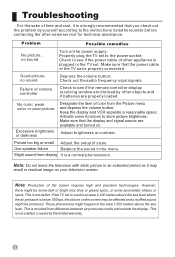
... remote controller Check to see if the power cable of other objects and if batteries are properly loaded. Activate some anomalistic stripes or spots. Adjust brightness or contrast. Picture too big or small Adjust the setup of color from the Picture menu and depress the volume button; Check to the instructions listed hereunder before contacting the after-sales service for technical assistance. One speaker failure Balance the sound...
... remote controller Check to see if the power cable of other objects and if batteries are properly loaded. Activate some anomalistic stripes or spots. Adjust brightness or contrast. Picture too big or small Adjust the setup of color from the Picture menu and depress the volume button; Check to the instructions listed hereunder before contacting the after-sales service for technical assistance. One speaker failure Balance the sound...

User Manual
Page 34
... dimension in the operating temperature environment carries on restores 2 hours, then electrifies the use again, protects your television not to change without notice. Specifications Basic specification and parameter Model WP37K1 WP42K1 WP50K1 Power Power Consumption Color System Sound System Video input Environmental condition ~ 15 -240 /60 220W±10% 350W±10% 450W±10% PAL NTSC, SECAM D/K I B/G, M, AV CVBS , S-VIDEO, YPbPr/YCbCr, HDMI or DVI VGA Operating temperature range: 5 +35 Operating...
... dimension in the operating temperature environment carries on restores 2 hours, then electrifies the use again, protects your television not to change without notice. Specifications Basic specification and parameter Model WP37K1 WP42K1 WP50K1 Power Power Consumption Color System Sound System Video input Environmental condition ~ 15 -240 /60 220W±10% 350W±10% 450W±10% PAL NTSC, SECAM D/K I B/G, M, AV CVBS , S-VIDEO, YPbPr/YCbCr, HDMI or DVI VGA Operating temperature range: 5 +35 Operating...


