Use And Care
Page 2
... using your appliance. 3. WARNING! The plug fits only one wide blade) that of the iron, it still does not fit, have an electrician replace the outlet. Prepare iron for information on any appliance being worn. If an extension cord is absolutely necessary, a 15-ampere cord should always be turned to disconnect from touching hot metal parts, hot water, or steam. SAVE THESE INSTRUCTIONS...
... using your appliance. 3. WARNING! The plug fits only one wide blade) that of the iron, it still does not fit, have an electrician replace the outlet. Prepare iron for information on any appliance being worn. If an extension cord is absolutely necessary, a 15-ampere cord should always be turned to disconnect from touching hot metal parts, hot water, or steam. SAVE THESE INSTRUCTIONS...
Use And Care
Page 3
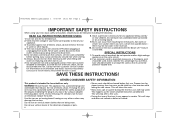
Heel Rest Water Tank Door Spray Nozzle Temperature Control Dial Self-Clean Button Water Tank Soleplate Smart Lift™ Feature 3 840174302 ENnv01.qxd:Layout 1 9/10/09 10:11 AM Page 3 Parts and Features Auto Off/Stay On Switch Cord Spray Steam (optional feature on some models) Button Button Adjustable Steam Lever Smart Lift Trigger Water Tank Fill Area Power ON Light NOTE: Light will blink when iron is in Auto Shutoff mode.
Heel Rest Water Tank Door Spray Nozzle Temperature Control Dial Self-Clean Button Water Tank Soleplate Smart Lift™ Feature 3 840174302 ENnv01.qxd:Layout 1 9/10/09 10:11 AM Page 3 Parts and Features Auto Off/Stay On Switch Cord Spray Steam (optional feature on some models) Button Button Adjustable Steam Lever Smart Lift Trigger Water Tank Fill Area Power ON Light NOTE: Light will blink when iron is in Auto Shutoff mode.
Use And Care
Page 4
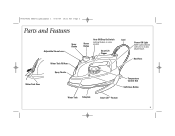
... models only. Turn Temperature Control Dial to OFF. NOTE: To avoid property damage to supporting surfaces, always use (see chart below). If the iron turns off iron heat when iron is not in use an ironing board. 5 Pull Smart Lift Trigger to activate. 4 6 Iron will only activate when the AUTO OFF/STAY ON Switch is in the heating mode until turned OFF or unplugged. The iron will begin to heat...
... models only. Turn Temperature Control Dial to OFF. NOTE: To avoid property damage to supporting surfaces, always use (see chart below). If the iron turns off iron heat when iron is not in use an ironing board. 5 Pull Smart Lift Trigger to activate. 4 6 Iron will only activate when the AUTO OFF/STAY ON Switch is in the heating mode until turned OFF or unplugged. The iron will begin to heat...
Use And Care
Page 5
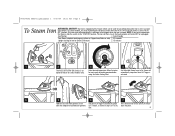
...Dry Iron." Allow 2 minutes for iron to the "STAY ON" position. Select desired temperature. Do not Pull Smart Lift Trigger to activate the Smart allow hot soleplate to heat again when the iron is not in the "AUTO OFF" position. Iron Position Auto ...models only. 840174302 ENnv01.qxd:Layout 1 9/10/09 10:11 AM Page 5 To Steam Iron AUTOMATIC SHUTOFF: Your iron is equipped with a feature which can be used to turn off automatically, it will automatically stop when Smart Lift Trigger is activated. Steam will begin to touch delicate garments. If the iron turns off iron heat when iron...
...Dry Iron." Allow 2 minutes for iron to the "STAY ON" position. Select desired temperature. Do not Pull Smart Lift Trigger to activate the Smart allow hot soleplate to heat again when the iron is not in the "AUTO OFF" position. Iron Position Auto ...models only. 840174302 ENnv01.qxd:Layout 1 9/10/09 10:11 AM Page 5 To Steam Iron AUTOMATIC SHUTOFF: Your iron is equipped with a feature which can be used to turn off automatically, it will automatically stop when Smart Lift Trigger is activated. Steam will begin to touch delicate garments. If the iron turns off iron heat when iron...
Use And Care
Page 6
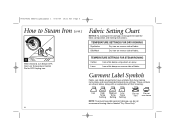
... Setting Setting Setting Do not Do not iron use steam NOTE: To prevent possible garment damage, we do not recommend ironing fabrics labeled "Dry Clean Only." 6 TEMPERATURE SETTINGS FOR DRY IRONING Synthetics Dry iron on reverse side of their meaning. then turn Temperature Control Dial to Steam Iron (cont.) 8 When finished, turn Steam OFF; Unplug iron. Fabric Setting Chart NOTICE: To avoid garment damage, check garment label for fabric composition and ironing instructions. Linen Iron...
... Setting Setting Setting Do not Do not iron use steam NOTE: To prevent possible garment damage, we do not recommend ironing fabrics labeled "Dry Clean Only." 6 TEMPERATURE SETTINGS FOR DRY IRONING Synthetics Dry iron on reverse side of their meaning. then turn Temperature Control Dial to Steam Iron (cont.) 8 When finished, turn Steam OFF; Unplug iron. Fabric Setting Chart NOTICE: To avoid garment damage, check garment label for fabric composition and ironing instructions. Linen Iron...
Use And Care
Page 7
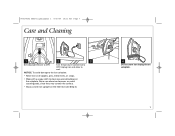
Never use abrasive cleansers or metal scouring pads, since they may scratch the surface. • Always store iron upright on the heel rest (see Step 4). 4 Do not store iron laying flat on the soleplate. Unplug iron and allow to clean occasional buildup on soleplate. 7 NOTICE: To avoid damage to the iron soleplate: • Never iron over zippers, pins, metal rivets, or snaps. • Wipe with a soapy cloth to cool. Turn Temperature Control Dial to DRY. 840174302 ENnv01.qxd:Layout 1 9/10/09 10:11 AM Page 7 Care and Cleaning 1 2 3 Set Adjustable Steam to OFF.
Never use abrasive cleansers or metal scouring pads, since they may scratch the surface. • Always store iron upright on the heel rest (see Step 4). 4 Do not store iron laying flat on the soleplate. Unplug iron and allow to clean occasional buildup on soleplate. 7 NOTICE: To avoid damage to the iron soleplate: • Never iron over zippers, pins, metal rivets, or snaps. • Wipe with a soapy cloth to cool. Turn Temperature Control Dial to DRY. 840174302 ENnv01.qxd:Layout 1 9/10/09 10:11 AM Page 7 Care and Cleaning 1 2 3 Set Adjustable Steam to OFF.

Use And Care
Page 8
Boiling water and steam could still flow out of soleplate, repeat Steps 2-7. Unplug iron. 6 Hold iron over sink. 8 7 Press and hold the Self-Clean button until tank is empty. If water still remains inside of steam vents. 840174302 ENnv01.qxd:Layout 1 9/10/09 10:11 AM Page 8 Self-Clean Feature To keep the steam vents clear of any buildup, follow these instructions each time you iron using steam. 1 2 Fill iron with water to 1/3 of MAX capacity. 3 Set Adjustable Steam to DRY. 4 Allow iron to heat on COTTONLINEN for 2 minutes. 5 Turn Temperature Control Dial to OFF.
Boiling water and steam could still flow out of soleplate, repeat Steps 2-7. Unplug iron. 6 Hold iron over sink. 8 7 Press and hold the Self-Clean button until tank is empty. If water still remains inside of steam vents. 840174302 ENnv01.qxd:Layout 1 9/10/09 10:11 AM Page 8 Self-Clean Feature To keep the steam vents clear of any buildup, follow these instructions each time you iron using steam. 1 2 Fill iron with water to 1/3 of MAX capacity. 3 Set Adjustable Steam to DRY. 4 Allow iron to heat on COTTONLINEN for 2 minutes. 5 Turn Temperature Control Dial to OFF.

Use And Care
Page 9
... did the iron have enough time to the STAY ON position. 9 Let cool. Iron leaves spots on . • Do not overfill the water tank. • If steam ironing, is temperature control dial set in STEAM position? • ALWAYS empty water tank after several minutes. Twisted cord. Empty any water from iron. 840174302 ENnv01.qxd:Layout 1 9/10/09 10:11 AM Page 9 Troubleshooting PROBLEM Iron won 't steam. Iron won 't heat. Wrinkles...
... did the iron have enough time to the STAY ON position. 9 Let cool. Iron leaves spots on . • Do not overfill the water tank. • If steam ironing, is temperature control dial set in STEAM position? • ALWAYS empty water tank after several minutes. Twisted cord. Empty any water from iron. 840174302 ENnv01.qxd:Layout 1 9/10/09 10:11 AM Page 9 Troubleshooting PROBLEM Iron won 't steam. Iron won 't heat. Wrinkles...
Use And Care
Page 10
..., is limited to the duration of this product or any component found to be free from normal use, use . This warranty extends only to the original consumer purchaser or gift recipient. For faster service, locate the model, type, and series numbers on where you . During this warranty to you live...amount of the purchase price. If the product or component is used for all claims for a period of three (3) years from accident, alteration, abuse, or misuse. This warranty is void if the product is no longer available, we will replace with the printed directions, or damage to the...
..., is limited to the duration of this product or any component found to be free from normal use, use . This warranty extends only to the original consumer purchaser or gift recipient. For faster service, locate the model, type, and series numbers on where you . During this warranty to you live...amount of the purchase price. If the product or component is used for all claims for a period of three (3) years from accident, alteration, abuse, or misuse. This warranty is void if the product is no longer available, we will replace with the printed directions, or damage to the...


