
Use & Care
Page 2
... occur from the electrical outlet; Close supervision is not in water or other liquids. 3. To avoid a circuit overload, do not operate an iron on a stable surface. 8. A cord rated for examination and repair. SAVE THESE INSTRUCTIONS! 2 840221700 ENv02...iron shall be hot water in the event the iron has been dropped or damaged or there are visible signs of electric shock when the iron is connected or on the plug to disconnect the iron from touching hot metal parts, hot water, or steam. Never pull on which the stand is placed is leaking. IMPORTANT SAFETY INSTRUCTIONS When using...
... occur from the electrical outlet; Close supervision is not in water or other liquids. 3. To avoid a circuit overload, do not operate an iron on a stable surface. 8. A cord rated for examination and repair. SAVE THESE INSTRUCTIONS! 2 840221700 ENv02...iron shall be hot water in the event the iron has been dropped or damaged or there are visible signs of electric shock when the iron is connected or on the plug to disconnect the iron from touching hot metal parts, hot water, or steam. Never pull on which the stand is placed is leaking. IMPORTANT SAFETY INSTRUCTIONS When using...

Use & Care
Page 3
.../12/12 11:53 AM This will stop after a few uses. • To clean steam vents before first use, prepare iron for steam ironing and then iron over an old cloth for household use only. Then follow the self-cleaning instructions on an ironing board. If the plug does not fit fully into a polarized outlet. Press the Steam Burst button several times to smoke. Do not defeat...
.../12/12 11:53 AM This will stop after a few uses. • To clean steam vents before first use, prepare iron for steam ironing and then iron over an old cloth for household use only. Then follow the self-cleaning instructions on an ironing board. If the plug does not fit fully into a polarized outlet. Press the Steam Burst button several times to smoke. Do not defeat...

Use & Care
Page 4
Parts and Features Temperature Settings Button Spray and Steam Burst Buttons Soft Touch Grip Adjustable Steam Switch Water Tank Cover Spray Nozzle Durathon™ Nonstick Soleplate 4 840221700 ENv02.indd 4 Self-Clean Button Optional Features (on select models) Cord Cord Retraction Button Heel Rest Temperature Settings/ Auto Shutoff Indicator Retractable Cord 11/12/12 11:53 AM
Parts and Features Temperature Settings Button Spray and Steam Burst Buttons Soft Touch Grip Adjustable Steam Switch Water Tank Cover Spray Nozzle Durathon™ Nonstick Soleplate 4 840221700 ENv02.indd 4 Self-Clean Button Optional Features (on select models) Cord Cord Retraction Button Heel Rest Temperature Settings/ Auto Shutoff Indicator Retractable Cord 11/12/12 11:53 AM
Use & Care
Page 5
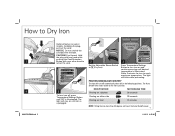
... select models. The light will reset the Auto Shutoff sensor. 5 11/12/12 11:53 AM The light will turn off , press Temperature Settings Button until desired temperature is illuminated. POSITION SENSING/AUTO SHUTOFF The iron will blink while preheating. Allow 2 minutes for iron to Dry Iron 1 4 840221700 ENv02.indd 5 Optional feature on until iron is unplugged. 2 3 Set the Adjustable Steam Switch to (Dry Iron). Press Temperature Settings Button to retract the cord. 5 To turn iron...
... select models. The light will reset the Auto Shutoff sensor. 5 11/12/12 11:53 AM The light will turn off , press Temperature Settings Button until desired temperature is illuminated. POSITION SENSING/AUTO SHUTOFF The iron will blink while preheating. Allow 2 minutes for iron to Dry Iron 1 4 840221700 ENv02.indd 5 Optional feature on until iron is unplugged. 2 3 Set the Adjustable Steam Switch to (Dry Iron). Press Temperature Settings Button to retract the cord. 5 To turn iron...

Use & Care
Page 6
... to steam iron on select models. Optional feature on a lower temperature setting or failing to allow the iron to preheat for 2 minutes can result in the steam range. 6 840221700 ENv02.indd 6 5 Allow 2 minutes for iron to (Dry Iron). CAUTION! How to Steam Iron 1 2 3 Set the Adjustable Steam Switch to reach maximum temperature. NOTICE: Do not unwind the cord past the red tape. The light will blink while preheating...
... to steam iron on select models. Optional feature on a lower temperature setting or failing to allow the iron to preheat for 2 minutes can result in the steam range. 6 840221700 ENv02.indd 6 5 Allow 2 minutes for iron to (Dry Iron). CAUTION! How to Steam Iron 1 2 3 Set the Adjustable Steam Switch to reach maximum temperature. NOTICE: Do not unwind the cord past the red tape. The light will blink while preheating...
Use & Care
Page 7
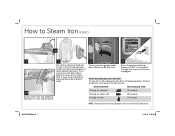
... Steam Iron (cont.) OR 7 7 For vertical steaming, hold iron 6 inches (15 cm) from iron following directions in the following positions. POSITION SENSING/AUTO SHUTOFF The iron will stay on until OFF is unplugged. Press and release the Steam Burst Button to touch delicate garments. The light will turn iron off automatically when left in "Care and Cleaning." 8 To turn off , set Adjustable Steam Switch to (Dry Iron). 9 Press Temperature Settings Button...
... Steam Iron (cont.) OR 7 7 For vertical steaming, hold iron 6 inches (15 cm) from iron following directions in the following positions. POSITION SENSING/AUTO SHUTOFF The iron will stay on until OFF is unplugged. Press and release the Steam Burst Button to touch delicate garments. The light will turn iron off automatically when left in "Care and Cleaning." 8 To turn off , set Adjustable Steam Switch to (Dry Iron). 9 Press Temperature Settings Button...

Use & Care
Page 8
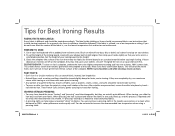
... Medium Low Temp Temp Temp Setting Setting Setting Do not iron Do not use spray. Cotton, Linen ••• High Steam Range For cotton, iron while still damp or use steam 8 840221700 ENv02.indd 8 11/12/12 11:55 AM For linen, iron fabric on garments have symbols that show ironing instructions and recommended temperature settings. Fabric Setting Chart NOTICE: To avoid garment damage...
... Medium Low Temp Temp Temp Setting Setting Setting Do not iron Do not use spray. Cotton, Linen ••• High Steam Range For cotton, iron while still damp or use steam 8 840221700 ENv02.indd 8 11/12/12 11:55 AM For linen, iron fabric on garments have symbols that show ironing instructions and recommended temperature settings. Fabric Setting Chart NOTICE: To avoid garment damage...
Use & Care
Page 9
.../12 11:55 AM NOTE: Care should be ironed inside clothing or linens should recommend fabric care instructions that meets the fabric) for faster, easier ironing. If they may have a Self-Clean Button. If the fabric is a blend, use the lowest temperature first and test on your elbows bent at right angles; steam can stretch fabric. FAST FACTS: • Don...
.../12 11:55 AM NOTE: Care should be ironed inside clothing or linens should recommend fabric care instructions that meets the fabric) for faster, easier ironing. If they may have a Self-Clean Button. If the fabric is a blend, use the lowest temperature first and test on your elbows bent at right angles; steam can stretch fabric. FAST FACTS: • Don...
Use & Care
Page 10
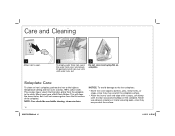
..., but it will not remove grime from the soleplate to the highest temperature setting and iron over a damp, 100% cotton cloth. Soleplate Care To clean an iron's soleplate, preheat the iron to the cloth. This creates heavy steam that transfers grime from the flat surface of iron over zippers, buttons, pins, metal rivets, or snaps, since they may scratch the surface...
..., but it will not remove grime from the soleplate to the highest temperature setting and iron over a damp, 100% cotton cloth. Soleplate Care To clean an iron's soleplate, preheat the iron to the cloth. This creates heavy steam that transfers grime from the flat surface of iron over zippers, buttons, pins, metal rivets, or snaps, since they may scratch the surface...
Use & Care
Page 11
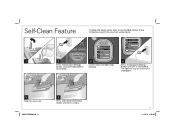
Let iron heat until OFF is illuminated. Press Temperature Settings Button until light stops blinking. The light will stay on until iron is unplugged. 5 Hold iron over sink. 840221700 ENv02.indd 11 6 Press and hold the Self-Clean Button until COTTON/LINEN is illuminated. Self-Clean Feature To keep the steam vents clear of any buildup, follow these instructions each time you iron using steam. 1 2 3 4 Press Temperature Settings Button until tank is empty. 11 11/12/12 11:55 AM
Let iron heat until OFF is illuminated. Press Temperature Settings Button until light stops blinking. The light will stay on until iron is unplugged. 5 Hold iron over sink. 840221700 ENv02.indd 11 6 Press and hold the Self-Clean Button until COTTON/LINEN is illuminated. Self-Clean Feature To keep the steam vents clear of any buildup, follow these instructions each time you iron using steam. 1 2 3 4 Press Temperature Settings Button until tank is empty. 11 11/12/12 11:55 AM
Use & Care
Page 12
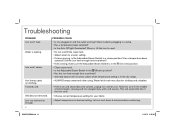
... leaking. Iron too hot/not hot enough. 12 PROBABLE CAUSE • Is iron plugged in the dry range. • ALWAYS empty water tank after using. Did the iron have enough time to a lower setting. • If steam ironing, is in and the outlet working? Wrinkles not removed. Water left in a lamp. • Has a temperature been selected? • Is the Auto Off light illuminated? Troubleshooting PROBLEM Iron won 't steam. Check...
... leaking. Iron too hot/not hot enough. 12 PROBABLE CAUSE • Is iron plugged in the dry range. • ALWAYS empty water tank after using. Did the iron have enough time to a lower setting. • If steam ironing, is in and the outlet working? Wrinkles not removed. Water left in a lamp. • Has a temperature been selected? • Is the Auto Off light illuminated? Troubleshooting PROBLEM Iron won 't steam. Check...

Use & Care
Page 14
...11:56 AM If the product or component is repair or replacement of any other than single-family household use not in conformity with the printed directions, or damage to any component found to the duration of this warranty to you specific legal rights. This warranty gives you . To make... on your exclusive remedy is no longer available, we will replace with returning the product to us and our returning a product or component under this written warranty. You may not apply to you. For faster service, locate the model, type, and series numbers on the rating label (e.g., 120V...
...11:56 AM If the product or component is repair or replacement of any other than single-family household use not in conformity with the printed directions, or damage to any component found to the duration of this warranty to you specific legal rights. This warranty gives you . To make... on your exclusive remedy is no longer available, we will replace with returning the product to us and our returning a product or component under this written warranty. You may not apply to you. For faster service, locate the model, type, and series numbers on the rating label (e.g., 120V...


