Use & Care
Page 2
... repair. If an extension cord is not in water or other liquids. 3. 840203500 ENv03.qxd:Layout 1 7/14/11 10:04 AM Page 2 IMPORTANT SAFETY INSTRUCTIONS When using your flatiron, basic safety precautions should always be used and rested on an ironing board. 10. Always turn a steam iron upside down- Do not let the cord touch hot surfaces. Do not operate the iron with retractable cord, fully retract cord...
... repair. If an extension cord is not in water or other liquids. 3. 840203500 ENv03.qxd:Layout 1 7/14/11 10:04 AM Page 2 IMPORTANT SAFETY INSTRUCTIONS When using your flatiron, basic safety precautions should always be used and rested on an ironing board. 10. Always turn a steam iron upside down- Do not let the cord touch hot surfaces. Do not operate the iron with retractable cord, fully retract cord...
Use & Care
Page 3
... old cloth for household use of electric shock. Ironing on page 11. 3 Shock Hazard: This appliance has a polarized plug (one way into the outlet, reverse the plug. If it may appear to clean the vents. This happens as the steam chamber becomes conditioned. Then follow the self-cleaning instructions on any way or by modifying the plug in the direction...
... old cloth for household use of electric shock. Ironing on page 11. 3 Shock Hazard: This appliance has a polarized plug (one way into the outlet, reverse the plug. If it may appear to clean the vents. This happens as the steam chamber becomes conditioned. Then follow the self-cleaning instructions on any way or by modifying the plug in the direction...
Use & Care
Page 4
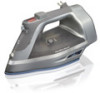
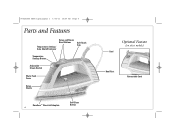
840203500 ENv03.qxd:Layout 1 7/14/11 10:04 AM Page 4 Parts and Features Spray and Steam Burst Buttons Temperature Settings/ Auto Shutoff Indicator Soft Touch Grip Temperature Settings Button Adjustable Steam Switch Water Tank Cover Spray Nozzle Durathon™ Nonstick Soleplate 4 Self-Clean Button Optional Feature (on select models) Cord Heel Rest Retractable Cord
840203500 ENv03.qxd:Layout 1 7/14/11 10:04 AM Page 4 Parts and Features Spray and Steam Burst Buttons Temperature Settings/ Auto Shutoff Indicator Soft Touch Grip Temperature Settings Button Adjustable Steam Switch Water Tank Cover Spray Nozzle Durathon™ Nonstick Soleplate 4 Self-Clean Button Optional Feature (on select models) Cord Heel Rest Retractable Cord
Use & Care
Page 5
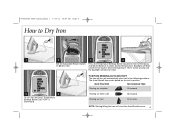
... on the iron's position. 840203500 ENv03.qxd:Layout 1 7/14/11 10:04 AM Page 5 How to Dry Iron 1 2 3 4 Set the Adjustable Steam Switch to select desired temperature. Press the Temperature Settings Button (located in the following positions. Backlight will turn iron off automatically when left in front of the Spray and Steam Buttons) to (Dry Iron). POSITION SENSING/AUTO SHUTOFF The iron will blink until "OFF...
... on the iron's position. 840203500 ENv03.qxd:Layout 1 7/14/11 10:04 AM Page 5 How to Dry Iron 1 2 3 4 Set the Adjustable Steam Switch to select desired temperature. Press the Temperature Settings Button (located in the following positions. Backlight will turn iron off automatically when left in front of the Spray and Steam Buttons) to (Dry Iron). POSITION SENSING/AUTO SHUTOFF The iron will blink until "OFF...
Use & Care
Page 6
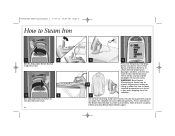
... a beep and the backlight will blink until the iron reaches desired temperature. Wait at least 5 seconds before pressing Steam Burst Button again. 840203500 ENv03.qxd:Layout 1 7/14/11 10:04 AM Page 6 How to Steam Iron 1 2 Set the Adjustable Steam Switch to (Dry Iron). 5 6 Set Adjustable Steam Switch to the desired steam level. 6 3 4 OR 6 Press the Temperature Settings Button (located in hot water dripping from garment and do...
... a beep and the backlight will blink until the iron reaches desired temperature. Wait at least 5 seconds before pressing Steam Burst Button again. 840203500 ENv03.qxd:Layout 1 7/14/11 10:04 AM Page 6 How to Steam Iron 1 2 Set the Adjustable Steam Switch to (Dry Iron). 5 6 Set Adjustable Steam Switch to the desired steam level. 6 3 4 OR 6 Press the Temperature Settings Button (located in hot water dripping from garment and do...
Use & Care
Page 7
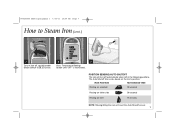
IRON POSITION MOTIONLESS TIME Resting on soleplate 30 seconds Resting on either side 30 seconds Resting on the iron's position. POSITION SENSING/AUTO SHUTOFF The iron will reset the Auto Shutoff sensor. 7 The Auto Shutoff time varies based on heel 15 minutes NOTE: Moving/tilting the iron will turn iron off automatically when left in the following positions. 840203500 ENv03.qxd:Layout 1 7/14/11 10:04 AM Page 7 How to Steam Iron (cont.) 7 To turn off , set Adjustable Steam Switch to (Dry Iron). 8 9 Press Temperature Settings Button until "OFF" is illuminated.
IRON POSITION MOTIONLESS TIME Resting on soleplate 30 seconds Resting on either side 30 seconds Resting on the iron's position. POSITION SENSING/AUTO SHUTOFF The iron will reset the Auto Shutoff sensor. 7 The Auto Shutoff time varies based on heel 15 minutes NOTE: Moving/tilting the iron will turn iron off automatically when left in the following positions. 840203500 ENv03.qxd:Layout 1 7/14/11 10:04 AM Page 7 How to Steam Iron (cont.) 7 To turn off , set Adjustable Steam Switch to (Dry Iron). 8 9 Press Temperature Settings Button until "OFF" is illuminated.

Use & Care
Page 8
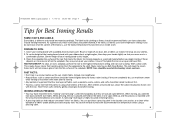
Steam Setting Dry Iron Temperature Setting OFF Synthetics • Low Silk, Wool •• Medium Ironing Instructions OFF Dry iron using spray if necessary. Garment Label Symbols Fabric care labels on garments have symbols that show ironing instructions and recommended temperature settings. Iron silk inside out. Iron High Temp Medium Low Temp Setting Temp Setting Setting Do not iron Do not use spray. 840203500 ENv03.qxd:Layout 1 7/14/11 10:04...
Steam Setting Dry Iron Temperature Setting OFF Synthetics • Low Silk, Wool •• Medium Ironing Instructions OFF Dry iron using spray if necessary. Garment Label Symbols Fabric care labels on garments have symbols that show ironing instructions and recommended temperature settings. Iron silk inside out. Iron High Temp Medium Low Temp Setting Temp Setting Setting Do not iron Do not use spray. 840203500 ENv03.qxd:Layout 1 7/14/11 10:04...
Use & Care
Page 9
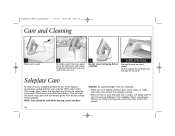
... heavy steam that transfers grime from the flat surface of the iron that has two layers of fabric such as pockets, seams, collars, and cuffs should recommend fabric care instructions that your clothes. A "pressing" technique is a blend, use the lowest temperature first and test on your arms are smooth. IRONING VERSUS PRESSING: • You may have a Self-Clean Button. then...
... heavy steam that transfers grime from the flat surface of the iron that has two layers of fabric such as pockets, seams, collars, and cuffs should recommend fabric care instructions that your clothes. A "pressing" technique is a blend, use the lowest temperature first and test on your arms are smooth. IRONING VERSUS PRESSING: • You may have a Self-Clean Button. then...
Use & Care
Page 10
... 10 Care and Cleaning 1 Allow iron to clean occasional buildup on the soleplate. Do not unwind the cord past the red tape on select models. NOTICE: To avoid damage to the iron soleplate: • Never iron over zippers, buttons, pins, metal rivets, or snaps, since they may scratch the surface. 10 Many irons have a Self-Clean Button. steam can burn. Never use abrasive cleaners or...
... 10 Care and Cleaning 1 Allow iron to clean occasional buildup on the soleplate. Do not unwind the cord past the red tape on select models. NOTICE: To avoid damage to the iron soleplate: • Never iron over zippers, buttons, pins, metal rivets, or snaps, since they may scratch the surface. 10 Many irons have a Self-Clean Button. steam can burn. Never use abrasive cleaners or...
Use & Care
Page 11
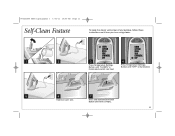
Press and hold the Self-Clean Button until "5 LINEN" is illuminated and let iron heat. 840203500 ENv03.qxd:Layout 1 7/14/11 10:05 AM Page 11 Self-Clean Feature To keep the steam vents clear of any buildup, follow these instructions each time you iron using steam. 1 2 3 4 Press Temperature Settings Button until tank is empty. 11 Press Temperature Settings Button until "OFF" is illuminated. 5 6 7 Hold iron over sink.
Press and hold the Self-Clean Button until "5 LINEN" is illuminated and let iron heat. 840203500 ENv03.qxd:Layout 1 7/14/11 10:05 AM Page 11 Self-Clean Feature To keep the steam vents clear of any buildup, follow these instructions each time you iron using steam. 1 2 3 4 Press Temperature Settings Button until tank is empty. 11 Press Temperature Settings Button until "OFF" is illuminated. 5 6 7 Hold iron over sink.
Use & Care
Page 12
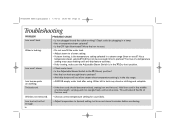
... 12 Troubleshooting PROBLEM Iron won 't steam. Twisted cord. PROBABLE CAUSE • Is iron plugged in a lamp. • Has a temperature been selected? • Is the OFF light illuminated? Water left in the dry range. • ALWAYS empty water tank after using. This will not allow steam when temperature setting is the temperature setting selected in the middle of the iron cord. Hold iron cord in a steam range (linen or wool)? Iron won 't heat. Wrinkles...
... 12 Troubleshooting PROBLEM Iron won 't steam. Twisted cord. PROBABLE CAUSE • Is iron plugged in a lamp. • Has a temperature been selected? • Is the OFF light illuminated? Water left in the dry range. • ALWAYS empty water tank after using. This will not allow steam when temperature setting is the temperature setting selected in the middle of the iron cord. Hold iron cord in a steam range (linen or wool)? Iron won 't heat. Wrinkles...

Use & Care
Page 14
...free ...1.800.851.8900 in Canada. For faster service, locate the model, type, and series numbers on implied warranties ...directions, or damage to be defective, at our option; This warranty gives you . This warranty is void if the product is used...date of the purchase price. To make a warranty claim. This product is repair or replacement of original purchase; ...replace with a similar one (1) year from the date of this period, your appliance. 14 You may not apply to you specific legal rights. and Canada. This warranty extends only to products purchased in addition, the Durathon...
...free ...1.800.851.8900 in Canada. For faster service, locate the model, type, and series numbers on implied warranties ...directions, or damage to be defective, at our option; This warranty gives you . This warranty is void if the product is used...date of the purchase price. To make a warranty claim. This product is repair or replacement of original purchase; ...replace with a similar one (1) year from the date of this period, your appliance. 14 You may not apply to you specific legal rights. and Canada. This warranty extends only to products purchased in addition, the Durathon...


