
Use and Care Manual
Page 2
... gas or electric burner or in a heated oven. 12. Use handles or knobs. 5. Do not operate any appliance with oven cooking bags. • Do not heat taco shells in toaster oven. Do not touch hot surfaces. Supply cord replacement and 2 repairs must be followed to reduce the risk of accessory attachments not recommended by the appliance manufacturer may cause injuries. 9. Do not use and before cleaning. Allow...
... gas or electric burner or in a heated oven. 12. Use handles or knobs. 5. Do not operate any appliance with oven cooking bags. • Do not heat taco shells in toaster oven. Do not touch hot surfaces. Supply cord replacement and 2 repairs must be followed to reduce the risk of accessory attachments not recommended by the appliance manufacturer may cause injuries. 9. Do not use and before cleaning. Allow...
Use and Care Manual
Page 3
... than the rating of an external timer or separate remote-control system. Do not store any way or by means of the appliance. To turn oven off the pad and touch electrical parts, creating a risk of the plug by modifying the plug in operation. 18. Clean oven interior carefully. Do not scratch or damage heating element tube. 27. BEFORE FIRST USE Most heating appliances produce an...
... than the rating of an external timer or separate remote-control system. Do not store any way or by means of the appliance. To turn oven off the pad and touch electrical parts, creating a risk of the plug by modifying the plug in operation. 18. Clean oven interior carefully. Do not scratch or damage heating element tube. 27. BEFORE FIRST USE Most heating appliances produce an...
Use and Care Manual
Page 4
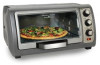
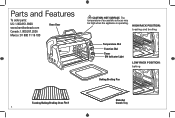
HIGH RACK POSITION: toasting and broiling Temperature Dial Function Dial Timer ON Indicator Light LOW RACK POSITION: baking Baking/Broiling Pan Toasting/Baking/Broiling Oven Rack 4 Slide-Out Crumb Tray The temperature of accessible surfaces may be high when the appliance is operating. Parts and Features To order parts: US: 1.800.851.8900 www.hamiltonbeach.com Canada: 1.800.267.2826 Mexico: 01 800 71 16 100 Oven Door CAUTION: HOT SURFACE.
HIGH RACK POSITION: toasting and broiling Temperature Dial Function Dial Timer ON Indicator Light LOW RACK POSITION: baking Baking/Broiling Pan Toasting/Baking/Broiling Oven Rack 4 Slide-Out Crumb Tray The temperature of accessible surfaces may be high when the appliance is operating. Parts and Features To order parts: US: 1.800.851.8900 www.hamiltonbeach.com Canada: 1.800.267.2826 Mexico: 01 800 71 16 100 Oven Door CAUTION: HOT SURFACE.
Use and Care Manual
Page 5
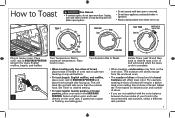
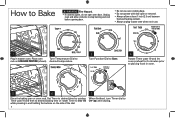
... and toast directly on the oven rack. If pastry has a glaze or frosting, use . 1 Plug in toaster oven. For example, toasting 4 slices of bread will toast the cut /split side facing up. Unplug oven and allow contents to stop burning and cool before opening door. • Do not operate with the color balance between the two sides of your food in the recommended rack position, select a different rack position. 5 Set Timer to desired setting...
... and toast directly on the oven rack. If pastry has a glaze or frosting, use . 1 Plug in toaster oven. For example, toasting 4 slices of bread will toast the cut /split side facing up. Unplug oven and allow contents to stop burning and cool before opening door. • Do not operate with the color balance between the two sides of your food in the recommended rack position, select a different rack position. 5 Set Timer to desired setting...
Use and Care Manual
Page 6
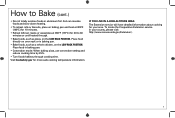
... heating element. • Always unplug toaster oven when not in use oven cooking bags. • Do not operate with door open oven door. Set Timer to desired time by rotating Timer past 10 and let oven preheat for 5 minutes prior to placing food in oven. 5 6 7 Place the baking pan on oven rack. desired temperature. 3 Turn Function Dial to Bake. 4 Rotate Timer past 10 and then to desired baking time or rotate Timer to Stay On while pressing in toaster oven...
... heating element. • Always unplug toaster oven when not in use oven cooking bags. • Do not operate with door open oven door. Set Timer to desired time by rotating Timer past 10 and let oven preheat for 5 minutes prior to placing food in oven. 5 6 7 Place the baking pan on oven rack. desired temperature. 3 Turn Function Dial to Bake. 4 Rotate Timer past 10 and then to desired baking time or rotate Timer to Stay On while pressing in toaster oven...
Use and Care Manual
Page 7
... baking pan. • Convection mode: When baking pizza, use convection setting and reduce cooking time by 25%. • Turn foods halfway through . • Bake foods, such as a whole chicken, on the LOW RACK POSITION. Place food in your area. IF YOU LIVE IN A HIGH-ALTITUDE AREA: The Extension service will have detailed information about cooking for more safe cooking temperature information. How to 30 minutes or until heated...
... baking pan. • Convection mode: When baking pizza, use convection setting and reduce cooking time by 25%. • Turn foods halfway through . • Bake foods, such as a whole chicken, on the LOW RACK POSITION. Place food in your area. IF YOU LIVE IN A HIGH-ALTITUDE AREA: The Extension service will have detailed information about cooking for more safe cooking temperature information. How to 30 minutes or until heated...
Use and Care Manual
Page 8
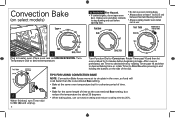
... RACK POSITION. After oven is preheated, set Timer to circulate in toaster oven. Place oven rack on the side of the dial. 5 When finished, turn Timer dial to Off ( ) and unplug. 8 TIPS FOR USING CONVECTION BAKE NOTE: Convection Bake forces more air to desired time by 25%. not in use. 1 2 Plug in the oven, so food will cook faster than the conventional Bake setting. • Bake at least 1 inch (2.5 cm) between food and heating element. Convection Bake (on select models...
... RACK POSITION. After oven is preheated, set Timer to circulate in toaster oven. Place oven rack on the side of the dial. 5 When finished, turn Timer dial to Off ( ) and unplug. 8 TIPS FOR USING CONVECTION BAKE NOTE: Convection Bake forces more air to desired time by 25%. not in use. 1 2 Plug in the oven, so food will cook faster than the conventional Bake setting. • Bake at least 1 inch (2.5 cm) between food and heating element. Convection Bake (on select models...
Use and Care Manual
Page 9
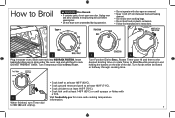
... Broil. Turn Temperature Dial to Broil/Toast. 3 4 Turn Function Dial to stop burning and cool before opening door. • Do not leave oven unattended during operation. • Do not operate with a fork. 5 Visit foodsafety.gov for more safe cooking temperature information. When finished, turn Timer dial to Broil w WARNING Fire Hazard. • If contents ignite, do not open or removed. • Keep 1 inch (2.5 cm) between food and heating element. • Do not use oven cooking...
... Broil. Turn Temperature Dial to Broil/Toast. 3 4 Turn Function Dial to stop burning and cool before opening door. • Do not leave oven unattended during operation. • Do not operate with a fork. 5 Visit foodsafety.gov for more safe cooking temperature information. When finished, turn Timer dial to Broil w WARNING Fire Hazard. • If contents ignite, do not open or removed. • Keep 1 inch (2.5 cm) between food and heating element. • Do not use oven cooking...
Use and Care Manual
Page 10
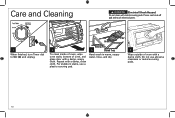
Oven Rack 2 To clean inside of oven, wipe oven walls, bottom of oven with metal scouring pads. Care and Cleaning w WARNING Electrical Shock Hazard. Repeat with a damp, soapy cloth. Pieces can break off pad and touch electrical parts. 1 When finished, turn Timer dial to Off ( ) and unplug. For stubborn stains, use abrasive cleansers or metal scouring pads. 10 Do not use a plastic scouring pad. Baking Pan 3 Crumb Tray Hand wash in warm, soapy water, rinse, and dry. 4 Wipe outside of oven, and glass door with a damp, clean cloth. Do not clean with a damp cloth.
Oven Rack 2 To clean inside of oven, wipe oven walls, bottom of oven with metal scouring pads. Care and Cleaning w WARNING Electrical Shock Hazard. Repeat with a damp, soapy cloth. Pieces can break off pad and touch electrical parts. 1 When finished, turn Timer dial to Off ( ) and unplug. For stubborn stains, use abrasive cleansers or metal scouring pads. 10 Do not use a plastic scouring pad. Baking Pan 3 Crumb Tray Hand wash in warm, soapy water, rinse, and dry. 4 Wipe outside of oven, and glass door with a damp, clean cloth. Do not clean with a damp cloth.
Use and Care Manual
Page 11
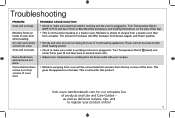
... the buttons on inside of the door. as well as delicious recipes, tips, and to escape from a toaster oven than from a toaster. Moisture forms on the side of products and Use and Care Guides - Turn Temperature Dial to (toast) and rotate Timer past 10 and then back to desired toast color. • Adjust oven temperature or cooking time for best results with your product online! 11 Oven will not heat. PROBABLE CAUSE/SOLUTION...
... the buttons on inside of the door. as well as delicious recipes, tips, and to escape from a toaster oven than from a toaster. Moisture forms on the side of products and Use and Care Guides - Turn Temperature Dial to (toast) and rotate Timer past 10 and then back to desired toast color. • Adjust oven temperature or cooking time for best results with your product online! 11 Oven will not heat. PROBABLE CAUSE/SOLUTION...
Use and Care Manual
Page 12
... damages caused by law, in Canada. To make a warranty claim. For faster service, locate the model, type, and series numbers on your exclusive remedy is repair or replacement of this product and is in lieu of any statutory warranty or condition of merchantability or fitness for...available, we will replace with a similar one (1) year from accident, alteration, abuse, or misuse. however, you specific legal rights. If the product or component is limited to the duration of the purchase price. Keep the original sales receipt, as specified on the rating label (e.g., 120V...
... damages caused by law, in Canada. To make a warranty claim. For faster service, locate the model, type, and series numbers on your exclusive remedy is repair or replacement of this product and is in lieu of any statutory warranty or condition of merchantability or fitness for...available, we will replace with a similar one (1) year from accident, alteration, abuse, or misuse. however, you specific legal rights. If the product or component is limited to the duration of the purchase price. Keep the original sales receipt, as specified on the rating label (e.g., 120V...

