
Use & Care
Page 2
..., cabinets, paper or plastic products, cloth towels, etc. The plug fits only one inch between food and heating element. • Do not cover or use near children. 5. If it still does not fit, have an electrician replace the outlet. IMPORTANT SAFEGUARDS When using an adaptor. Use handles or knobs. 3. To protect against electrical shock do not open oven door. Allow to 4 inches away...
..., cabinets, paper or plastic products, cloth towels, etc. The plug fits only one inch between food and heating element. • Do not cover or use near children. 5. If it still does not fit, have an electrician replace the outlet. IMPORTANT SAFEGUARDS When using an adaptor. Use handles or knobs. 3. To protect against electrical shock do not open oven door. Allow to 4 inches away...
Use & Care
Page 3
... place eyes or face in operation. Do not place anything on heating elements. Plug toaster oven into pieces with metal scouring pads. Use extreme caution when extending loaded rack or adding food to breakage. The electrical rating of electrical shock. 15. If the door has a scratch or nick, call a qualified electrician. 26. Remove baking pan, broil rack, and oven rack. Do not place any part of becoming tangled in...
... place eyes or face in operation. Do not place anything on heating elements. Plug toaster oven into pieces with metal scouring pads. Use extreme caution when extending loaded rack or adding food to breakage. The electrical rating of electrical shock. 15. If the door has a scratch or nick, call a qualified electrician. 26. Remove baking pan, broil rack, and oven rack. Do not place any part of becoming tangled in...
Use & Care
Page 4
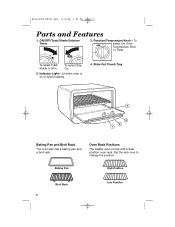
To select the Oven Temperature, Broil, or Toast. Slide-Out Crumb Tray Baking Pan and Broil Rack The oven also has a baking pan and a broil rack. Baking Pan High Position Broil Rack 4 Low Position To select toast shade or time. Oven Rack Positions The toaster oven comes with a dualposition oven rack. Indicator Light - ON/OFF/Toast Shade Selector/ Timer 3. Function/Temperature Knob - 840148700 ENv01.qxd 3/31/06 2:43 PM Page 4 Parts and Features 1. To select Stay On. 2. Flip the rack over to change the position. Lit when oven is on or when toasting. 4.
To select the Oven Temperature, Broil, or Toast. Slide-Out Crumb Tray Baking Pan and Broil Rack The oven also has a baking pan and a broil rack. Baking Pan High Position Broil Rack 4 Low Position To select toast shade or time. Oven Rack Positions The toaster oven comes with a dualposition oven rack. Indicator Light - ON/OFF/Toast Shade Selector/ Timer 3. Function/Temperature Knob - 840148700 ENv01.qxd 3/31/06 2:43 PM Page 4 Parts and Features 1. To select Stay On. 2. Flip the rack over to change the position. Lit when oven is on or when toasting. 4.

Use & Care
Page 5
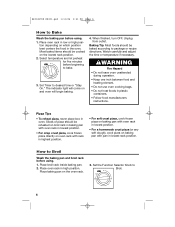
... bread freshness, and the starting temperature of the bagel. Select a light color and toast directly on the second batch to escape. Adjust Toast Shade Selector to TOAST. 3. If toasting four slices of toast, the toast shade selector should be in the high position and insert bread item. 2. After toasting, wipe door to the Medium setting. • To toast English muffins, place oven rack in the toaster oven will ensure that the timer operates...
... bread freshness, and the starting temperature of the bagel. Select a light color and toast directly on the second batch to escape. Adjust Toast Shade Selector to TOAST. 3. If toasting four slices of toast, the toast shade selector should be in the high position and insert bread item. 2. After toasting, wipe door to the Medium setting. • To toast English muffins, place oven rack in the toaster oven will ensure that the timer operates...
Use & Care
Page 6
... operation. • Keep one inch between food and heating element. • Do not use oven cooking bags. • Do not heat foods in low or high posi- Most baked items should be baked according to Broil. 6 When finished, turn OFF. How to bake. 3. Set the Function Selector Knob to package or recipe directions. Place oven rack in plastic containers. • Follow food manufacturers instructions. Place broil rack inside baking pan. 2. Slices of pizza should be cooked on baking pan with oven rack...
... operation. • Keep one inch between food and heating element. • Do not use oven cooking bags. • Do not heat foods in low or high posi- Most baked items should be baked according to Broil. 6 When finished, turn OFF. How to bake. 3. Set the Function Selector Knob to package or recipe directions. Place oven rack in plastic containers. • Follow food manufacturers instructions. Place broil rack inside baking pan. 2. Slices of pizza should be cooked on baking pan with oven rack...

Use & Care
Page 7
... finished turn food over to cool. 2. The Indicator Light will also reduce the risk of electric shock. 7 Unplug oven and allow at least one inch between the food and the heating element. To clean the crumb tray, slide out crumb tray. Slide crumb tray back into position. 5. Set Timer to individual preferences. Only the top heating elements come on during toasting or top-browning. To clean the outside of oven, and glass door...
... finished turn food over to cool. 2. The Indicator Light will also reduce the risk of electric shock. 7 Unplug oven and allow at least one inch between the food and the heating element. To clean the crumb tray, slide out crumb tray. Slide crumb tray back into position. 5. Set Timer to individual preferences. Only the top heating elements come on during toasting or top-browning. To clean the outside of oven, and glass door...
Use & Care
Page 8
... toll-free customer service number for 1 hour or until cheese melts. Bake at 450°F (230ºC) for best results with pepperoni. Turn the ON/OFF Knob to TOAST. 2. Use the oven rack position to OFF. Turn ON/OFF Knob to center food in 425ºF (22ºC) oven. Bake for information on baking pan and place in the oven. The Indicator Light should now be present after the initial heating period...
... toll-free customer service number for 1 hour or until cheese melts. Bake at 450°F (230ºC) for best results with pepperoni. Turn the ON/OFF Knob to TOAST. 2. Use the oven rack position to OFF. Turn ON/OFF Knob to center food in 425ºF (22ºC) oven. Bake for information on baking pan and place in the oven. The Indicator Light should now be present after the initial heating period...

Use & Care
Page 9
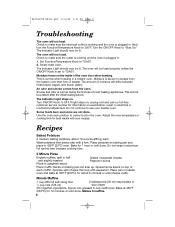
... Makes 4 to 6 servings. Serve over chicken. Bake at 400ºF on lowest rack position for 30 minutes or until done. Add two teaspoons of each biscuit. Bake at 350°F (180ºC) for 20 minutes ...Bake at 400ºF on greased baking pan. Divide the mixture between 6-cup muffin pan. Top with salsa, cheese, chicken, onion, and green pepper. Makes four pizzas. Mexican Pizza Crust Topping 1 cup water 2 teaspoons yeast 1 teaspoon salt 1 tablespoon vegetable oil 3 cups bread flour 11⁄2 cups shredded Mexican Blend cheese 1 cup chicken strips, cooked...
... Makes 4 to 6 servings. Serve over chicken. Bake at 400ºF on lowest rack position for 30 minutes or until done. Add two teaspoons of each biscuit. Bake at 350°F (180ºC) for 20 minutes ...Bake at 400ºF on greased baking pan. Divide the mixture between 6-cup muffin pan. Top with salsa, cheese, chicken, onion, and green pepper. Makes four pizzas. Mexican Pizza Crust Topping 1 cup water 2 teaspoons yeast 1 teaspoon salt 1 tablespoon vegetable oil 3 cups bread flour 11⁄2 cups shredded Mexican Blend cheese 1 cup chicken strips, cooked...
Use & Care
Page 10
... be free from defects in material and workmanship for a period of one (1) year for Hamilton Beach products or one hundred eighty (180) days for commercial purposes, or any use for ProctorSilex and Traditions products from the date of your appliance, call our CUSTOMER SERVICE NUMBER. (For faster service please have model, series, and type numbers ready for operator to clean product regularly in accordance with manufacturer's instructions, use...
... be free from defects in material and workmanship for a period of one (1) year for Hamilton Beach products or one hundred eighty (180) days for commercial purposes, or any use for ProctorSilex and Traditions products from the date of your appliance, call our CUSTOMER SERVICE NUMBER. (For faster service please have model, series, and type numbers ready for operator to clean product regularly in accordance with manufacturer's instructions, use...

