Use and Care Manual
Page 2
... to persons, including the following: 1. Supply cord replacement and repairs must be conducted by a person responsible for use by persons (including children) with reduced physical, sensory, or mental capabilities, or lack of electric shock, do not play with the appliance. 4. Call the provided customer service number for use outdoors. 11. Always dry deep fryer components thoroughly after the appliance malfunctions...
... to persons, including the following: 1. Supply cord replacement and repairs must be conducted by a person responsible for use by persons (including children) with reduced physical, sensory, or mental capabilities, or lack of electric shock, do not play with the appliance. 4. Call the provided customer service number for use outdoors. 11. Always dry deep fryer components thoroughly after the appliance malfunctions...
Use and Care Manual
Page 3
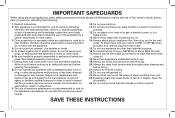
...electric shock. w WARNING Electrical Shock Hazard: This appliance is provided with any way or by children or become entangled with an extension cord. • Hot liquid will splash if you miss the drain bracket and accidentally drop the frying basket into the hot liquid. If it may result from a deep-fat fryer... being pulled off . 3 Do not defeat the safety purpose of the plug by modifying the plug in any nonfood materials or products. Do not use with the user. Other Consumer Safety ...
...electric shock. w WARNING Electrical Shock Hazard: This appliance is provided with any way or by children or become entangled with an extension cord. • Hot liquid will splash if you miss the drain bracket and accidentally drop the frying basket into the hot liquid. If it may result from a deep-fat fryer... being pulled off . 3 Do not defeat the safety purpose of the plug by modifying the plug in any nonfood materials or products. Do not use with the user. Other Consumer Safety ...

Use and Care Manual
Page 4
Parts and Features *To order parts: US: 1.800.851.8900 www.hamiltonbeach.com Canada: 1.800.267.2826 Mexico: 01 800 71 16 100 Steam Vent Removable Lid* Reset Button Heating Element Assembly Reset Button Pour Spout Removable Oil Pot* Base 4 Removable Vent Cover View Window Power Light Basket Handle READY Light Frying Basket* Adjustable Thermostat MIN Basket Drain Bracket Power Light Adjustable Thermostat Magnetic Cord Assembly* Timer READY Light (on certain models)
Parts and Features *To order parts: US: 1.800.851.8900 www.hamiltonbeach.com Canada: 1.800.267.2826 Mexico: 01 800 71 16 100 Steam Vent Removable Lid* Reset Button Heating Element Assembly Reset Button Pour Spout Removable Oil Pot* Base 4 Removable Vent Cover View Window Power Light Basket Handle READY Light Frying Basket* Adjustable Thermostat MIN Basket Drain Bracket Power Light Adjustable Thermostat Magnetic Cord Assembly* Timer READY Light (on certain models)
Use and Care Manual
Page 5
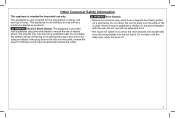
... on unless correctly installed on a stable, flat surface. Snap lid into base. 2. Align tines with grooves on metal bracket inside basket. 4. Insert oil pot into place. 5 For storage: Rotate handle into metal bracket. 5. Align grooves of handle together. Place base on base. 3. How to Assemble the Fryer BEFORE FIRST USE: Follow Care and Cleaning on heating element...
... on unless correctly installed on a stable, flat surface. Snap lid into base. 2. Align tines with grooves on metal bracket inside basket. 4. Insert oil pot into place. 5 For storage: Rotate handle into metal bracket. 5. Align grooves of handle together. Place base on base. 3. How to Assemble the Fryer BEFORE FIRST USE: Follow Care and Cleaning on heating element...
Use and Care Manual
Page 6
... MIN or OFF ( ). Magnetic end of children. Remove basket from accidentally being pulled off a countertop. 6 Lift lid to Reset" section for details. 1. Open lid carefully. See "How to open. 2. Place assembled fryer on removable oil pot. 4. Attach magnetic end of oil to "break away" which prevents unit from fryer. 3. NOTE: The low magnetic force allows the cord to top indicator...
... MIN or OFF ( ). Magnetic end of children. Remove basket from accidentally being pulled off a countertop. 6 Lift lid to Reset" section for details. 1. Open lid carefully. See "How to open. 2. Place assembled fryer on removable oil pot. 4. Attach magnetic end of oil to "break away" which prevents unit from fryer. 3. NOTE: The low magnetic force allows the cord to top indicator...
Use and Care Manual
Page 7
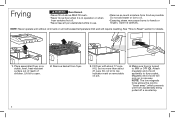
.... For more information. 8. then carefully place food directly into oil; NOTE: Do not exceed maximum amount of food to disturb magnetic connection when plugging cord into outlet. When oil has reached selected temperature, READY light will come on . READY...oil in basket and proceed with Step 8. Set thermostat to fry next batch of food. To fry food, place food in fryer. TO FRY BATTERED FOOD (such as tempura batter): Lower basket into oil. Carefully place basket in basket. Unit is now ready to desired setting. Plug into electrical outlet. 6. Preheat fryer...
.... For more information. 8. then carefully place food directly into oil; NOTE: Do not exceed maximum amount of food to disturb magnetic connection when plugging cord into outlet. When oil has reached selected temperature, READY light will come on . READY...oil in basket and proceed with Step 8. Set thermostat to fry next batch of food. To fry food, place food in fryer. TO FRY BATTERED FOOD (such as tempura batter): Lower basket into oil. Carefully place basket in basket. Unit is now ready to desired setting. Plug into electrical outlet. 6. Preheat fryer...

Use and Care Manual
Page 8
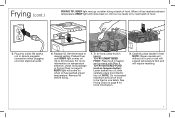
NOTE: Do not allow condensation to complete frying. 12. Fill basket and repeat as needed to drain into oil pot while removing lid or while unit is done, remove lid, raise basket, and hook over removable oil pot to MIN or OFF ( ) and unplug. 8 Set control to drain. Carefully empty food from basket and place in a bowl, colander, or tray lined with paper towel. When frying is off. 11. Frying (cont.) 9. Replace lid. 10.
NOTE: Do not allow condensation to complete frying. 12. Fill basket and repeat as needed to drain into oil pot while removing lid or while unit is done, remove lid, raise basket, and hook over removable oil pot to MIN or OFF ( ) and unplug. 8 Set control to drain. Carefully empty food from basket and place in a bowl, colander, or tray lined with paper towel. When frying is off. 11. Frying (cont.) 9. Replace lid. 10.
Use and Care Manual
Page 10
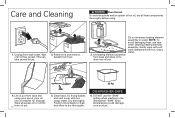
...: To avoid damaging fryer, use the "SANI" setting when washing in water. DO NOT use care when cleaning heating element assembly. Do not immerse heating element assembly in the dishwasher. Dry thoroughly. DISHWASHER-SAFE 6. Lift heating element assembly from fryer. 3. Lift oil pot from base and using . 1. "SANI" cycle temperatures could damage your product. Remove lid and remove basket from base and...
...: To avoid damaging fryer, use the "SANI" setting when washing in water. DO NOT use care when cleaning heating element assembly. Do not immerse heating element assembly in the dishwasher. Dry thoroughly. DISHWASHER-SAFE 6. Lift heating element assembly from fryer. 3. Lift oil pot from base and using . 1. "SANI" cycle temperatures could damage your product. Remove lid and remove basket from base and...

Use and Care Manual
Page 11
..., and store in refrigerator or a cool, dark place. • Pour cool oil into basket. Use basket to splatter or foam. GENERAL TIPS: • DO NOT use cooking thermometer to cool completely. STORAGE: • Basket handle can be reused more information on...batch size. Filter oil by blotting with a paper towel. Frying Tips SELECTING AND CHANGING THE FRYING OIL: • Use a good quality vegetable or peanut oil. • Frying foods in butter, margarine, olive oil, or animal... cheesecloth or fine strainer. Place oil pot in base and then place basket and power cord in oil pot.
..., and store in refrigerator or a cool, dark place. • Pour cool oil into basket. Use basket to splatter or foam. GENERAL TIPS: • DO NOT use cooking thermometer to cool completely. STORAGE: • Basket handle can be reused more information on...batch size. Filter oil by blotting with a paper towel. Frying Tips SELECTING AND CHANGING THE FRYING OIL: • Use a good quality vegetable or peanut oil. • Frying foods in butter, margarine, olive oil, or animal... cheesecloth or fine strainer. Place oil pot in base and then place basket and power cord in oil pot.
Use and Care Manual
Page 12
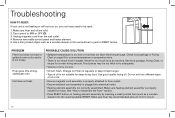
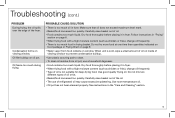
Turn control to fryer socket. • Ensure electrical cord assembly is plugged into the opening labeled RESET. See food package, Frying Chart, or recipe for deep-frying food. Change oil. PROBLEM Fried food does ...fryer and oil are cold. 2. Unplug magnetic cord from the wall outlet. 4. Use a thin pointed object such as a wooden skewer) into electrical outlet. • Heating element assembly not correctly assembled. PROBABLE CAUSE/SOLUTION • Selected temperature is not crispy. Never fry too much food in RESET button. Filter oil regularly to push in basket. Use...
Turn control to fryer socket. • Ensure electrical cord assembly is plugged into the opening labeled RESET. See food package, Frying Chart, or recipe for deep-frying food. Change oil. PROBLEM Fried food does ...fryer and oil are cold. 2. Unplug magnetic cord from the wall outlet. 4. Use a thin pointed object such as a wooden skewer) into electrical outlet. • Heating element assembly not correctly assembled. PROBABLE CAUSE/SOLUTION • Selected temperature is not crispy. Never fry too much food in RESET button. Filter oil regularly to push in basket. Use...
Use and Care Manual
Page 13
... on window. Oil foams too much liquid. Troubleshooting (cont.) PROBLEM During frying, the oil spills over the edge of oil or fat. • Basket/food immersed too quickly. Carefully raise basket out of refrigerated oil may cause excessive splattering. When unit is too much oil in frying basket. Use good quality frying oil. Use room-temperature oil. • Oil pot has not been cleaned properly. PROBABLE...
... on window. Oil foams too much liquid. Troubleshooting (cont.) PROBLEM During frying, the oil spills over the edge of oil or fat. • Basket/food immersed too quickly. Carefully raise basket out of refrigerated oil may cause excessive splattering. When unit is too much oil in frying basket. Use good quality frying oil. Use room-temperature oil. • Oil pot has not been cleaned properly. PROBABLE...
Use and Care Manual
Page 14
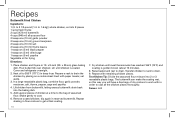
to coat. 6. Pour buttermilk over chicken; set aside. 3. Shake gently to 3 1/2-pound [1.4- Transfer chicken to rack to get a thick coating. 7. Heat oil to 350°F (177°C) in order to coat all -purpose flour 2 teaspoons (10 ml) garlic powder 2 teaspoons (10 ml) ground marjoram 2 teaspoons (10 ml) ... at a time to the bag of dry mixture to drain. Remove coated chicken; dip again in 13- Repeat shaking in flour mixture to drain. 9. Raise basket and rest to work with in deep fryer. Test Kitchen Tip: Divide the seasoned flour mixture into the baking dish. 5.
to coat. 6. Pour buttermilk over chicken; set aside. 3. Shake gently to 3 1/2-pound [1.4- Transfer chicken to rack to get a thick coating. 7. Heat oil to 350°F (177°C) in order to coat all -purpose flour 2 teaspoons (10 ml) garlic powder 2 teaspoons (10 ml) ground marjoram 2 teaspoons (10 ml) ... at a time to the bag of dry mixture to drain. Remove coated chicken; dip again in 13- Repeat shaking in flour mixture to drain. 9. Raise basket and rest to work with in deep fryer. Test Kitchen Tip: Divide the seasoned flour mixture into the baking dish. 5.
Use and Care Manual
Page 15
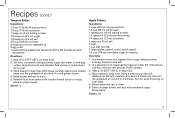
...Using a small scoop (about 2 tablespoons [30 ml]), carefully drop about 6 fritters at a time into the preheated oil at a time. Serves: 24 15 Stir flour, cornstarch, baking powder, sugar, salt, water, oil and egg yolks in apples. 3. Remove food from basket with powdered sugar. Heat oil...peeled and deveined shrimp OR 2 heads broccoli flowerettes Directions: 1. Place basket in deep fryer. Cook 3 to 375°F (191°C) in deep fryer. 2. Serve warm. With tongs, carefully place a few coated items into the preheated oil. place on both sides. 5. In a separate bowl, beat ...
...Using a small scoop (about 2 tablespoons [30 ml]), carefully drop about 6 fritters at a time into the preheated oil at a time. Serves: 24 15 Stir flour, cornstarch, baking powder, sugar, salt, water, oil and egg yolks in apples. 3. Remove food from basket with powdered sugar. Heat oil...peeled and deveined shrimp OR 2 heads broccoli flowerettes Directions: 1. Place basket in deep fryer. Cook 3 to 375°F (191°C) in deep fryer. 2. Serve warm. With tongs, carefully place a few coated items into the preheated oil. place on both sides. 5. In a separate bowl, beat ...
Use and Care Manual
Page 16
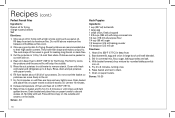
... ml) sugar 1/2 teaspoon (2.5 ml) baking powder 1/2 teaspoon (2.5 ml) salt Directions: 1. Fill fryer basket about 1/3 full of fryer and heat oil to remove starch. Beat buttermilk, egg and onion in deep fryer to drain. 7. Heat oil in large bowl until crispy and dark golden brown. With basket lowered, drop mixture by 1/4-inch thick sticks. Potatoes can move freely in...
... ml) sugar 1/2 teaspoon (2.5 ml) baking powder 1/2 teaspoon (2.5 ml) salt Directions: 1. Fill fryer basket about 1/3 full of fryer and heat oil to remove starch. Beat buttermilk, egg and onion in deep fryer to drain. 7. Heat oil in large bowl until crispy and dark golden brown. With basket lowered, drop mixture by 1/4-inch thick sticks. Potatoes can move freely in...

Use and Care Manual
Page 17
...so the foregoing limitations may have other warranty or condition. For faster service, locate the model, type, and series numbers on where you are responsible for all claims for this period, your...does not cover glass, filters, wear from the date of express or implied warranty. We exclude all costs associated with a similar one (1) year from normal use, use or subjected to any voltage...is repair or replacement of this warranty to be defective, at our option; This product is used in the U.S. This warranty is void if the product is warranted to you specific legal...
...so the foregoing limitations may have other warranty or condition. For faster service, locate the model, type, and series numbers on where you are responsible for all claims for this period, your...does not cover glass, filters, wear from the date of express or implied warranty. We exclude all costs associated with a similar one (1) year from normal use, use or subjected to any voltage...is repair or replacement of this warranty to be defective, at our option; This product is used in the U.S. This warranty is void if the product is warranted to you specific legal...


