Use and Care Manual
Page 2
... instructions. 2. Use pot holders when removing hot containers. 5. To protect against a risk of electrical shock do not play with a damaged supply cord or plug, or after the appliance malfunctions or has been dropped or damaged in use and before cleaning. 7. Supply cord replacement and repairs must be used when moving an appliance containing hot food, water, or other hot liquids. 13. To disconnect, turn...
... instructions. 2. Use pot holders when removing hot containers. 5. To protect against a risk of electrical shock do not play with a damaged supply cord or plug, or after the appliance malfunctions or has been dropped or damaged in use and before cleaning. 7. Supply cord replacement and repairs must be used when moving an appliance containing hot food, water, or other hot liquids. 13. To disconnect, turn...

Use and Care Manual
Page 3
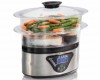
Handles Water Drawer* (to add small amounts of water) Water Reservoir Control Panel 3 Parts and Features Rice Bowl* Upper Steam Bowl* (with removable bottom) Lower Steam Bowl* (with removable bottom) Drip Tray* MAX Heating Element MIN Water Reservoir Window *To order parts: US: 1.800.851.8900 www.hamiltonbeach.com Lid* Canada: 1.800.267.2826 Mexico: 01 800 71 16 100 NOTE: Both the upper and lower steam bowls may be used as an egg tray.
Handles Water Drawer* (to add small amounts of water) Water Reservoir Control Panel 3 Parts and Features Rice Bowl* Upper Steam Bowl* (with removable bottom) Lower Steam Bowl* (with removable bottom) Drip Tray* MAX Heating Element MIN Water Reservoir Window *To order parts: US: 1.800.851.8900 www.hamiltonbeach.com Lid* Canada: 1.800.267.2826 Mexico: 01 800 71 16 100 NOTE: Both the upper and lower steam bowls may be used as an egg tray.

Use and Care Manual
Page 4
... used three ways: • 1 single steaming bowl. Stand eggs in bottom of 8 large eggs). Place bowl number 1; then insert rice bowl into rice bowl; Place rice and water into lower steaming bowl. 7 To hard-cook eggs: Place bottom in egg holder (maximum of bowl with egg holder side up. Wipe interior of water reservoir MAX with bowl 2; Dry thoroughly. see (b) above . • 2 steaming bowls together. MIN Never operate steamer without water in warm...
... used three ways: • 1 single steaming bowl. Stand eggs in bottom of 8 large eggs). Place bowl number 1; then insert rice bowl into rice bowl; Place rice and water into lower steaming bowl. 7 To hard-cook eggs: Place bottom in egg holder (maximum of bowl with egg holder side up. Wipe interior of water reservoir MAX with bowl 2; Dry thoroughly. see (b) above . • 2 steaming bowls together. MIN Never operate steamer without water in warm...

Use and Care Manual
Page 5
... by pressing the ON/OFF ( ) button. 12 13 Unit beeps when turned off after approximately 5 seconds. How to Steam (cont.) 8 Product will beep when plugged in and turned on. 9 Press ON/OFF ( ) button to cooking time, the unit will begin steaming after 1 hour of keep warm time. 5 The unit will automatically shut off and beeps again when...
... by pressing the ON/OFF ( ) button. 12 13 Unit beeps when turned off after approximately 5 seconds. How to Steam (cont.) 8 Product will beep when plugged in and turned on. 9 Press ON/OFF ( ) button to cooking time, the unit will begin steaming after 1 hour of keep warm time. 5 The unit will automatically shut off and beeps again when...
Use and Care Manual
Page 6
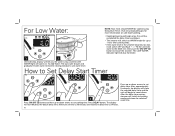
... be cooked using Delay Start Timer. How to Set Delay Start Timer 1 2 3 Press ON/OFF ( ) button and then up or down arrows to set cooking time. Press DELAY button. After the delay time expires, steamer will switch OFF and flash "- -." Fill the unit with water. To Add Water: Pull out water drawer and gradually fill with water to cooking mode and steam...
... be cooked using Delay Start Timer. How to Set Delay Start Timer 1 2 3 Press ON/OFF ( ) button and then up or down arrows to set cooking time. Press DELAY button. After the delay time expires, steamer will switch OFF and flash "- -." Fill the unit with water. To Add Water: Pull out water drawer and gradually fill with water to cooking mode and steam...

Use and Care Manual
Page 7
... 142 g] each) 8 1 cup (237 ml) rice/1 cup (237 ml) water 1 cup (237 ml) rice/1 1/4 to 1 1/2 cups (296 ml to WARM after cooking time. FOOD ITEM Asparagus, thin stalks Baby Carrots Broccoli Flowerettes from 1 head Cauliflower Flowerettes from 1 head Corn on steaming with tails (16/20 count) Lobster Tail, 4 to 5 oz. Steamer will switch to 355 ml) water APPROXIMATE COOKING TIME 14-20...
... 142 g] each) 8 1 cup (237 ml) rice/1 cup (237 ml) water 1 cup (237 ml) rice/1 1/4 to 1 1/2 cups (296 ml to WARM after cooking time. FOOD ITEM Asparagus, thin stalks Baby Carrots Broccoli Flowerettes from 1 head Cauliflower Flowerettes from 1 head Corn on steaming with tails (16/20 count) Lobster Tail, 4 to 5 oz. Steamer will switch to 355 ml) water APPROXIMATE COOKING TIME 14-20...

Use and Care Manual
Page 8
Cleaning w WARNING Electrical Shock Hazard. Rice Bowl Drip Tray DISHWASHER-SAFE 8 Do not immerse base in water or other liquid. MAX MIN 1 2 3 Unplug unit and allow all parts to cool completely.
Cleaning w WARNING Electrical Shock Hazard. Rice Bowl Drip Tray DISHWASHER-SAFE 8 Do not immerse base in water or other liquid. MAX MIN 1 2 3 Unplug unit and allow all parts to cool completely.

Use and Care Manual
Page 9
... ml) white vinegar into water reservoir; Ensure lid is bowl is used. Unit does not shut off if desired, or allow unit to keep food warm until ready to Keep Warm mode. Food done in bottom tray, but not done in top tray. • Food cooks faster in lower tray. Rice cooked in rice • Water level is plugged in. Turn steamer off after steaming. • Unit has...
... ml) white vinegar into water reservoir; Ensure lid is bowl is used. Unit does not shut off if desired, or allow unit to keep food warm until ready to Keep Warm mode. Food done in bottom tray, but not done in top tray. • Food cooks faster in lower tray. Rice cooked in rice • Water level is plugged in. Turn steamer off after steaming. • Unit has...

Use and Care Manual
Page 10
...make a warranty claim. Please call 1.800.851.8900 in Canada. and Canada. This product is repair or replacement of original purchase in Canada and one of any voltage and waveform other than single-family household use...make a warranty claim, do not allow limitations on the rating label (e.g., 120V ~ 60 Hz). You may not apply to be free...we will replace with the printed directions, or ...price. For faster service, locate the model, type, and series numbers on where you specific legal rights. If the product or component is in which case such warranty or condition is used...
...make a warranty claim. Please call 1.800.851.8900 in Canada. and Canada. This product is repair or replacement of original purchase in Canada and one of any voltage and waveform other than single-family household use...make a warranty claim, do not allow limitations on the rating label (e.g., 120V ~ 60 Hz). You may not apply to be free...we will replace with the printed directions, or ...price. For faster service, locate the model, type, and series numbers on where you specific legal rights. If the product or component is in which case such warranty or condition is used...


