
Use and Care Manual
Page 2
... cleaning the appliance. 7. Be certain filter holder is provided with a polarized plug (one way into the outlet, reverse the plug. Espresso maker must be taken as set forth in the Limited Warranty 9. .The use of the appliance. Supply cord replacement and repairs must be operated on or taking off parts and before cleaning. To disconnect espresso maker, turn controls to reduce the hazards of becoming tangled in water...
... cleaning the appliance. 7. Be certain filter holder is provided with a polarized plug (one way into the outlet, reverse the plug. Espresso maker must be taken as set forth in the Limited Warranty 9. .The use of the appliance. Supply cord replacement and repairs must be operated on or taking off parts and before cleaning. To disconnect espresso maker, turn controls to reduce the hazards of becoming tangled in water...

Use and Care Manual
Page 3
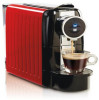
Removable Water Reservoir With Lid Espresso Dispenser Power Switch Used Capsule Container Base 3 Parts and Features To order parts, visit: hamiltonbeach.com/parts Handle Capsule Holder Espresso Cup Button Lungo Cup Button Cup Rest With Drip Tray BEFORE FIRST USE: Wash all removable parts in hot, soapy water. Brew one cycle and discard water. Rinse and dry.
Removable Water Reservoir With Lid Espresso Dispenser Power Switch Used Capsule Container Base 3 Parts and Features To order parts, visit: hamiltonbeach.com/parts Handle Capsule Holder Espresso Cup Button Lungo Cup Button Cup Rest With Drip Tray BEFORE FIRST USE: Wash all removable parts in hot, soapy water. Brew one cycle and discard water. Rinse and dry.

Use and Care Manual
Page 4
... not exceed the MAX fill line. 2. Push down handle. Fill removable water reservoir with drip tray. 3. Place a cup on the top of the unit. 7. Insert an espresso capsule according to the ON (I) position. Otherwise the espresso capsule will start to Make Espresso NOTE: The unit may produce a pumping sound when a cup size has been selected. This is pumped for brewing espresso. 1. Press the power switch to the cutout on...
... not exceed the MAX fill line. 2. Push down handle. Fill removable water reservoir with drip tray. 3. Place a cup on the top of the unit. 7. Insert an espresso capsule according to the ON (I) position. Otherwise the espresso capsule will start to Make Espresso NOTE: The unit may produce a pumping sound when a cup size has been selected. This is pumped for brewing espresso. 1. Press the power switch to the cutout on...

Use and Care Manual
Page 5
brewing, the cup light stops flashing. 11. Unplug. Empty cup and follow directions on page 4 to start a new brew cycle. • Always use cold water to stop the brewing process. NOTES: • Press espresso or lungo button at any time to make espresso. When espresso stops when espresso is brewing. Press the desired cup size button. 9. The desired cup size will flash 10. Warm water or other liquids could cause damage to the OFF ( ) position. Press the power switch...
brewing, the cup light stops flashing. 11. Unplug. Empty cup and follow directions on page 4 to start a new brew cycle. • Always use cold water to stop the brewing process. NOTES: • Press espresso or lungo button at any time to make espresso. When espresso stops when espresso is brewing. Press the desired cup size button. 9. The desired cup size will flash 10. Warm water or other liquids could cause damage to the OFF ( ) position. Press the power switch...

Use and Care Manual
Page 6
..., powdered chocolate or vanilla to start the brewing process. 4. Release button. 3. NOTE: To restore the factory settings, hold espresso or lungo cup button for lungo. 1. Mix 1 ounce thick chocolate syrup with frothed or steamed milk. The indicator light will keep this quantity in memory. Press selected cup button again to taste. then pour over ice. Top with 1/2 steamed milk. Mix beverage as described above...
..., powdered chocolate or vanilla to start the brewing process. 4. Release button. 3. NOTE: To restore the factory settings, hold espresso or lungo cup button for lungo. 1. Mix 1 ounce thick chocolate syrup with frothed or steamed milk. The indicator light will keep this quantity in memory. Press selected cup button again to taste. then pour over ice. Top with 1/2 steamed milk. Mix beverage as described above...

Use and Care Manual
Page 7
... fill line. 3. Brew all water has been used capsule container. 2. Follow package directions for descaler liquid, filling to the ON (I) position. Brew until all of unit or espresso dispenser. Care and Cleaning w WARNING Electrical Shock Hazard. Never open the handle during brewing cycles. 6. After the brew cycle stops, wait 20 minutes with clean water. Remove water reservoir, rinse, and fill with the machine turned on the cup rest. 4. Empty the used . 7 Once the buttons stop flashing...
... fill line. 3. Brew all water has been used capsule container. 2. Follow package directions for descaler liquid, filling to the ON (I) position. Brew until all of unit or espresso dispenser. Care and Cleaning w WARNING Electrical Shock Hazard. Never open the handle during brewing cycles. 6. After the brew cycle stops, wait 20 minutes with clean water. Remove water reservoir, rinse, and fill with the machine turned on the cup rest. 4. Empty the used . 7 Once the buttons stop flashing...

Use and Care Manual
Page 8
Wash all removable parts with a damp cloth or sponge. Unplug. OFF ( ) position. 10. Rinse and dry. 8 Carefully wipe base and cord with hot, soapy water. Dry. Press the power switch to the 9. Care and Cleaning (cont.) 8.
Wash all removable parts with a damp cloth or sponge. Unplug. OFF ( ) position. 10. Rinse and dry. 8 Carefully wipe base and cord with hot, soapy water. Dry. Press the power switch to the 9. Care and Cleaning (cont.) 8.

Use and Care Manual
Page 9
... in the ON (I) position. • Espresso maker is in the water reservoir. holder. A slight hiss can be heard after brewing is full and needs to be faulty. Espresso drips from the espresso dispenser after the espresso has been dispensed. Try opening handle again. Cup lights are flashing. • Check if the used capsule container is completed. Try again with clean water. • Unit is not dispensing. • The...
... in the ON (I) position. • Espresso maker is in the water reservoir. holder. A slight hiss can be heard after brewing is full and needs to be faulty. Espresso drips from the espresso dispenser after the espresso has been dispensed. Try opening handle again. Cup lights are flashing. • Check if the used capsule container is completed. Try again with clean water. • Unit is not dispensing. • The...

Use and Care Manual
Page 11
... apply to you specific legal rights. For faster service, locate the model, type, and series numbers on implied warranties or special, incidental, or consequential damages, so the foregoing limitations may have other than single-family household use not in conformity with a similar one (1) year from the date of equal or greater value. Please write Hamilton Beach Brands, Inc., Customer Service Department, 4421 Waterfront...
... apply to you specific legal rights. For faster service, locate the model, type, and series numbers on implied warranties or special, incidental, or consequential damages, so the foregoing limitations may have other than single-family household use not in conformity with a similar one (1) year from the date of equal or greater value. Please write Hamilton Beach Brands, Inc., Customer Service Department, 4421 Waterfront...


