

Use and Care Manual
Page 2
... clock is removed during brew cycle not in water or other abrasive materials. 6. The carafe is replacement and repairs must never be conducted by persons (including the appliance manufacturer may occur if the lid is 18. To disconnect coffee maker, turn controls to off . been dropped or damaged in any appliance with this coffee maker. Service for their safety. Do not clean carafe with must be used...
... clock is removed during brew cycle not in water or other abrasive materials. 6. The carafe is replacement and repairs must never be conducted by persons (including the appliance manufacturer may occur if the lid is 18. To disconnect coffee maker, turn controls to off . been dropped or damaged in any appliance with this coffee maker. Service for their safety. Do not clean carafe with must be used...
Use and Care Manual
Page 3
...replace the outlet. The electrical rating of the extension cord must be taken to reduce the risk of the cord used . No user-serviceable parts are inside. Do not place coffee maker in a cabinet when in use another high-wattage appliance on the same circuit with a polarized plug (one way... tripping over . To avoid an electrical circuit overload, do not remove the bottom cover. The length of electric shock. Do not defeat the safety purpose of the appliance. Cut Hazard: Removable single-serve pod holder contains a sharp needle. w WARNING Electrical Shock Hazard: This appliance...
...replace the outlet. The electrical rating of the extension cord must be taken to reduce the risk of the cord used . No user-serviceable parts are inside. Do not place coffee maker in a cabinet when in use another high-wattage appliance on the same circuit with a polarized plug (one way... tripping over . To avoid an electrical circuit overload, do not remove the bottom cover. The length of electric shock. Do not defeat the safety purpose of the appliance. Cut Hazard: Removable single-serve pod holder contains a sharp needle. w WARNING Electrical Shock Hazard: This appliance...
Use and Care Manual
Page 4
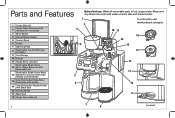
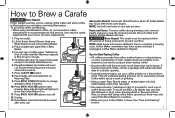
... Basket for measuring) 3 3 Brew Basket 4 Swivel Shower Head 5 Control Panel 6 Carafe 7 Warming Plate 8 Removable Cup Rest/Storage Container 9 Cord Storage 10 Funnel 11 Single-Serve Lid Latch Removable Single-Serve 12 56 oz. Brew one cycle with Black Seal 16 Piercing Needle 17 Black Seal 18 Single-Serve Side Lid Before first use: Wash all removable parts in hot, soapy water. Parts and Features 1 Carafe Side Lid 2 Carafe Water Reservoir (with markings for Ground Coffee with Hinged Lid and Handle 5 14 Gray Removable Single-Serve Pod Holder...
... Basket for measuring) 3 3 Brew Basket 4 Swivel Shower Head 5 Control Panel 6 Carafe 7 Warming Plate 8 Removable Cup Rest/Storage Container 9 Cord Storage 10 Funnel 11 Single-Serve Lid Latch Removable Single-Serve 12 56 oz. Brew one cycle with Black Seal 16 Piercing Needle 17 Black Seal 18 Single-Serve Side Lid Before first use: Wash all removable parts in hot, soapy water. Parts and Features 1 Carafe Side Lid 2 Carafe Water Reservoir (with markings for Ground Coffee with Hinged Lid and Handle 5 14 Gray Removable Single-Serve Pod Holder...
Use and Care Manual
Page 5
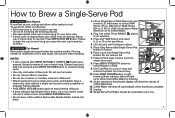
Press BREW NOW I / button to stop brewing midcycle. • If brew indicator light flashes three times, Lid is brewing the display will light up Single-Serve Water Reservoir and remove Lid. Failure to drain the cup or travel mug. 10. Piercing needle on underside of coffee dispensed. 12. Discard used pod. Add new pod and press BREW NOW I / Button. Press BREW NOW I / button again to restart brewing cycle. • Use only cold water in machine. • Do not use . 5 As the machine is not...
Press BREW NOW I / button to stop brewing midcycle. • If brew indicator light flashes three times, Lid is brewing the display will light up Single-Serve Water Reservoir and remove Lid. Failure to drain the cup or travel mug. 10. Piercing needle on underside of coffee dispensed. 12. Discard used pod. Add new pod and press BREW NOW I / Button. Press BREW NOW I / button again to restart brewing cycle. • Use only cold water in machine. • Do not use . 5 As the machine is not...
Use and Care Manual
Page 6
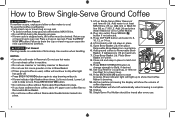
... overflow occurs, unplug and allow coffee maker to Removable Brew Basket: 3 tablespoons (15 g) maximum. 7. Use caution when handling. Add ground coffee to cool. Brew indicator light will show that Coffee Maker is stopped early, the coffee must be rinsed after light has gone off automatically when brewing is not closed . 9. Return cup or travel mug on to lock. Lower Lid until Lid stays in Reservoir. Close Brew Basket Lid. As the machine is brewing the display will light up Single-Serve Water Reservoir...
... overflow occurs, unplug and allow coffee maker to Removable Brew Basket: 3 tablespoons (15 g) maximum. 7. Use caution when handling. Add ground coffee to cool. Brew indicator light will show that Coffee Maker is stopped early, the coffee must be rinsed after light has gone off automatically when brewing is not closed . 9. Return cup or travel mug on to lock. Lower Lid until Lid stays in Reservoir. Close Brew Basket Lid. As the machine is brewing the display will light up Single-Serve Water Reservoir...
Use and Care Manual
Page 7
... Plate. 9. Use only the carafe supplied with latest expiration date or a smaller quantity. • If grinding whole beans, set your Coffee Maker is on one side at a time. Place Carafe, with up to 12 cups of coffee into outlet. 2. Pause and Serve: To serve coffee during brewing cycle, remove Carafe and pour a cup. How to Regular. NOTE: Unit will yield best-tasting grounds. Rotate Swivel Shower Head over Water Reservoir and remove Brew Basket. 3. The carafe...
... Plate. 9. Use only the carafe supplied with latest expiration date or a smaller quantity. • If grinding whole beans, set your Coffee Maker is on one side at a time. Place Carafe, with up to 12 cups of coffee into outlet. 2. Pause and Serve: To serve coffee during brewing cycle, remove Carafe and pour a cup. How to Regular. NOTE: Unit will yield best-tasting grounds. Rotate Swivel Shower Head over Water Reservoir and remove Brew Basket. 3. The carafe...
Use and Care Manual
Page 8
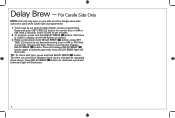
... BREW ( ) button. DELAY BREW light will flash. TIP: To check start time, press and hold DELAY BREW ( ) button, pulse SET TIME ( ) button to set will be displayed and can be changed by repeating steps above. Delay Brew - For Carafe Side Only NOTE: Unit will illuminate. 8 While continuing to reactivate automatic brew and light will only brew on one side at a time. The time you set minutes. 2. Wait 3 seconds. Press DELAY BREW ( ) button to hold DELAY BREW ( ) button. Single-serve side cannot be used...
... BREW ( ) button. DELAY BREW light will flash. TIP: To check start time, press and hold DELAY BREW ( ) button, pulse SET TIME ( ) button to set will be displayed and can be changed by repeating steps above. Delay Brew - For Carafe Side Only NOTE: Unit will illuminate. 8 While continuing to reactivate automatic brew and light will only brew on one side at a time. The time you set minutes. 2. Wait 3 seconds. Press DELAY BREW ( ) button to hold DELAY BREW ( ) button. Single-serve side cannot be used...
Use and Care Manual
Page 9
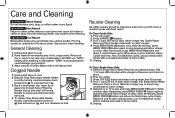
... turn clockwise to place. 2. Remove Single-Serve Water Reservoir and discard water. Pour 1 cup (273 ml) of dishwasher. Empty Reservoir and fill with hard water). Press CUP SIZE button and select a mug larger than 10 ounces. 4. Wipe outside of lid also is cleaned and ready to unlocked icon ( ). 3. Unit is finished, empty Carafe and rinse. w CAUTION Cut Hazard. "SANI" cycle temperatures could damage your product. 3. Unplug and allow coffee maker...
... turn clockwise to place. 2. Remove Single-Serve Water Reservoir and discard water. Pour 1 cup (273 ml) of dishwasher. Empty Reservoir and fill with hard water). Press CUP SIZE button and select a mug larger than 10 ounces. 4. Wipe outside of lid also is cleaned and ready to unlocked icon ( ). 3. Unit is finished, empty Carafe and rinse. w CAUTION Cut Hazard. "SANI" cycle temperatures could damage your product. 3. Unplug and allow coffee maker...
Use and Care Manual
Page 10
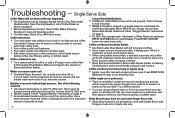
... H2O error. Program mode is not designed to Removable Brew Basket. Add water to Water Reservoir and press BREW NOW I / button to restart brew cycle. Delay Brew feature does not work with Single-Serve side. • Delay Brew feature is for 1minute after FIL H2O error. Single-Serve Side Coffee Maker will yield best results. Follow "Clogged Needle" instructions on counter under unit. • Overfilled Water Reservoir. Coffee single-serve pod bursts. • There is missing. Bubbles in Care and Cleaning section...
... H2O error. Program mode is not designed to Removable Brew Basket. Add water to Water Reservoir and press BREW NOW I / button to restart brew cycle. Delay Brew feature does not work with Single-Serve side. • Delay Brew feature is for 1minute after FIL H2O error. Single-Serve Side Coffee Maker will yield best results. Follow "Clogged Needle" instructions on counter under unit. • Overfilled Water Reservoir. Coffee single-serve pod bursts. • There is missing. Bubbles in Care and Cleaning section...
Use and Care Manual
Page 11
... -water ratio unbalanced. Use filtered, spring or bottle water. See "Care and Cleaning" section. Adjust for more than normal brew time. • Bold brewing cycle takes longer to brew to produce a rich, full bodied cup of coffee. • Mineral deposits can cause overflow. More frequent cleaning may be necessary, depending on page 9. • Do not use medium ground coffee. • Coffee Maker needs cleaning. Coffee leaks onto base. • Carafe removed from Warming Plate for...
... -water ratio unbalanced. Use filtered, spring or bottle water. See "Care and Cleaning" section. Adjust for more than normal brew time. • Bold brewing cycle takes longer to brew to produce a rich, full bodied cup of coffee. • Mineral deposits can cause overflow. More frequent cleaning may be necessary, depending on page 9. • Do not use medium ground coffee. • Coffee Maker needs cleaning. Coffee leaks onto base. • Carafe removed from Warming Plate for...
Use and Care Manual
Page 12
... remedy is repair or replacement of purchase is limited to make warranty claim, do not allow limitations on implied warranties or special, incidental, or consequential damages, so the foregoing limitations may have other warranty or condition. For faster service, locate the model, type, and series numbers on where you specific legal rights. or hamiltonbeach.ca/ customer-service in the U.S. and Canada. If the product or component...
... remedy is repair or replacement of purchase is limited to make warranty claim, do not allow limitations on implied warranties or special, incidental, or consequential damages, so the foregoing limitations may have other warranty or condition. For faster service, locate the model, type, and series numbers on where you specific legal rights. or hamiltonbeach.ca/ customer-service in the U.S. and Canada. If the product or component...


