

Use & Care
Page 2
... our toll-free customer service number for other liquid. 3. Do not use broken, cracked, or loose cutting blades. 14. Do not fill blender jar beyond the 3-cup (750 ml) level. Keep hands and other . Do not use appliance for information on or taking off parts, and before cleaning. 5. Read all instructions. 2. Do not operate any way. 2 The length of the cord used on this appliance was selected to persons. 8. A rubber spatula...
... our toll-free customer service number for other liquid. 3. Do not use broken, cracked, or loose cutting blades. 14. Do not fill blender jar beyond the 3-cup (750 ml) level. Keep hands and other . Do not use appliance for information on or taking off parts, and before cleaning. 5. Read all instructions. 2. Do not operate any way. 2 The length of the cord used on this appliance was selected to persons. 8. A rubber spatula...

Use & Care
Page 3
... Use: After unpacking the blender, wash everything except the blender base in the freezer filled with the exception of the blender is intended for information. Lid* 3. The Type FP04 food processor attachment may draw significantly less power. Call the toll-free customer service number for use . Filler Cap 2. This will damage the motor. Jar 4. 840133000 ENv02.qxd 2/24/05 10:50 AM Page 3 The Hamilton Beach/Proctor-Silex, Inc. Type FP04 food processor attachment is based on available cutting blades and jar...
... Use: After unpacking the blender, wash everything except the blender base in the freezer filled with the exception of the blender is intended for information. Lid* 3. The Type FP04 food processor attachment may draw significantly less power. Call the toll-free customer service number for use . Filler Cap 2. This will damage the motor. Jar 4. 840133000 ENv02.qxd 2/24/05 10:50 AM Page 3 The Hamilton Beach/Proctor-Silex, Inc. Type FP04 food processor attachment is based on available cutting blades and jar...

Use & Care
Page 4
... toll-free customer service number to UNLOCK as button is unplugged. Make sure blender is pushed. Fit gasket over blades. Plug cord into motor during normal use . Place hand on clean, dry surface to wear during operation. 2. See the "Blending Techniques" section for speeds and processing tips. 8. ALWAYS turn to as indicated.) If not, gently rock the jar until blades have stopped rotating before removing jar. 9. and 10-Speed Control Panels* HI OFF LO PULSE BLEND...
... toll-free customer service number to UNLOCK as button is unplugged. Make sure blender is pushed. Fit gasket over blades. Plug cord into motor during normal use . Place hand on clean, dry surface to wear during operation. 2. See the "Blending Techniques" section for speeds and processing tips. 8. ALWAYS turn to as indicated.) If not, gently rock the jar until blades have stopped rotating before removing jar. 9. and 10-Speed Control Panels* HI OFF LO PULSE BLEND...
Use & Care
Page 5
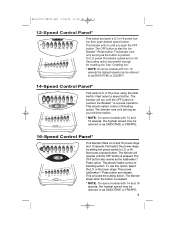
... OFF button. The blender will operate until the OFF button is powerful enough for crushing ice. On LO power the blender pulses and on HI the pulsing action is pressed. This allows instant control of blending action. The blender will run until you hold the switch. * NOTE: On some models with 14 and 16 speeds, the highest speed may be referred to as SMOOTHIE or FRAPPE. 5 To use this...
... OFF button. The blender will operate until the OFF button is powerful enough for crushing ice. On LO power the blender pulses and on HI the pulsing action is pressed. This allows instant control of blending action. The blender will run until you hold the switch. * NOTE: On some models with 14 and 16 speeds, the highest speed may be referred to as SMOOTHIE or FRAPPE. 5 To use this...

Use & Care
Page 6
... foods or liquids in the blender jar. Always remove the filler cap of the jar, turn blender OFF. The blender will provide a professional programmed blending cycle. First select the desired speed. Add about 2 cups (500 ml) of blending. Remove cover and use a rubber spatula to push mixture toward blades. • Do not try to drain off automatically. * NOTE: On some models, the highest speed may be referred to desired consistency. Crushing Ice Fill blender jar...
... foods or liquids in the blender jar. Always remove the filler cap of the jar, turn blender OFF. The blender will provide a professional programmed blending cycle. First select the desired speed. Add about 2 cups (500 ml) of blending. Remove cover and use a rubber spatula to push mixture toward blades. • Do not try to drain off automatically. * NOTE: On some models, the highest speed may be referred to desired consistency. Crushing Ice Fill blender jar...

Use & Care
Page 7
... desired grind consistency is reached. Pour 1 cup (250 ml) heavy or whipping cream in blender jar. Chopped Nuts Place 1 cup (250 ml) nuts in blender jar. Chopping Vegetables Cabbage, carrots, onion, green pepper, potatoes. PULSE until desired chopped consistency is reached. Coffee Beans Place 1⁄2 cup (125 ml) beans in blender jar. BLEND 30 seconds. Grated Baking Chocolate On a cutting board, cut 2 to 3 ounces (50 to drain off...
... desired grind consistency is reached. Pour 1 cup (250 ml) heavy or whipping cream in blender jar. Chopped Nuts Place 1 cup (250 ml) nuts in blender jar. Chopping Vegetables Cabbage, carrots, onion, green pepper, potatoes. PULSE until desired chopped consistency is reached. Coffee Beans Place 1⁄2 cup (125 ml) beans in blender jar. BLEND 30 seconds. Grated Baking Chocolate On a cutting board, cut 2 to 3 ounces (50 to drain off...
Use & Care
Page 8
... to Clean." Carefully wash blades, safety base, gasket, jar (if plastic), and cover in any other dairy products, meats, or seafood. 8 Reassemble cutting unit assembly onto jar, and replace jar onto blender base. 7. Unplug blender from jar. 4. Run the blender on QUICK CLEAN for regular cleaning as instructed in "How to Clean 1. Wipe blender base, control panel, and cord with Cutting Assembly: The filler cap, lid, jar, gasket, and cutting assembly may be used to prevent container odor. Carefully remove blades and gasket from bottom of processing the same food. For...
... to Clean." Carefully wash blades, safety base, gasket, jar (if plastic), and cover in any other dairy products, meats, or seafood. 8 Reassemble cutting unit assembly onto jar, and replace jar onto blender base. 7. Unplug blender from jar. 4. Run the blender on QUICK CLEAN for regular cleaning as instructed in "How to Clean 1. Wipe blender base, control panel, and cord with Cutting Assembly: The filler cap, lid, jar, gasket, and cutting assembly may be used to prevent container odor. Carefully remove blades and gasket from bottom of processing the same food. For...

Use & Care
Page 9
... blender recipes, call our toll-free number or check our Web site at www.hamiltonbeach.com. Makes 48 ounces (1.5 L). PULSE on Ice Breaker 45 seconds or until desired consistency. PULSE on Ice Breaker 45 seconds or until desired consistency. Banana Berry Smoothie 11⁄2 cups (375 ml) milk 2 cups (500 ml) frozen strawberries 2 ripe bananas, broken into pieces Place all ingredients in blender jar...
... blender recipes, call our toll-free number or check our Web site at www.hamiltonbeach.com. Makes 48 ounces (1.5 L). PULSE on Ice Breaker 45 seconds or until desired consistency. PULSE on Ice Breaker 45 seconds or until desired consistency. Banana Berry Smoothie 11⁄2 cups (375 ml) milk 2 cups (500 ml) frozen strawberries 2 ripe bananas, broken into pieces Place all ingredients in blender jar...

Use & Care
Page 10
cover. PULSE on Pulse or IceBreaker for 45 seconds or until done. Makes 32 ounces (950 ml). Pour omelet into jar. Makes 1 omelet. Turn blender off. Serve with spatula. Pour into individual dessert dishes and refrigerate at least 2 hours or until ice is crushed. Makes 32 ounces (950 ml). Cover and process on Ice Breaker 45 seconds or until set ; cover. Process on high...
cover. PULSE on Pulse or IceBreaker for 45 seconds or until done. Makes 32 ounces (950 ml). Pour omelet into jar. Makes 1 omelet. Turn blender off. Serve with spatula. Pour into individual dessert dishes and refrigerate at least 2 hours or until ice is crushed. Makes 32 ounces (950 ml). Cover and process on Ice Breaker 45 seconds or until set ; cover. Process on high...

Use & Care
Page 11
... does not cover a defect resulting from defects in that information below . LIMITED WARRANTY This product is no cost. During this period, we will help us answer your blender. Before calling, please note the model, type, and series numbers and fill in material and workmanship for a period of three (3) years for Hamilton Beach products or one hundred eighty (180) days for operator to...
... does not cover a defect resulting from defects in that information below . LIMITED WARRANTY This product is no cost. During this period, we will help us answer your blender. Before calling, please note the model, type, and series numbers and fill in material and workmanship for a period of three (3) years for Hamilton Beach products or one hundred eighty (180) days for operator to...


