Use & Care
Page 3
... it will freeze and can deliver when power is a measure of input wattage after 30 seconds of becoming tangled in the freezer filled with your blender jar, the round rubber gasket must be pulled on this appliance was selected to or greater than the rating of operation. The wattage rating of the...
... it will freeze and can deliver when power is a measure of input wattage after 30 seconds of becoming tangled in the freezer filled with your blender jar, the round rubber gasket must be pulled on this appliance was selected to or greater than the rating of operation. The wattage rating of the...
Use & Care
Page 4
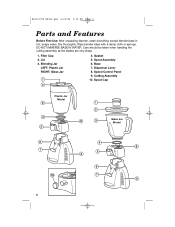
Care should be taken when handling the cutting assembly as the blades are very sharp. 1. Spout Assembly 6. Gasket 5. Dry thoroughly. DO NOT IMMERSE BASE IN WATER. Filler Cap 2. 840153700 ENv02.qxd 6/22/06 5:16 PM Page 4 Parts and Features Before First Use: After unpacking blender, wash everything except blender base in hot, soapy water. Wipe blender base with a damp cloth or sponge. Base 7. Spout Cap Plastic Jar Model Glass Jar Model 4 Dispenser Lever 8. Speed Control Panel 9. Cutting Assembly 10. Lid 3. Blending Jar LEFT: Plastic Jar RIGHT: Glass Jar 4.
Care should be taken when handling the cutting assembly as the blades are very sharp. 1. Spout Assembly 6. Gasket 5. Dry thoroughly. DO NOT IMMERSE BASE IN WATER. Filler Cap 2. 840153700 ENv02.qxd 6/22/06 5:16 PM Page 4 Parts and Features Before First Use: After unpacking blender, wash everything except blender base in hot, soapy water. Wipe blender base with a damp cloth or sponge. Base 7. Spout Cap Plastic Jar Model Glass Jar Model 4 Dispenser Lever 8. Speed Control Panel 9. Cutting Assembly 10. Lid 3. Blending Jar LEFT: Plastic Jar RIGHT: Glass Jar 4.
Use & Care
Page 5
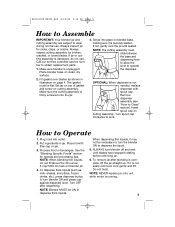
... 4. See the "Blending Specific Foods" section for speeds and processing tips. shakes, smoothies, frozen drinks, etc.), press dispense button to dispense the liquid. 5. Put ingredients in illustration on blender base, making sure it is not easily removed, rock gently and lift. The gasket must slide between the base and dispensing lever to allow the lever to...
... 4. See the "Blending Specific Foods" section for speeds and processing tips. shakes, smoothies, frozen drinks, etc.), press dispense button to dispense the liquid. 5. Put ingredients in illustration on blender base, making sure it is not easily removed, rock gently and lift. The gasket must slide between the base and dispensing lever to allow the lever to...
Use & Care
Page 8
... cutting assembly and gasket may occur if your household dishwasher temperature is fully pushed on spout and rotated clockwise to follow these instructions can result in hot, soapy water. Reassemble cutting unit assembly onto jar, and replace jar onto blender base. Store blender with a damp cloth or sponge. This releases dispenser from electrical outlet...
... cutting assembly and gasket may occur if your household dishwasher temperature is fully pushed on spout and rotated clockwise to follow these instructions can result in hot, soapy water. Reassemble cutting unit assembly onto jar, and replace jar onto blender base. Store blender with a damp cloth or sponge. This releases dispenser from electrical outlet...
Use & Care
Page 9
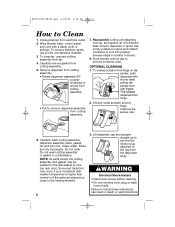
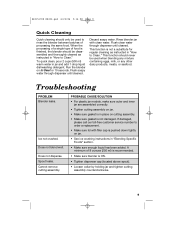
... make sure outer and inner jar are assembled correctly. • Tighten cutting assembly on cutting assembly. • Make sure gasket is ON. • Tighten dispenser cap (located above spout). • Loosen collar by holding jar and tighten cutting assembly counterclockwise. 9 840153700 ENv02.qxd 6/22...8226; See ice crushing instructions in place on jar. • Make sure gasket is in "Blending Specific Foods" section. • Make sure enough liquid has been added. Troubleshooting PROBLEM Blender leaks. Does not dispense. To quick clean, pour 2 cups (500 ml) warm water in "How...
... make sure outer and inner jar are assembled correctly. • Tighten cutting assembly on cutting assembly. • Make sure gasket is ON. • Tighten dispenser cap (located above spout). • Loosen collar by holding jar and tighten cutting assembly counterclockwise. 9 840153700 ENv02.qxd 6/22...8226; See ice crushing instructions in place on jar. • Make sure gasket is in "Blending Specific Foods" section. • Make sure enough liquid has been added. Troubleshooting PROBLEM Blender leaks. Does not dispense. To quick clean, pour 2 cups (500 ml) warm water in "How...
Use & Care
Page 12
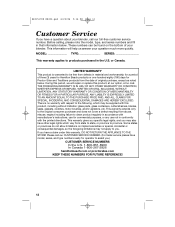
....qxd 6/22/06 5:16 PM Page 12 Customer Service If you have a claim ...gaskets, clutches, motor brushes, and/or agitators, etc. LIMITED WARRANTY This product is no cost. These numbers can be found on implied warranties or special, incidental or consequential damages, so the foregoing limitations may be free from defects in material and workmanship for a period of three (3) years for Hamilton Beach... products or one hundred eighty (180) days for Proctor-Silex and Traditions products from the date of your blender. This warranty extends only to the ...
....qxd 6/22/06 5:16 PM Page 12 Customer Service If you have a claim ...gaskets, clutches, motor brushes, and/or agitators, etc. LIMITED WARRANTY This product is no cost. These numbers can be found on implied warranties or special, incidental or consequential damages, so the foregoing limitations may be free from defects in material and workmanship for a period of three (3) years for Hamilton Beach... products or one hundred eighty (180) days for Proctor-Silex and Traditions products from the date of your blender. This warranty extends only to the ...


