Use & Care
Page 2
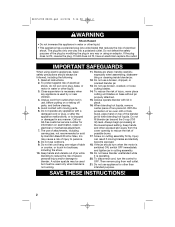
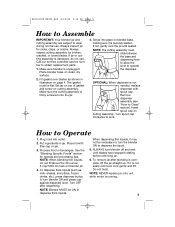
...cracked, or loose cutting blades. 14. especially when assembling, disassembling or cleaning inside blender jar. 12. Do not fill blender jar beyond the 3-cup (750 ml) level. Always begin processing at the lowest speed setting. If the plug does not fit, reverse the plug. Avoid contact with ...toll-free customer service number for other than intended purpose. The use , before putting on or taking off parts, and before cleaning. 5. With the protection of the plug by Hamilton Beach/Proctor-Silex, Inc. 840153700 ENv02.qxd 6/22/06 5:16 PM Page 2 wWARNING Shock Hazard • Do...
...cracked, or loose cutting blades. 14. especially when assembling, disassembling or cleaning inside blender jar. 12. Do not fill blender jar beyond the 3-cup (750 ml) level. Always begin processing at the lowest speed setting. If the plug does not fit, reverse the plug. Avoid contact with ...toll-free customer service number for other than intended purpose. The use , before putting on or taking off parts, and before cleaning. 5. With the protection of the plug by Hamilton Beach/Proctor-Silex, Inc. 840153700 ENv02.qxd 6/22/06 5:16 PM Page 2 wWARNING Shock Hazard • Do...
Use & Care
Page 3
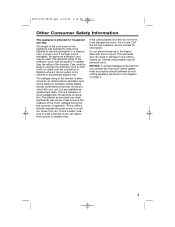
...crush ice, frozen fruit, etc. This is a measure of input wattage after 30 seconds of operation. NOTICE: To prevent leakage of the blender is determined by children or accidentally tripped over , a longer cord. Peak power is the measure of the motor wattage during the first ... unit, but are available as replacement parts. The blender as shown in personal injury. This is a better measure of the blender. Call the toll-free customer service number for household use . Do not place blender jar in the freezer filled with your blender jar, the round rubber gasket must ...
...crush ice, frozen fruit, etc. This is a measure of input wattage after 30 seconds of operation. NOTICE: To prevent leakage of the blender is determined by children or accidentally tripped over , a longer cord. Peak power is the measure of the motor wattage during the first ... unit, but are available as replacement parts. The blender as shown in personal injury. This is a better measure of the blender. Call the toll-free customer service number for household use . Do not place blender jar in the freezer filled with your blender jar, the round rubber gasket must ...
Use & Care
Page 4
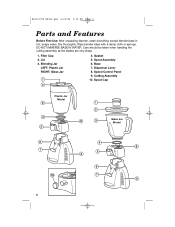
Dry thoroughly. Filler Cap 2. Spout Assembly 6. DO NOT IMMERSE BASE IN WATER. Base 7. Gasket 5. Spout Cap Plastic Jar Model Glass Jar Model 4 Wipe blender base with a damp cloth or sponge. Care should be taken when handling the cutting assembly as the blades are very sharp. 1. Blending Jar LEFT: Plastic Jar RIGHT: Glass Jar 4. Dispenser Lever 8. 840153700 ENv02.qxd 6/22/06 5:16 PM Page 4 Parts and Features Before First Use: After unpacking blender, wash everything except blender base in hot, soapy water. Speed Control Panel 9. Cutting Assembly 10. Lid 3.
Dry thoroughly. Filler Cap 2. Spout Assembly 6. DO NOT IMMERSE BASE IN WATER. Base 7. Gasket 5. Spout Cap Plastic Jar Model Glass Jar Model 4 Wipe blender base with a damp cloth or sponge. Care should be taken when handling the cutting assembly as the blades are very sharp. 1. Blending Jar LEFT: Plastic Jar RIGHT: Glass Jar 4. Dispenser Lever 8. 840153700 ENv02.qxd 6/22/06 5:16 PM Page 4 Parts and Features Before First Use: After unpacking blender, wash everything except blender base in hot, soapy water. Speed Control Panel 9. Cutting Assembly 10. Lid 3.
Use & Care
Page 5
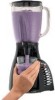
... jar into outlet. 2. Remove dispenser assembly (see "How to obtain replacement parts. 1. Process food or beverages. Turn OFF after blending is complete, lift the jar straight up. NOTE: Blender MUST be necessary to turn the blender ON to dispense the liquid. 5. Always inspect ...etc.), press dispense button to turn blender off and wait until seated. ALWAYS turn blender ON and press cup against dispenser lever. Make sure blender is firmly screwed onto the jar. 4. Place blender base on cutting assembly. See the "Blending Specific Foods" section for speeds and processing tips...
... jar into outlet. 2. Remove dispenser assembly (see "How to obtain replacement parts. 1. Process food or beverages. Turn OFF after blending is complete, lift the jar straight up. NOTE: Blender MUST be necessary to turn the blender ON to dispense the liquid. 5. Always inspect ...etc.), press dispense button to turn blender off and wait until seated. ALWAYS turn blender ON and press cup against dispenser lever. Make sure blender is firmly screwed onto the jar. 4. Place blender base on cutting assembly. See the "Blending Specific Foods" section for speeds and processing tips...
Use & Care
Page 8
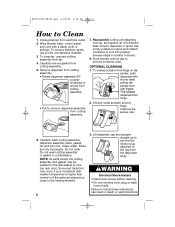
... not soak. Carefully remove gasket from hinge. 2. This releases dispenser from cutting assembly. 5. Failure to Clean 1. Unplug blender from electrical outlet. 2. Wipe blender base, control panel, and cord with lid ajar to lock into position (reverse steps in a dishwasher. Unscrew dispenser cap. 6. NOTE: All parts except the cutting assembly and gasket may occur if your...
... not soak. Carefully remove gasket from hinge. 2. This releases dispenser from cutting assembly. 5. Failure to Clean 1. Unplug blender from electrical outlet. 2. Wipe blender base, control panel, and cord with lid ajar to lock into position (reverse steps in a dishwasher. Unscrew dispenser cap. 6. NOTE: All parts except the cutting assembly and gasket may occur if your...
Use & Care
Page 12
... to products purchased in that information below . During this period, we will help us answer your blender, call our CUSTOMER SERVICE NUMBER. (For faster service please have model, series, and type numbers...06 5:16 PM Page 12 Customer Service If you may also have other legal rights which may be free from defects in material and workmanship for a period of three (3) years for Hamilton Beach products or one hundred...supplied with this product, including without limitation: glass parts, glass containers, cutter/strainers, blades, seals, gaskets, clutches, motor brushes, and/or agitators, etc.
... to products purchased in that information below . During this period, we will help us answer your blender, call our CUSTOMER SERVICE NUMBER. (For faster service please have model, series, and type numbers...06 5:16 PM Page 12 Customer Service If you may also have other legal rights which may be free from defects in material and workmanship for a period of three (3) years for Hamilton Beach products or one hundred...supplied with this product, including without limitation: glass parts, glass containers, cutter/strainers, blades, seals, gaskets, clutches, motor brushes, and/or agitators, etc.


