Use & Care
Page 2
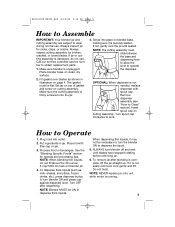
...jars, not recommended or sold by Hamilton Beach/Proctor-Silex, Inc. IMPORTANT SAFEGUARDS When using an adaptor. Close supervision is necessary when any appliance with a damaged cord or plug, or after the appliance malfunctions, or is not running. 11. Do not operate any appliance is used only when blender... for information on base without jar properly attached. 15. Always begin processing at the lowest speed setting. Keep hands and other... or cleaning inside blender jar. 12. To reduce the risk of injury to blender. With the protection of the blender jar lid while blending ...
...jars, not recommended or sold by Hamilton Beach/Proctor-Silex, Inc. IMPORTANT SAFEGUARDS When using an adaptor. Close supervision is necessary when any appliance with a damaged cord or plug, or after the appliance malfunctions, or is not running. 11. Do not operate any appliance is used only when blender... for information on base without jar properly attached. 15. Always begin processing at the lowest speed setting. Keep hands and other... or cleaning inside blender jar. 12. To reduce the risk of injury to blender. With the protection of the blender jar lid while blending ...
Use & Care
Page 3
If a longer cord is necessary, an approved extension cord may be provided with food or liquid. Do not place blender jar in the freezer filled with your blender jar, the round rubber gasket must be taken to arrange the extension cord so that it will not drape over the countertop or... tabletop where it will freeze and can be pulled on available cutting blades and jar combinations that may draw significantly less power. This is when a blender requires the most . This is the measure of the motor wattage during the first seconds of operation. ...
If a longer cord is necessary, an approved extension cord may be provided with food or liquid. Do not place blender jar in the freezer filled with your blender jar, the round rubber gasket must be taken to arrange the extension cord so that it will not drape over the countertop or... tabletop where it will freeze and can be pulled on available cutting blades and jar combinations that may draw significantly less power. This is when a blender requires the most . This is the measure of the motor wattage during the first seconds of operation. ...
Use & Care
Page 4
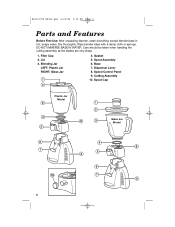
Filler Cap 2. Spout Assembly 6. Cutting Assembly 10. DO NOT IMMERSE BASE IN WATER. Blending Jar LEFT: Plastic Jar RIGHT: Glass Jar 4. Base 7. Gasket 5. Dry thoroughly. Dispenser Lever 8. Wipe blender base with a damp cloth or sponge. Spout Cap Plastic Jar Model Glass Jar Model 4 Care should be taken when handling the cutting assembly as the blades are very sharp. 1. Lid 3. 840153700 ENv02.qxd 6/22/06 5:16 PM Page 4 Parts and Features Before First Use: After unpacking blender, wash everything except blender base in hot, soapy water. Speed Control Panel 9.
Filler Cap 2. Spout Assembly 6. Cutting Assembly 10. DO NOT IMMERSE BASE IN WATER. Blending Jar LEFT: Plastic Jar RIGHT: Glass Jar 4. Base 7. Gasket 5. Dry thoroughly. Dispenser Lever 8. Wipe blender base with a damp cloth or sponge. Spout Cap Plastic Jar Model Glass Jar Model 4 Care should be taken when handling the cutting assembly as the blades are very sharp. 1. Lid 3. 840153700 ENv02.qxd 6/22/06 5:16 PM Page 4 Parts and Features Before First Use: After unpacking blender, wash everything except blender base in hot, soapy water. Speed Control Panel 9.
Use & Care
Page 5
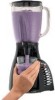
...do not fill above the 40-ounce/ 5 cup/1200 ml mark on blender jar. 4. Insert spout cap on cutting assembly. How to Clean" section). NOTE: Blender MUST be necessary to turn blender ON and press cup against dispenser lever. 840153700 ENv02.qxd 6/22/06 5:16 PM Page 5 How to...to lock. Process food or beverages. Put ingredients in illustration on jar. 3. See the "Blending Specific Foods" section for speeds and processing tips. The gasket must slide between the base and dispensing lever to allow the lever to dispense the liquid. 5. NOTE: When blending thin liquids, do not...
...do not fill above the 40-ounce/ 5 cup/1200 ml mark on blender jar. 4. Insert spout cap on cutting assembly. How to Clean" section). NOTE: Blender MUST be necessary to turn blender ON and press cup against dispenser lever. 840153700 ENv02.qxd 6/22/06 5:16 PM Page 5 How to...to lock. Process food or beverages. Put ingredients in illustration on jar. 3. See the "Blending Specific Foods" section for speeds and processing tips. The gasket must slide between the base and dispensing lever to allow the lever to dispense the liquid. 5. NOTE: When blending thin liquids, do not...
Use & Care
Page 6
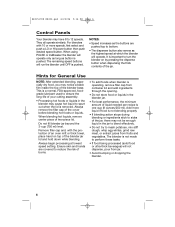
... action stops during blending or ingredients stick to sides of the jar, there may not be enough liquid in the blender jar. • For best performance, the minimum amount of burns. • To add foods when blender is operating, remove filler cap from container lid and add ingredients...by pressing the dispense button when dispensing the thick contents of the cover before blending hot foods or liquids. It is not made to 12 speeds. They all operate similarly. When using PULSE or IceBreaker the blender will operate only as long as the highest speed at lowest speed setting. Always ...
... action stops during blending or ingredients stick to sides of the jar, there may not be enough liquid in the blender jar. • For best performance, the minimum amount of burns. • To add foods when blender is operating, remove filler cap from container lid and add ingredients...by pressing the dispense button when dispensing the thick contents of the cover before blending hot foods or liquids. It is not made to 12 speeds. They all operate similarly. When using PULSE or IceBreaker the blender will operate only as long as the highest speed at lowest speed setting. Always ...
Use & Care
Page 7
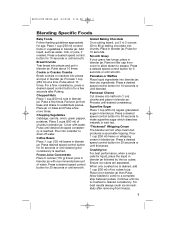
... Place 6 ounces (170 g) frozen juice in blender jar. Press a desired speed control button for 10 seconds or until smooth. Place jar on blender jar then Pulse. Coffee Beans Place 1⁄2 cup (125 ml) beans in blender jar. Press a desired speed control button for 20 seconds or until blended. ... Chopped Nuts Place 1 cup (250 ml) nuts in blender jar followed by the ice cubes. Press desired speed control button for liquid, place the liquid in blender jar. Pulse for a few times. Press a desired speed control button for 10 seconds or until smooth. Allow blades...
... Place 6 ounces (170 g) frozen juice in blender jar. Press a desired speed control button for 10 seconds or until smooth. Place jar on blender jar then Pulse. Coffee Beans Place 1⁄2 cup (125 ml) beans in blender jar. Press a desired speed control button for 20 seconds or until blended. ... Chopped Nuts Place 1 cup (250 ml) nuts in blender jar followed by the ice cubes. Press desired speed control button for liquid, place the liquid in blender jar. Pulse for a few times. Press a desired speed control button for 10 seconds or until smooth. Allow blades...
Use & Care
Page 8
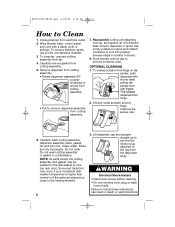
... may be washed in the dishwasher (on spout and rotated clockwise to remove dispenser assembly from jar. 4. 840153700 ENv02.qxd 6/22/06 5:16 PM Page 8 How to follow these instructions can result in death or electrical shock. Unscrew dispenser cap. 6. Wipe blender base, control panel, and cord with a damp cloth or sponge. Carefully remove...
... may be washed in the dishwasher (on spout and rotated clockwise to remove dispenser assembly from jar. 4. 840153700 ENv02.qxd 6/22/06 5:16 PM Page 8 How to follow these instructions can result in death or electrical shock. Unscrew dispenser cap. 6. Wipe blender base, control panel, and cord with a damp cloth or sponge. Carefully remove...
Use & Care
Page 9
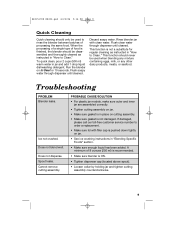
... instructed in "How to Clean." Discard soapy water. Troubleshooting PROBLEM Blender leaks. Does not dispense. PROBABLE CAUSE/SOLUTION • For plastic jar models, make sure outer and inner jar are assembled correctly. • Tighten cutting assembly on jar. • Make sure gasket is finished, the blender should be disassembled and thoroughly cleaned as instructed in "How...
... instructed in "How to Clean." Discard soapy water. Troubleshooting PROBLEM Blender leaks. Does not dispense. PROBABLE CAUSE/SOLUTION • For plastic jar models, make sure outer and inner jar are assembled correctly. • Tighten cutting assembly on jar. • Make sure gasket is finished, the blender should be disassembled and thoroughly cleaned as instructed in "How...
Use & Care
Page 10
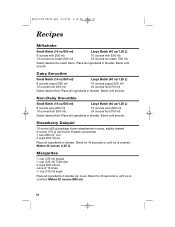
... strawberries in syrup, slightly thawed 6-ounce (170 g) can frozen limeade concentrate 1 cup (250 ml) rum 2 cups (500 ml) ice Place all ingredients in blender jar; Margaritas 1⁄2 cup (125 ml) tequila 1⁄2 cup (125 ml) Triple Sec 2 cups (500 ml) ice Juice of 16 limes 1⁄2 cup ...ml) 16 ounces juice (500 ml) 24 ounces fruit (750 ml) Select desired fruit. Blend until smooth. Place all ingredients in blender. Place all ingredients in blender. 840153700 ENv02.qxd 6/22/06 5:16 PM Page 10 Recipes Milkshake Small Batch (16 oz/500 ml) Large Batch (40 oz/1....
... strawberries in syrup, slightly thawed 6-ounce (170 g) can frozen limeade concentrate 1 cup (250 ml) rum 2 cups (500 ml) ice Place all ingredients in blender jar; Margaritas 1⁄2 cup (125 ml) tequila 1⁄2 cup (125 ml) Triple Sec 2 cups (500 ml) ice Juice of 16 limes 1⁄2 cup ...ml) 16 ounces juice (500 ml) 24 ounces fruit (750 ml) Select desired fruit. Blend until smooth. Place all ingredients in blender. Place all ingredients in blender. 840153700 ENv02.qxd 6/22/06 5:16 PM Page 10 Recipes Milkshake Small Batch (16 oz/500 ml) Large Batch (40 oz/1....
Use & Care
Page 11
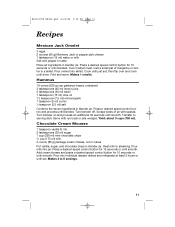
...;2 teaspoon (2.5 ml) salt Combine the seven ingredients in a skillet. Scrape sides of margarine or butter in blender jar. Serve with spatula. Pour milk into skillet. Press a desired speed control button for 10 seconds or until just set . Cook until smooth. Makes 1 omelet. Transfer to steaming...package cream cheese, cut in cubes Put vanilla, sugar, and chocolate chips in blender jar. Pour omelet into jar. Fold and serve. Press a desired speed control button for 15 seconds or until smooth. Turn blender on and process an additional 30 seconds until smooth. Yield: about 3 cups...
...;2 teaspoon (2.5 ml) salt Combine the seven ingredients in a skillet. Scrape sides of margarine or butter in blender jar. Serve with spatula. Pour milk into skillet. Press a desired speed control button for 10 seconds or until just set . Cook until smooth. Makes 1 omelet. Transfer to steaming...package cream cheese, cut in cubes Put vanilla, sugar, and chocolate chips in blender jar. Pour omelet into jar. Fold and serve. Press a desired speed control button for 15 seconds or until smooth. Turn blender on and process an additional 30 seconds until smooth. Yield: about 3 cups...


