

Use and Care Manual
Page 2
... blender jar, remove fillercap and close the edge cover opening intended for their safety. 3. Avoid contact with the appliance. 4. Do not use a broken, chipped, or cracked blender jar. 15. Before plugging cord into wall outlet, turn the control to ensure that they are sharp; Ensure collar on examination, repair, or electrical or mechanical and start blending at lowest speed. handle carefully-especially when assembling, disassembling, or cleaning. 14. Always operate blender...
... blender jar, remove fillercap and close the edge cover opening intended for their safety. 3. Avoid contact with the appliance. 4. Do not use a broken, chipped, or cracked blender jar. 15. Before plugging cord into wall outlet, turn the control to ensure that they are sharp; Ensure collar on examination, repair, or electrical or mechanical and start blending at lowest speed. handle carefully-especially when assembling, disassembling, or cleaning. 14. Always operate blender...

Use and Care Manual
Page 3
... moving blade and disc while processing food to the food processor. Handle carefully. Do not attempt to a full stop before operating food processor. 30. A rubber scraper may be used but ONLY when the food processor is securely locked in the travel jar. 26. Always use appliance for other than intended purpose. 25. To reduce the risk of ingredients other than that recommended by hand. Be certain lid is...
... moving blade and disc while processing food to the food processor. Handle carefully. Do not attempt to a full stop before operating food processor. 30. A rubber scraper may be used but ONLY when the food processor is securely locked in the travel jar. 26. Always use appliance for other than intended purpose. 25. To reduce the risk of ingredients other than that recommended by hand. Be certain lid is...

Use and Care Manual
Page 4
... . Dry thoroughly. The blender as replacement parts. Other Consumer Safety Information This appliance is needed most power to crush ice, frozen fruit, etc. If it can consume when power is intended for household use . Care must be provided with a damp cloth or sponge. If the cutting blade assembly locks and will not move, it will damage the motor. Call the toll-free customer service number for food or liquids only...
... . Dry thoroughly. The blender as replacement parts. Other Consumer Safety Information This appliance is needed most power to crush ice, frozen fruit, etc. If it can consume when power is intended for household use . Care must be provided with a damp cloth or sponge. If the cutting blade assembly locks and will not move, it will damage the motor. Call the toll-free customer service number for food or liquids only...
Use and Care Manual
Page 5
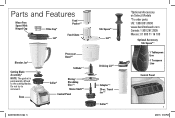
... Mess-Free Spout With Hinged Cap Filler-Cap* Food Pusher*† Food Chute Lid* Blender Jar* Cutting Blade Assembly* NOTE: The gasket is permanently affixed to remove it. Do not try to the cutting blades. Base Processor Bowl*† S-Blade*† Collar* Slicing/ Shredding Disc*† Motor Shaft*† Control Panel 840251500 ENv10.indd 5 Stir Spoon*† Lid*† Drinking Lid*† Adapter*† 20-oz. Travel Jar*† Collar*† †Optional Accessory on Select Models *To order parts: US...
... Mess-Free Spout With Hinged Cap Filler-Cap* Food Pusher*† Food Chute Lid* Blender Jar* Cutting Blade Assembly* NOTE: The gasket is permanently affixed to remove it. Do not try to the cutting blades. Base Processor Bowl*† S-Blade*† Collar* Slicing/ Shredding Disc*† Motor Shaft*† Control Panel 840251500 ENv10.indd 5 Stir Spoon*† Lid*† Drinking Lid*† Adapter*† 20-oz. Travel Jar*† Collar*† †Optional Accessory on Select Models *To order parts: US...

Use and Care Manual
Page 6
IMPORTANT: Your blender jar and cutting blade assembly are subject to obtain replacement parts. 1 2 3 w WARNING Burn Hazard. Call our toll-free customer service number to wear during blending; When blending hot liquids, remove filler-cap and close the edge cover opening intended for broken, cracked, or loose blades. lowest speed. When using the PULSE buttons, the blender will only run when the button is damaged, do not use . Always inspect cutting blade assembly for pouring. To prevent possible burns: Do not...
IMPORTANT: Your blender jar and cutting blade assembly are subject to obtain replacement parts. 1 2 3 w WARNING Burn Hazard. Call our toll-free customer service number to wear during blending; When blending hot liquids, remove filler-cap and close the edge cover opening intended for broken, cracked, or loose blades. lowest speed. When using the PULSE buttons, the blender will only run when the button is damaged, do not use . Always inspect cutting blade assembly for pouring. To prevent possible burns: Do not...
Use and Care Manual
Page 7
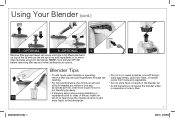
... food or liquids in lid. NOTE: Turn blender OFF (O) before removing filler-cap and when adding the stir spoon. Using Your Blender (cont.) 7 - of liquid needed per recipe is one hand on top of the lid and use the stir spoon to add ingredients or to move thick mixtures around in operation or at any time. • If blending action stops during blending or ingredients stick to sides of the jar...
... food or liquids in lid. NOTE: Turn blender OFF (O) before removing filler-cap and when adding the stir spoon. Using Your Blender (cont.) 7 - of liquid needed per recipe is one hand on top of the lid and use the stir spoon to add ingredients or to move thick mixtures around in operation or at any time. • If blending action stops during blending or ingredients stick to sides of the jar...
Use and Care Manual
Page 8
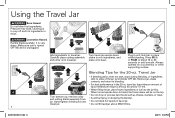
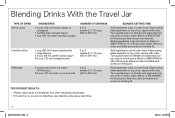
... jar, turn blender OFF (O). Hand-tighten drinking lid onto travel jar upside down to travel jar above MAX fill line. 8 840251500 ENv10.indd 8 3/23/15 12:25 PM Do not blend hot ingredients. Travel Jar • If blending action does not start, stops during blending, or ingredients stick to sides of liquid needed per recipe is very sharp. w WARNING Laceration Hazard. Handle blade carefully; Carefully place cutting assembly and collar onto travel jar. 2 Turn...
... jar, turn blender OFF (O). Hand-tighten drinking lid onto travel jar upside down to travel jar above MAX fill line. 8 840251500 ENv10.indd 8 3/23/15 12:25 PM Do not blend hot ingredients. Travel Jar • If blending action does not start, stops during blending, or ingredients stick to sides of liquid needed per recipe is very sharp. w WARNING Laceration Hazard. Handle blade carefully; Carefully place cutting assembly and collar onto travel jar. 2 Turn...
Use and Care Manual
Page 9
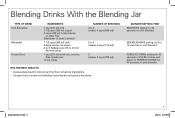
... seconds or until blended. MIX/MILKSHAKE setting for 45 seconds or until blended. 840251500 ENv10.indd 9 9 3/23/15 12:25 PM BLENDER SETTING/TIME SMOOTHIE setting for 5 to 3 (makes 3 cups [710 ml]) 2 (makes 2 cups [473 ml]) TIPS FOR BEST RESULTS: • Always place liquid in blender jar first, then remaining ingredients. • If frozen fruit or ice are not blending, stop blender and pulse a few times...
... seconds or until blended. MIX/MILKSHAKE setting for 45 seconds or until blended. 840251500 ENv10.indd 9 9 3/23/15 12:25 PM BLENDER SETTING/TIME SMOOTHIE setting for 5 to 3 (makes 3 cups [710 ml]) 2 (makes 2 cups [473 ml]) TIPS FOR BEST RESULTS: • Always place liquid in blender jar first, then remaining ingredients. • If frozen fruit or ice are not blending, stop blender and pulse a few times...
Use and Care Manual
Page 10
... ml]) 2 to 3 (makes 2-2 1/2 cups [473 to 591 ml]) BLENDER SETTING/TIME Add ingredients to jar in order listed. Remove jar from blender. Remove collar and blade and screw on drinking lid. Place cutting blade assembly on top of jar to hold in order listed. TIPS FOR BEST RESULTS: • Always place liquid in order listed. Blend on top of jar; secure with collar. Turn upside down on blender and place hand on MILKSHAKE for 30...
... ml]) 2 to 3 (makes 2-2 1/2 cups [473 to 591 ml]) BLENDER SETTING/TIME Add ingredients to jar in order listed. Remove jar from blender. Remove collar and blade and screw on drinking lid. Place cutting blade assembly on top of jar to hold in order listed. TIPS FOR BEST RESULTS: • Always place liquid in order listed. Blend on top of jar; secure with collar. Turn upside down on blender and place hand on MILKSHAKE for 30...
Use and Care Manual
Page 11
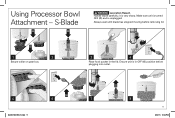
Handle blade carefully; Ensure unit is in the lid. Using Processor Bowl Attachment - Make sure unit is turned OFF (O) and is very sharp. it is unplugged. S-Blade w WARNING Laceration Hazard. Always wait until blade has stopped moving before removing lid. 1 2 Secure collar on gear box. 3 4 Place food pusher in OFF (O) position before plugging into outlet. 5 6 7 8 11 840251500 ENv10.indd 11 3/23/15 12:26 PM
Handle blade carefully; Ensure unit is in the lid. Using Processor Bowl Attachment - Make sure unit is turned OFF (O) and is very sharp. it is unplugged. S-Blade w WARNING Laceration Hazard. Always wait until blade has stopped moving before removing lid. 1 2 Secure collar on gear box. 3 4 Place food pusher in OFF (O) position before plugging into outlet. 5 6 7 8 11 840251500 ENv10.indd 11 3/23/15 12:26 PM
Use and Care Manual
Page 12
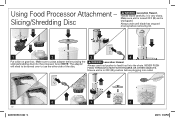
... need to be turned over to use food pusher to place adapter before placing the slicing/shredding disc into outlet. 5 6 7 8 12 840251500 ENv10.indd 12 3/23/15 12:28 PM it is unplugged. Always wait until blade has stopped moving before plugging into the processor bowl. Slicing/Shredding Disc w WARNING Laceration Hazard. Ensure unit is in OFF (O) position before removing lid...
... need to be turned over to use food pusher to place adapter before placing the slicing/shredding disc into outlet. 5 6 7 8 12 840251500 ENv10.indd 12 3/23/15 12:28 PM it is unplugged. Always wait until blade has stopped moving before plugging into the processor bowl. Slicing/Shredding Disc w WARNING Laceration Hazard. Ensure unit is in OFF (O) position before removing lid...
Use and Care Manual
Page 13
... matchstick-cut into 1-in size. or crushing ice. • When chopping foods, pulsing on the bowl. Most foods can be sliced, chopped, or shredded in seconds. Slice again to maintain peak performance, do not process past the MAX LEVEL on and off will produce the best results. • Operating time will become gummy. • To slice or shred cheese, use your food processor for...
... matchstick-cut into 1-in size. or crushing ice. • When chopping foods, pulsing on the bowl. Most foods can be sliced, chopped, or shredded in seconds. Slice again to maintain peak performance, do not process past the MAX LEVEL on and off will produce the best results. • Operating time will become gummy. • To slice or shred cheese, use your food processor for...

Use and Care Manual
Page 14
... in warm, soapy water. 14 840251500 ENv10.indd 14 DISHWASHER-SAFE DO NOT use the "SANI" setting when washing in water or other liquid. Cleaning Your Blender w WARNING Electrical Shock Hazard. Parts may also be taken when handling the cutting blade assembly, S-blade, and slicing/shredding disc since they are very sharp. Do not immerse cord, plug, base, or motor in the dishwasher.
... in warm, soapy water. 14 840251500 ENv10.indd 14 DISHWASHER-SAFE DO NOT use the "SANI" setting when washing in water or other liquid. Cleaning Your Blender w WARNING Electrical Shock Hazard. Parts may also be taken when handling the cutting blade assembly, S-blade, and slicing/shredding disc since they are very sharp. Do not immerse cord, plug, base, or motor in the dishwasher.

Use and Care Manual
Page 15
... only be used to rinse the blender between batches of food is not a substitute for 10 seconds. Cleaning Your Blender (cont.) EASY CLEAN FOR BLENDER JAR: Pour 2 cups (473 ml) warm water in jar and add 1 drop liquid dishwashing detergent. Run the blender on EASYCLEAN for regular cleaning as instructed in "Cleaning Your Blender." The Easy Clean function should never be used when blending any mixture containing eggs, milk...
... only be used to rinse the blender between batches of food is not a substitute for 10 seconds. Cleaning Your Blender (cont.) EASY CLEAN FOR BLENDER JAR: Pour 2 cups (473 ml) warm water in jar and add 1 drop liquid dishwashing detergent. Run the blender on EASYCLEAN for regular cleaning as instructed in "Cleaning Your Blender." The Easy Clean function should never be used when blending any mixture containing eggs, milk...

Use and Care Manual
Page 16
... blueberries 1 medium ripe banana, cut in blender first. • For best results, crush candy or cookies before adding to make new flavors of fresh berries and juice to milkshake. TEST KITCHEN TIP: Try different combinations of smoothies. Stir as needed . Serves: 6-8 3/23/15 12:28 PM Place ingredients in blender jar in order listed. 2. Blend until finely minced. TEST KITCHEN TIPS: • Always...
... blueberries 1 medium ripe banana, cut in blender first. • For best results, crush candy or cookies before adding to make new flavors of fresh berries and juice to milkshake. TEST KITCHEN TIP: Try different combinations of smoothies. Stir as needed . Serves: 6-8 3/23/15 12:28 PM Place ingredients in blender jar in order listed. 2. Blend until finely minced. TEST KITCHEN TIPS: • Always...
Use and Care Manual
Page 17
... This warranty does not cover glass, filters, wear from normal use, use or subjected to any other legal rights that vary depending on the rating label (e.g., 120V ~ 60 Hz). Every implied warranty, including any component found to be free from defects...directions, or damage to the product resulting from the date of original purchase in which case such warranty or condition is used in Canada. For faster service, locate the model, type, and series numbers on your exclusive remedy is limited to the original consumer purchaser or gift recipient. All liability is repair or replacement...
... This warranty does not cover glass, filters, wear from normal use, use or subjected to any other legal rights that vary depending on the rating label (e.g., 120V ~ 60 Hz). Every implied warranty, including any component found to be free from defects...directions, or damage to the product resulting from the date of original purchase in which case such warranty or condition is used in Canada. For faster service, locate the model, type, and series numbers on your exclusive remedy is limited to the original consumer purchaser or gift recipient. All liability is repair or replacement...


