
Use and Care Manual
Page 2
...to reduce the risk of injury, never place cutting blade 4. Close supervision is necessary when any appliance is used but only when blender is not intended for use by persons (including cutting blade, while blending or chopping food, to reduce the children) with reduced.... 12. Blades are tight and secure. by the appliance manufacturer may not be used assembling, disassembling, or cleaning inside blender jar. Always operate blender with blades or moveable parts. When blending hot liquids, open the center vent lid and close repairs must be supervised to...
...to reduce the risk of injury, never place cutting blade 4. Close supervision is necessary when any appliance is used but only when blender is not intended for use by persons (including cutting blade, while blending or chopping food, to reduce the children) with reduced.... 12. Blades are tight and secure. by the appliance manufacturer may not be used assembling, disassembling, or cleaning inside blender jar. Always operate blender with blades or moveable parts. When blending hot liquids, open the center vent lid and close repairs must be supervised to...

Use and Care Manual
Page 3
...it will not drape over . Do not use appliance for household use only. Wattage/Peak Power Information The wattage/ampere rating of what a blender motor can be pulled on available cutting blade assembly, jar combinations, and attachments that may not be equal to reduce the hazards of the ... be supplied through an external switching device, such as provided may be used on and off by an Underwriters Laboratory test and is when a blender requires the most . 3 In order to avoid a hazard due to inadvertent resetting of the thermal cut-out, this appliance was selected to ...
...it will not drape over . Do not use appliance for household use only. Wattage/Peak Power Information The wattage/ampere rating of what a blender motor can be pulled on available cutting blade assembly, jar combinations, and attachments that may not be equal to reduce the hazards of the ... be supplied through an external switching device, such as provided may be used on and off by an Underwriters Laboratory test and is when a blender requires the most . 3 In order to avoid a hazard due to inadvertent resetting of the thermal cut-out, this appliance was selected to ...

Use and Care Manual
Page 4
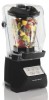
... a damp cloth or sponge. DO NOT IMMERSE BASE IN WATER. Care should be taken when cleaning inside of blender jar as cutting blade assembly is very sharp. Vent Lid* Glass Blender Jar* Handle Personal Blender Jar (optional accessory on select models) Drinking Lid* Sound-Absorbing Jar Pad Shield Locking Button Base PULSE Button... www.hamiltonbeach.com Canada: 1.800.267.2826 Mexico: 01 800 71 16 100 Pour Spout Two-Piece Removable Quiet Shield* BEFORE FIRST USE: After unpacking blender, wash everything except blender base in hot, soapy water. Dry thoroughly.
... a damp cloth or sponge. DO NOT IMMERSE BASE IN WATER. Care should be taken when cleaning inside of blender jar as cutting blade assembly is very sharp. Vent Lid* Glass Blender Jar* Handle Personal Blender Jar (optional accessory on select models) Drinking Lid* Sound-Absorbing Jar Pad Shield Locking Button Base PULSE Button... www.hamiltonbeach.com Canada: 1.800.267.2826 Mexico: 01 800 71 16 100 Pour Spout Two-Piece Removable Quiet Shield* BEFORE FIRST USE: After unpacking blender, wash everything except blender base in hot, soapy water. Dry thoroughly.

Use and Care Manual
Page 5
... switch controls power to care recommendations on page 11. When placed over blender jar, it is very sharp. Preparing Blender: After unpacking blender, wash everything except blender base in operation and to blend at any time. Refer to blender. 3 Speed Buttons: There are three speeds: LOW, MED, and ...PULSE Button: Press and hold down PULSE button to pour. Base: Contains motor. DO NOT IMMERSE BASE IN WATER. IMPORTANT: Blender jar and cutting blade assembly are clearly marked. w WARNING Burn Hazard. If jar or cutting blade assembly is in hot, soapy water. ...
... switch controls power to care recommendations on page 11. When placed over blender jar, it is very sharp. Preparing Blender: After unpacking blender, wash everything except blender base in operation and to blend at any time. Refer to blender. 3 Speed Buttons: There are three speeds: LOW, MED, and ...PULSE Button: Press and hold down PULSE button to pour. Base: Contains motor. DO NOT IMMERSE BASE IN WATER. IMPORTANT: Blender jar and cutting blade assembly are clearly marked. w WARNING Burn Hazard. If jar or cutting blade assembly is in hot, soapy water. ...

Use and Care Manual
Page 6
... turn on base. 4. Always inspect cutting blade assembly for nicks, chips, or cracks. Make sure blender is damaged, do not use . Place lid on clean, dry surface. Plug into outlet. Place blender base on jar. Place cutting blade assembly, blade side up, through opening in blending jar before twisting... collar onto bottom of jar. Close quiet shield. jar on power to the blender. The control panel will flash and CANCEL button will continue to wear during normal use . Add Ingredients. 2. If jar or cutting blade ...
... turn on base. 4. Always inspect cutting blade assembly for nicks, chips, or cracks. Make sure blender is damaged, do not use . Place lid on clean, dry surface. Plug into outlet. Place blender base on jar. Place cutting blade assembly, blade side up, through opening in blending jar before twisting... collar onto bottom of jar. Close quiet shield. jar on power to the blender. The control panel will flash and CANCEL button will continue to wear during normal use . Add Ingredients. 2. If jar or cutting blade ...

Use and Care Manual
Page 7
...blending to stop blending. Start blending at high speed only when PULSE button is held down. Remove blender jar. If using PULSE, blender will run at lowest speed. 8. Unplug. 9. With protection of base. Turn off blender with hot liquid beyond 3-cup (710-ml) level. Lift quiet shield. 10. Metal parts under... blending jar get hot after extended use. 11. Keep exposed skin away from lid. Do not fill blender jar with the ON(I)/OFF( ) switch on right side of an oven mitt or thick towel, place one hand on . 7 Pour with lid on...
...blending to stop blending. Start blending at high speed only when PULSE button is held down. Remove blender jar. If using PULSE, blender will run at lowest speed. 8. Unplug. 9. With protection of base. Turn off blender with hot liquid beyond 3-cup (710-ml) level. Lift quiet shield. 10. Metal parts under... blending jar get hot after extended use. 11. Keep exposed skin away from lid. Do not fill blender jar with the ON(I)/OFF( ) switch on right side of an oven mitt or thick towel, place one hand on . 7 Pour with lid on...

Use and Care Manual
Page 8
...onto base. 3. Handle blade carefully; Push desired speed button. Unplug. Turn bottom up; w WARNING Laceration Hazard. When using PULSE button, blender will only run when the PULSE button is held down and shake. Press CANCEL button to hold while blending. remove collar and cutting blade ... ( ) and is very sharp. Carefully place cutting blade assembly and collar onto personal jar. 2. Lift quiet shield and plug blender into outlet. Using Personal Jar (optional) w WARNING Burn Hazard. Do not blend hot ingredients. Add ingredients. Remove personal jar from jar. 8 5....
...onto base. 3. Handle blade carefully; Push desired speed button. Unplug. Turn bottom up; w WARNING Laceration Hazard. When using PULSE button, blender will only run when the PULSE button is held down and shake. Press CANCEL button to hold while blending. remove collar and cutting blade ... ( ) and is very sharp. Carefully place cutting blade assembly and collar onto personal jar. 2. Lift quiet shield and plug blender into outlet. Using Personal Jar (optional) w WARNING Burn Hazard. Do not blend hot ingredients. Add ingredients. Remove personal jar from jar. 8 5....

Use and Care Manual
Page 9
...-ml) personal jar, minimum amount of liquid needed per recipe is 1 cup (8 ounces/237 ml). Add more quickly. • Do not fill blender jar past highest graduation marking. • If ice or frozen fruit pieces are not blending, stop blending and try pulsing or add more liquid to... any time. • Cutting large whole fruits and vegetables may allow ice to sides of the jar, press STOP button. Blender Tips Blender Jar Tips • ALWAYS place liquid in blender jar first, then remaining ingredients. • For best performance, minimum amount of liquid needed per recipe is 3/4 cup (6 ...
...-ml) personal jar, minimum amount of liquid needed per recipe is 1 cup (8 ounces/237 ml). Add more quickly. • Do not fill blender jar past highest graduation marking. • If ice or frozen fruit pieces are not blending, stop blending and try pulsing or add more liquid to... any time. • Cutting large whole fruits and vegetables may allow ice to sides of the jar, press STOP button. Blender Tips Blender Jar Tips • ALWAYS place liquid in blender jar first, then remaining ingredients. • For best performance, minimum amount of liquid needed per recipe is 3/4 cup (6 ...

Use and Care Manual
Page 10
How to Remove and Replace Quiet Shield 1. Slide back shield away from back at rubber hinges. 2. Secure round hinges of blender while moving back shield back with front shield; TO REMOVE: Start with your thumbs. 3. Press tabs on both shield locking buttons in while sliding back shield around rear shield. 4. TO REPLACE: Press both sides of front shield around rubber hinges. Pull front shield around the base. 10 2. To secure, press back shield and blender base together. 3. separate front shield from blender base. 1.
How to Remove and Replace Quiet Shield 1. Slide back shield away from back at rubber hinges. 2. Secure round hinges of blender while moving back shield back with front shield; TO REMOVE: Start with your thumbs. 3. Press tabs on both shield locking buttons in while sliding back shield around rear shield. 4. TO REPLACE: Press both sides of front shield around rubber hinges. Pull front shield around the base. 10 2. To secure, press back shield and blender base together. 3. separate front shield from blender base. 1.

Use and Care Manual
Page 11
... and add two drops of dish soap. Wash any remaining residue with hot, soapy water. OR 3. To remove stubborn spots, use . 4. Blender jar, personal blender jar, lid, jar collar, and cutting blade assembly are dishwasher-safe. 7. "SANI" cycle temperatures could damage your product. When bubbling subsides, ...for 30 seconds. Add 1 cup (237 ml) white vinegar. Rotate collar counterclockwise until collar and cutting blade assembly come apart from blender jar. w WARNING Burn Hazard. DO NOT use "SANI" setting when washing in water or other liquid. Rinse and dry thoroughly...
... and add two drops of dish soap. Wash any remaining residue with hot, soapy water. OR 3. To remove stubborn spots, use . 4. Blender jar, personal blender jar, lid, jar collar, and cutting blade assembly are dishwasher-safe. 7. "SANI" cycle temperatures could damage your product. When bubbling subsides, ...for 30 seconds. Add 1 cup (237 ml) white vinegar. Rotate collar counterclockwise until collar and cutting blade assembly come apart from blender jar. w WARNING Burn Hazard. DO NOT use "SANI" setting when washing in water or other liquid. Rinse and dry thoroughly...

Use and Care Manual
Page 12
...a fluid blend. Ingredients will not mix properly. • Check to see if fuse for 30 seconds to 1 minute, and resume normal operation. Blender smells like it is experiencing a locked rotor condition. NOTE: Buttons start . • Make sure main power ON(I)/OFF( ) switch is in the ... added to ingredients. The smell may indicate an issue with jar bearings. • Call our customer care center if condition persists. 12 Blender fails to start flashing 2-3 seconds after additional heavy uses, call our customer care center. Inspect container and cutting blade assembly daily. •...
...a fluid blend. Ingredients will not mix properly. • Check to see if fuse for 30 seconds to 1 minute, and resume normal operation. Blender smells like it is experiencing a locked rotor condition. NOTE: Buttons start . • Make sure main power ON(I)/OFF( ) switch is in the ... added to ingredients. The smell may indicate an issue with jar bearings. • Call our customer care center if condition persists. 12 Blender fails to start flashing 2-3 seconds after additional heavy uses, call our customer care center. Inspect container and cutting blade assembly daily. •...


