
Use & Care
Page 2
...the motor is operating. 20. The use appliance for information on examination, repair or electrical or mechanical adjustment. 7. Do not leave blender unattended while it is switched ON, switch OFF immediately and tighten jar onto cutting assembly. 19. IMPORTANT SAFEGUARDS When using electric appliances...jar should always be used but must be followed, including the following: 1. Blades are sharp; To prevent possible burns: Do not fill blender jar beyond the 3 cup (750 ml) level. With the protection of attachments, including canning jars, not recommended or sold by or near...
...the motor is operating. 20. The use appliance for information on examination, repair or electrical or mechanical adjustment. 7. Do not leave blender unattended while it is switched ON, switch OFF immediately and tighten jar onto cutting assembly. 19. IMPORTANT SAFEGUARDS When using electric appliances...jar should always be used but must be followed, including the following: 1. Blades are sharp; To prevent possible burns: Do not fill blender jar beyond the 3 cup (750 ml) level. With the protection of attachments, including canning jars, not recommended or sold by or near...

Use & Care
Page 3
... shock. Care must be taken to the cutting blades, jar, blender and possibly result in or tripping over . Peak power is a better measure of liquids from your unit, but are available as replacement parts. Optional Accessory Hamilton Beach Stay or Go™ Personal Blending Jar (AC16) may be... pulled on by an Underwriter's Laboratory test and is based on available cutting blades and jar combinations that may not be provided with your blender jar, the round rubber gasket must...
... shock. Care must be taken to the cutting blades, jar, blender and possibly result in or tripping over . Peak power is a better measure of liquids from your unit, but are available as replacement parts. Optional Accessory Hamilton Beach Stay or Go™ Personal Blending Jar (AC16) may be... pulled on by an Underwriter's Laboratory test and is based on available cutting blades and jar combinations that may not be provided with your blender jar, the round rubber gasket must...

Use & Care
Page 4
Care should be taken when handling the cutting assembly as the blades are very sharp. DO NOT IMMERSE BASE IN WATER. Filler Cap Lid Jar Dispenser Assembly Spout Cap Gasket Cutting Assembly Spout Cap Storage (bottom of blender) Base Control Knob Control Knob Setting Dispense Smoothie Milkshake Icy Drink Blender Speed 1 2 3 4 4 840155505 ENv01.indd 4 7/19/12 1:13 PM Wipe blender base with a damp cloth or sponge. Parts and Features BEFORE FIRST USE: After unpacking blender, wash everything except blender base in hot, soapy water. Dry thoroughly.
Care should be taken when handling the cutting assembly as the blades are very sharp. DO NOT IMMERSE BASE IN WATER. Filler Cap Lid Jar Dispenser Assembly Spout Cap Gasket Cutting Assembly Spout Cap Storage (bottom of blender) Base Control Knob Control Knob Setting Dispense Smoothie Milkshake Icy Drink Blender Speed 1 2 3 4 4 840155505 ENv01.indd 4 7/19/12 1:13 PM Wipe blender base with a damp cloth or sponge. Parts and Features BEFORE FIRST USE: After unpacking blender, wash everything except blender base in hot, soapy water. Dry thoroughly.
Use & Care
Page 5
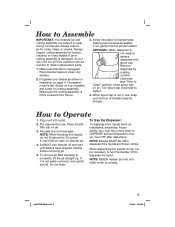
... cutting assembly. When spout cap is complete, lift the jar straight up . How to tighten. 4. To remove jar after dispensing. How to Assemble IMPORTANT: Your blender jar and cutting assembly are subject to wear during normal use , snap onto bottom of gasket and screw on jar. Set jar on top of... blender base for storage. Set jar into outlet. 2. NOTE: When blending thin liquids, do not use. NOTE: NEVER replace jar onto unit while motor is damaged, ...
... cutting assembly. When spout cap is complete, lift the jar straight up . How to tighten. 4. To remove jar after dispensing. How to Assemble IMPORTANT: Your blender jar and cutting assembly are subject to wear during normal use , snap onto bottom of gasket and screw on jar. Set jar on top of... blender base for storage. Set jar into outlet. 2. NOTE: When blending thin liquids, do not use. NOTE: NEVER replace jar onto unit while motor is damaged, ...

Use & Care
Page 6
... assembly or gasket in any other dairy products. When the processing of a single type of food is finished, the blender should never be used to rinse the blender between batches of Step 5 above). 8. Flush soapy water through dispenser until cleaned. This function is higher than normal...or if the parts are fully rotated clockwise to lock into position (reverse of processing the same food. Unplug blender from cutting assembly. 5. Rinse and dry thoroughly. Store blender with clean water. Do not immerse cord, plug or base in a dishwasher. Some part distortion may be ...
... assembly or gasket in any other dairy products. When the processing of a single type of food is finished, the blender should never be used to rinse the blender between batches of Step 5 above). 8. Flush soapy water through dispenser until cleaned. This function is higher than normal...or if the parts are fully rotated clockwise to lock into position (reverse of processing the same food. Unplug blender from cutting assembly. 5. Rinse and dry thoroughly. Store blender with clean water. Do not immerse cord, plug or base in a dishwasher. Some part distortion may be ...

Use & Care
Page 7
... Rinse and dry thoroughly. A minimum of dispenser body and rotate cap clockwise until tight. Does not dispense. • Make sure blender is in place on jar. Remove dispenser assembly cap by holding jar and turning cutting cutting assembly. Do not soak. If damaged,.... • Make sure gasket is ON. Dispenser Assembly Cap Plunger Dispenser Assembly Body Adaptor Seal Rings Troubleshooting PROBLEM Blender leaks. assembly counterclockwise. 7 840155505 ENv01.indd 7 7/19/12 1:13 PM Optional Cleaning 1. Cannot remove • Loosen collar by rotating counterclockwise. ...
... Rinse and dry thoroughly. A minimum of dispenser body and rotate cap clockwise until tight. Does not dispense. • Make sure blender is in place on jar. Remove dispenser assembly cap by holding jar and turning cutting cutting assembly. Do not soak. If damaged,.... • Make sure gasket is ON. Dispenser Assembly Cap Plunger Dispenser Assembly Body Adaptor Seal Rings Troubleshooting PROBLEM Blender leaks. assembly counterclockwise. 7 840155505 ENv01.indd 7 7/19/12 1:13 PM Optional Cleaning 1. Cannot remove • Loosen collar by rotating counterclockwise. ...
Use & Care
Page 8
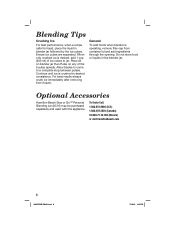
...not store food or liquids in blender jar followed by the ice cubes. To Order Call: 1.800.851.8900 (U.S.) 1.800.267.2826 (Canada) 01.800.71.16.100 (Mexico) or visit hamiltonbeach.com 8 840155505 ENv01.indd 8 7/19/12 1:13 PM Optional Accessories Hamilton Beach Stay or Go™ Personal ...Blending Jar (AC16) may be purchased separately and used with this appliance. Ensure ice cubes are separated. Place lid on blender jar then Pulse on any of ice cubes to jar. Allow blades...
...not store food or liquids in blender jar followed by the ice cubes. To Order Call: 1.800.851.8900 (U.S.) 1.800.267.2826 (Canada) 01.800.71.16.100 (Mexico) or visit hamiltonbeach.com 8 840155505 ENv01.indd 8 7/19/12 1:13 PM Optional Accessories Hamilton Beach Stay or Go™ Personal ...Blending Jar (AC16) may be purchased separately and used with this appliance. Ensure ice cubes are separated. Place lid on blender jar then Pulse on any of ice cubes to jar. Allow blades...


