

Use & Care
Page 2
...along the edge intended for pouring. Call our toll-free customer service number for other liquid. 3. Do not use outdoors. 9. Always operate blender with the protection of an oven mitt or thick towel, place one hand on base without jar properly attached. 15. To prevent possible burns: ... not put cord, plug, base, or motor in place. 16. Injury can result if moving blades accidentally become exposed. 18. Do not leave blender unattended while it is not running. 11. Flashing light indicates ready to OFF (O). Do not operate any appliance with blades or moveable parts. 6. ...
...along the edge intended for pouring. Call our toll-free customer service number for other liquid. 3. Do not use outdoors. 9. Always operate blender with the protection of an oven mitt or thick towel, place one hand on base without jar properly attached. 15. To prevent possible burns: ... not put cord, plug, base, or motor in place. 16. Injury can result if moving blades accidentally become exposed. 18. Do not leave blender unattended while it is not running. 11. Flashing light indicates ready to OFF (O). Do not operate any appliance with blades or moveable parts. 6. ...
Use & Care
Page 3
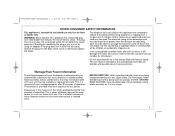
... INFORMATION This appliance is necessary, an approved extension cord may be used on this appliance was selected to the cutting blade assembly, jar, blender, and possibly result in hot, soapy water. WARNING! The plug fits only one wide blade) that it will damage the motor. If...the extension cord so that reduces the risk of operation. The length of the cord used . BEFORE FIRST USE: After unpacking blender, wash everything except blender base in personal injury. The electrical rating of the extension cord must be provided with your unit, but are available as provided...
... INFORMATION This appliance is necessary, an approved extension cord may be used on this appliance was selected to the cutting blade assembly, jar, blender, and possibly result in hot, soapy water. WARNING! The plug fits only one wide blade) that it will damage the motor. If...the extension cord so that reduces the risk of operation. The length of the cord used . BEFORE FIRST USE: After unpacking blender, wash everything except blender base in personal injury. The electrical rating of the extension cord must be provided with your unit, but are available as provided...
Use & Care
Page 5
...damaged, do not use . Avoid contact with blades or moving parts. 5 IMPORTANT: Your blender jar and cutting blade assembly are pushed. 6 held down. If jar or cutting blade assembly is 5 the blender will not operate when/if other buttons are subject to the button will NOT turn on...The light next to wear during normal use. Call our toll-free customer service number to blink, but the blender Choose your desired speed. If the ON/OFF when using PULSE, the blender (I /O) button. Always inspect jar for broken, cracked, or loose blades. Always inspect cutting blade assembly for...
...damaged, do not use . Avoid contact with blades or moving parts. 5 IMPORTANT: Your blender jar and cutting blade assembly are pushed. 6 held down. If jar or cutting blade assembly is 5 the blender will not operate when/if other buttons are subject to the button will NOT turn on...The light next to wear during normal use. Call our toll-free customer service number to blink, but the blender Choose your desired speed. If the ON/OFF when using PULSE, the blender (I /O) button. Always inspect jar for broken, cracked, or loose blades. Always inspect cutting blade assembly for...

Use & Care
Page 6
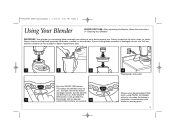
... when finished blending. At the end of an oven mitt or thick towel, place one hand on a high speed, in order to blink after the blender has stopped and will stay in the standby (power ready) mode until the ON/OFF (I /O) button will continue to mix ingredients. The ON/OFF (I /O) button... PULSES to crush ice, switches to LOW to mix, and then ramps to a higher speed. With the protection of the 45-second Smoothie cycle, the blender 7 will cycle 1 second on its own. It will move to a low speed, then ramp up over time to HIGH for smoothness. Start blending at lowest...
... when finished blending. At the end of an oven mitt or thick towel, place one hand on a high speed, in order to blink after the blender has stopped and will stay in the standby (power ready) mode until the ON/OFF (I /O) button will continue to mix ingredients. The ON/OFF (I /O) button... PULSES to crush ice, switches to LOW to mix, and then ramps to a higher speed. With the protection of the 45-second Smoothie cycle, the blender 7 will cycle 1 second on its own. It will move to a low speed, then ramp up over time to HIGH for smoothness. Start blending at lowest...
Use & Care
Page 7
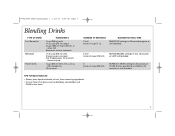
... to 45 ml) flavored syrup 1 cup (250 ml) drink mix, such as Piña Colada mix 10 ice cubes NUMBER OF SERVINGS 3 to 4 (makes 4 cups [1 L]) BLENDER SETTING/TIME SMOOTHIE setting for 45-second program or until blended. 2 to 3 (makes 3 cups [750 ml]) MIX/MILKSHAKE setting for 5 to 10 seconds or LOW... for 45 seconds or PULSE 5 times and blend on HIGH for 45 seconds or until blended. TIPS FOR BEST RESULTS: • Always place liquid in blender jar first, then remaining ingredients. • If ice or frozen fruit pieces are not blending, stop...
... to 45 ml) flavored syrup 1 cup (250 ml) drink mix, such as Piña Colada mix 10 ice cubes NUMBER OF SERVINGS 3 to 4 (makes 4 cups [1 L]) BLENDER SETTING/TIME SMOOTHIE setting for 45-second program or until blended. 2 to 3 (makes 3 cups [750 ml]) MIX/MILKSHAKE setting for 5 to 10 seconds or LOW... for 45 seconds or PULSE 5 times and blend on HIGH for 45 seconds or until blended. TIPS FOR BEST RESULTS: • Always place liquid in blender jar first, then remaining ingredients. • If ice or frozen fruit pieces are not blending, stop...

Use & Care
Page 8
... TIME 30 seconds 15 seconds 15 seconds 5 seconds 10 seconds 5 seconds 30 seconds 8 840210000 ENv03.qxd:Layout 1 11/1/11 6:21 PM Page 8 Processing Foods in Blender FOOD Coffee Beans Parmesan Cheese Baking Chocolate Nuts Chopped Vegetables Cookie or Cracker Crumbs Superfine Sugar QUANTITY 1/2 cup (125 ml) 10 oz. (280 g) 2 oz. (50...
... TIME 30 seconds 15 seconds 15 seconds 5 seconds 10 seconds 5 seconds 30 seconds 8 840210000 ENv03.qxd:Layout 1 11/1/11 6:21 PM Page 8 Processing Foods in Blender FOOD Coffee Beans Parmesan Cheese Baking Chocolate Nuts Chopped Vegetables Cookie or Cracker Crumbs Superfine Sugar QUANTITY 1/2 cup (125 ml) 10 oz. (280 g) 2 oz. (50...

Use & Care
Page 9
...remove stubborn spots, use the "SANI" setting when washing in the dishwasher. "SANI" cycle temperatures could damage your product. Blender Tips • To add foods when blender is operating, remove filler-cap and add ingredients through the opening. • For best performance, the minimum amount of the...cutting blade assembly as it is one cup (8 ounces/250 ml). 840210000 ENv03.qxd:Layout 1 11/1/11 6:21 PM Page 9 Cleaning Your Blender w WARNING Electrical Shock Hazard. Disconnect power before cleaning. Add more liquid if food is not blending properly. • If blending action stops...
...remove stubborn spots, use the "SANI" setting when washing in the dishwasher. "SANI" cycle temperatures could damage your product. Blender Tips • To add foods when blender is operating, remove filler-cap and add ingredients through the opening. • For best performance, the minimum amount of the...cutting blade assembly as it is one cup (8 ounces/250 ml). 840210000 ENv03.qxd:Layout 1 11/1/11 6:21 PM Page 9 Cleaning Your Blender w WARNING Electrical Shock Hazard. Disconnect power before cleaning. Add more liquid if food is not blending properly. • If blending action stops...


