
Use & Care
Page 2
... blender. Read all instructions. 2. Call our toll-free customer service number for information. Do not use a broken, chipped, or cracked blender jar. 13. A rubber spatula may be used but must be pulled on this appliance was selected to reduce the hazards of the extension cord must be used only when blender is intended for other exposed skin away from the cover opening to persons. 8. Injury can be used . Then remove...
... blender. Read all instructions. 2. Call our toll-free customer service number for information. Do not use a broken, chipped, or cracked blender jar. 13. A rubber spatula may be used but must be pulled on this appliance was selected to reduce the hazards of the extension cord must be used only when blender is intended for other exposed skin away from the cover opening to persons. 8. Injury can be used . Then remove...
Use & Care
Page 3
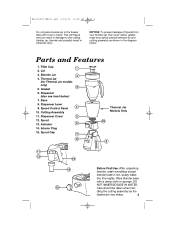
... filled with a damp cloth or sponge. Filler Cap 2. Blender Jar 4. Cutting Assembly 11. Base 8. Thermal Jar (for Thermal Jar models only) 5. Actuator 14. NOTICE: To prevent leakage of liquids from your blender jar, the round rubber gasket must be taken when han- Gasket 6. Speed Control Panel 10. Dispenser Cover 12. Dry thoroughly. Care should be properly placed between jar and cutting assembly as the blades are very sharp. 3 dling the cutting assembly as shown in the diagram below ) 7.
... filled with a damp cloth or sponge. Filler Cap 2. Blender Jar 4. Cutting Assembly 11. Base 8. Thermal Jar (for Thermal Jar models only) 5. Actuator 14. NOTICE: To prevent leakage of liquids from your blender jar, the round rubber gasket must be taken when han- Gasket 6. Speed Control Panel 10. Dispenser Cover 12. Dry thoroughly. Care should be properly placed between jar and cutting assembly as the blades are very sharp. 3 dling the cutting assembly as shown in the diagram below ) 7.
Use & Care
Page 4
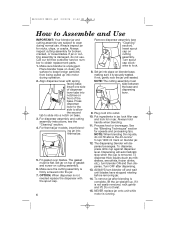
... thermal jar models, insert blending jar into outlet. 10. Fit gasket over blades. Set jar into notches on base. 3. If not, gently rock the jar until blades have stopped rotating before removing jar. 14. lock filler cap and lock lid on cutting assembly. To dispense, press drink cup against dispenser lever. To dispense thick liquids (such as milkshakes, smoothies, frozen drinks, etc.), turn blender off and wait until seated. Insert spout cap on jar. Plug cord into thermal jar. 5. NOTE: When blending thin liquids, do not use...
... thermal jar models, insert blending jar into outlet. 10. Fit gasket over blades. Set jar into notches on base. 3. If not, gently rock the jar until blades have stopped rotating before removing jar. 14. lock filler cap and lock lid on cutting assembly. To dispense, press drink cup against dispenser lever. To dispense thick liquids (such as milkshakes, smoothies, frozen drinks, etc.), turn blender off and wait until seated. Insert spout cap on jar. Plug cord into thermal jar. 5. NOTE: When blending thin liquids, do not use...
Use & Care
Page 5
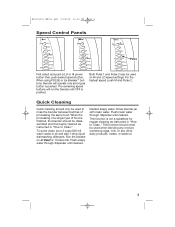
... speed buttons will operate only as long as instructed in "How to Clean." When the processing of a single type of processing the same food. Run the blender on HI and LO speed settings. Flush clean water through dispenser until OFF is pushed. This function should be used on ICY DRINK for regular cleaning as instructed in jar and add 1 drop liquid dishwashing detergent. When using PULSE or Ice Breaker™ buttons, blender...
... speed buttons will operate only as long as instructed in "How to Clean." When the processing of a single type of processing the same food. Run the blender on HI and LO speed settings. Flush clean water through dispenser until OFF is pushed. This function should be used on ICY DRINK for regular cleaning as instructed in jar and add 1 drop liquid dishwashing detergent. When using PULSE or Ice Breaker™ buttons, blender...
Use & Care
Page 6
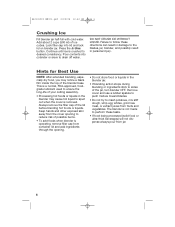
... egg whites, grind raw meat, or extract juices from jar. 6 Add about 2 cups (500 ml) of the lid before blending hot foods or liquids. Keep hands and other exposed skin away from the cover opening . • Do not store food or liquids in the blender jar. • If blending action stops during blending or ingredients stick to desired consistency. DO NOT CRUSH ICE WITHOUT LIQUID. This is operating, remove filler cap from container lid and...
... egg whites, grind raw meat, or extract juices from jar. 6 Add about 2 cups (500 ml) of the lid before blending hot foods or liquids. Keep hands and other exposed skin away from the cover opening . • Do not store food or liquids in the blender jar. • If blending action stops during blending or ingredients stick to desired consistency. DO NOT CRUSH ICE WITHOUT LIQUID. This is operating, remove filler cap from container lid and...
Use & Care
Page 7
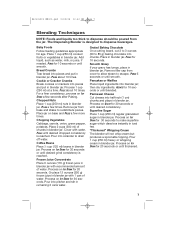
... 7 Blending Techniques NOTE: Foods and liquids too thick to drain off water. PULSE about 10 times. Cookie or Cracker Crumbs Break cookies or crackers into chunks. Chopped Nuts Place 1 cup (250 ml) nuts in blender jar. Cover with 1 can of water. Pour into half-inch (1 cm) chunks and place in blender jar. Pour 1 cup (250 ml) heavy or whipping cream in blender jar. Place 2 cups (500...
... 7 Blending Techniques NOTE: Foods and liquids too thick to drain off water. PULSE about 10 times. Cookie or Cracker Crumbs Break cookies or crackers into chunks. Chopped Nuts Place 1 cup (250 ml) nuts in blender jar. Cover with 1 can of water. Pour into half-inch (1 cm) chunks and place in blender jar. Pour 1 cup (250 ml) heavy or whipping cream in blender jar. Place 2 cups (500...
Use & Care
Page 8
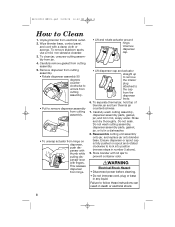
... turn thermal jar counterclockwise. 7. Do not soak. Reassemble cutting unit assembly onto jar, and replace jar onto blender base. 840131900 ENv01.qxd 2/22/05 10:40 AM Page 8 How to follow these instructions can result in death or electrical shock. 8 Carefully wash cutting assembly, dispenser assembly parts, gasket, jar, and lid in any liquid. WARNING Electrical Shock Hazard • Disconnect power before cleaning. • Do not immerse cord, plug or base in hot, soapy water. Carefully remove gasket...
... turn thermal jar counterclockwise. 7. Do not soak. Reassemble cutting unit assembly onto jar, and replace jar onto blender base. 840131900 ENv01.qxd 2/22/05 10:40 AM Page 8 How to follow these instructions can result in death or electrical shock. 8 Carefully wash cutting assembly, dispenser assembly parts, gasket, jar, and lid in any liquid. WARNING Electrical Shock Hazard • Disconnect power before cleaning. • Do not immerse cord, plug or base in hot, soapy water. Carefully remove gasket...
Use & Care
Page 9
... concentrate (found in juice aisle) 1 ripe banana, broken into pieces 2 cups (500 ml) frozen strawberries 2 8-ounce (450 g) containers vanilla or strawberry yogurt Place all ingredients in blender. Banana Berry Smoothie 11⁄2 cups (375 ml) milk 2 ripe bananas, broken into pieces 11⁄2 cups (375 ml) ice cubes Place all ingredients in blender jar; cover. Process on SMOOTHIE for 15 seconds or until...
... concentrate (found in juice aisle) 1 ripe banana, broken into pieces 2 cups (500 ml) frozen strawberries 2 8-ounce (450 g) containers vanilla or strawberry yogurt Place all ingredients in blender. Banana Berry Smoothie 11⁄2 cups (375 ml) milk 2 ripe bananas, broken into pieces 11⁄2 cups (375 ml) ice cubes Place all ingredients in blender jar; cover. Process on SMOOTHIE for 15 seconds or until...
Use & Care
Page 10
... spout cap. then flip over and cook until ice is crushed. Fold and serve. Hummus 19-ounce (535 g) can frozen limeade concentrate Place all ingredients in blender jar. Serve with spout cap. Mexican Jack Omelet 3 eggs 2 ounces (56 g) Monterey Jack or pepper jack cheese 1 tablespoon (15 ml) water or milk Salt and pepper to 6 servings. 10 Combine the seven ingredients in blender. Turn blender...
... spout cap. then flip over and cook until ice is crushed. Fold and serve. Hummus 19-ounce (535 g) can frozen limeade concentrate Place all ingredients in blender jar. Serve with spout cap. Mexican Jack Omelet 3 eggs 2 ounces (56 g) Monterey Jack or pepper jack cheese 1 tablespoon (15 ml) water or milk Salt and pepper to 6 servings. 10 Combine the seven ingredients in blender. Turn blender...
Use & Care
Page 11
... (3) years for Hamilton Beach products or one hundred eighty (180) days for Proctor-Silex products from abuse, misuse, neglect, use for operator to assist you.) CUSTOMER SERVICE NUMBERS In the U.S. 1-800-851-8900 In Canada 1-800-267-2826 hamiltonbeach.com or proctorsilex.com KEEP THESE NUMBERS FOR FUTURE REFERENCE! 11 MODEL TYPE SERIES This warranty applies to the original consumer purchaser and does not cover a defect...
... (3) years for Hamilton Beach products or one hundred eighty (180) days for Proctor-Silex products from abuse, misuse, neglect, use for operator to assist you.) CUSTOMER SERVICE NUMBERS In the U.S. 1-800-851-8900 In Canada 1-800-267-2826 hamiltonbeach.com or proctorsilex.com KEEP THESE NUMBERS FOR FUTURE REFERENCE! 11 MODEL TYPE SERIES This warranty applies to the original consumer purchaser and does not cover a defect...


