
Operation Manual
Page 2
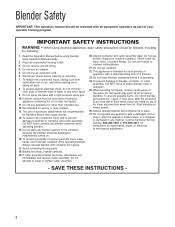
...manner. Always operate blender with container lid in any kitchen utensils in place. 17. Blades are loose, discontinue use by Hamilton Beach may push lid off parts. 8. If cutter assembly blades are sharp. Do not use broken, chipped or cracked container. Keep exposed skin away ...from outlet when not in operation. 25. Blender Safety IMPORTANT: This operation manual should be used when moving parts. 18. When using blender. Extreme caution must be followed, including the following: 1. Not intended for wear, nicks, or broken blades...
...manner. Always operate blender with container lid in any kitchen utensils in place. 17. Blades are loose, discontinue use by Hamilton Beach may push lid off parts. 8. If cutter assembly blades are sharp. Do not use broken, chipped or cracked container. Keep exposed skin away ...from outlet when not in operation. 25. Blender Safety IMPORTANT: This operation manual should be used when moving parts. 18. When using blender. Extreme caution must be followed, including the following: 1. Not intended for wear, nicks, or broken blades...
Operation Manual
Page 3
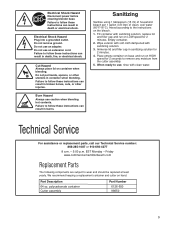
...LOW speed for 2 minutes. 4. When ready to wear and should be replaced at least yearly. EST Monday - polycarbonate container Cutter assembly Part Number 6126-650 98650 3 Do not use , rinse with sanitizing solution. 3. Cut Hazard Always place lid on the bleach. 1. Sanitizing...of clean, cool water (60°F/16°C), mixed according to follow these instructions can result in death or electrical shock. Part Description 64 oz. Electrical Shock Hazard Disconnect power before cleaning blender base. Failure to the instructions on container when blending. Do...
...LOW speed for 2 minutes. 4. When ready to wear and should be replaced at least yearly. EST Monday - polycarbonate container Cutter assembly Part Number 6126-650 98650 3 Do not use , rinse with sanitizing solution. 3. Cut Hazard Always place lid on the bleach. 1. Sanitizing...of clean, cool water (60°F/16°C), mixed according to follow these instructions can result in death or electrical shock. Part Description 64 oz. Electrical Shock Hazard Disconnect power before cleaning blender base. Failure to the instructions on container when blending. Do...
Operation Manual
Page 4
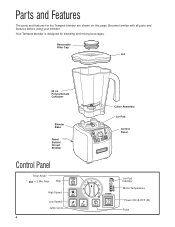
Become familiar with all parts and features before using your blender. Polycarbonate Container Blender Base Reset Switch/ Circuit Breaker Control Panel Timer Knob* * = 3 Min. Your Tempest blender is designed for the Tempest blender are shown on this page. Removable Filler Cap Lid 64 oz. Parts and Features The parts and features for blending and mixing beverages. Max Stop High Speed Low Speed Jump Cycle 4 Cutter Assembly Jar Pad 5 10 15 20 STOP 25 30 35 40 POWER HIGH LOW JUMP PULSE Control Panel Jar Pad Indicator Motor Temperature Power ON (I)/OFF (O) Pulse
Become familiar with all parts and features before using your blender. Polycarbonate Container Blender Base Reset Switch/ Circuit Breaker Control Panel Timer Knob* * = 3 Min. Your Tempest blender is designed for the Tempest blender are shown on this page. Removable Filler Cap Lid 64 oz. Parts and Features The parts and features for blending and mixing beverages. Max Stop High Speed Low Speed Jump Cycle 4 Cutter Assembly Jar Pad 5 10 15 20 STOP 25 30 35 40 POWER HIGH LOW JUMP PULSE Control Panel Jar Pad Indicator Motor Temperature Power ON (I)/OFF (O) Pulse
Operation Manual
Page 12
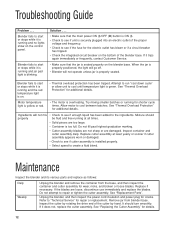
...OFF (O) button is ON (I). • Check to see if unit is running for cracks. Maintenance Inspect the blender and its various parts and replace as follows: Daily Weekly Unplug the blender and remove the container from blender base. Allow motor to start or stops while it...least yearly or sooner if cutter assembly appears worn or damaged. • Check to see if the fuse for repair or replacement. See "Replacement Parts". Inspect the cutter by hand. Troubleshooting Guide Problem . . . Do not fill past highest graduation marking. • Cutter assembly blades are not...
...OFF (O) button is ON (I). • Check to see if unit is running for cracks. Maintenance Inspect the blender and its various parts and replace as follows: Daily Weekly Unplug the blender and remove the container from blender base. Allow motor to start or stops while it...least yearly or sooner if cutter assembly appears worn or damaged. • Check to see if the fuse for repair or replacement. See "Replacement Parts". Inspect the cutter by hand. Troubleshooting Guide Problem . . . Do not fill past highest graduation marking. • Cutter assembly blades are not...
Operation Manual
Page 13
...Program * * Available only to end users located in the continental U.S., Alaska, and Hawaii Hamilton Beach Commercial understands that minimal on implied warranties or special, incidental or consequential damages, so the ...parts subject to wear, including without limitation: motor brushes, container and cutter assembly, clutches, bristle brushes, funnel, stainless steel cup, agitators, carafes, etc. You'll find that 's quick, convenient, and dependable. Friday 8:00 AM - 5:00 PM EST). Always use not in material and workmanship for your bottom line and your location. Hamilton Beach...
...Program * * Available only to end users located in the continental U.S., Alaska, and Hawaii Hamilton Beach Commercial understands that minimal on implied warranties or special, incidental or consequential damages, so the ...parts subject to wear, including without limitation: motor brushes, container and cutter assembly, clutches, bristle brushes, funnel, stainless steel cup, agitators, carafes, etc. You'll find that 's quick, convenient, and dependable. Friday 8:00 AM - 5:00 PM EST). Always use not in material and workmanship for your bottom line and your location. Hamilton Beach...


