
User Manual
Page 4
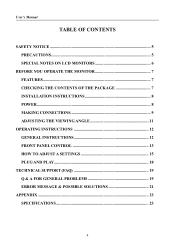
User's Manual TABLE OF CONTENTS SAFETY NOTICE 5 PRECAUTIONS 5 SPECIAL NOTES ON LCD MONITORS 6 BEFORE YOU OPERATE THE MONITOR 7 FEATURES...7 CHECKING THE CONTENTS OF THE PACKAGE 7 INSTALLATION INSTRUCTIONS 8 POWER...8 MAKING CONNECTIONS 9 ADJUSTING THE VIEWING ANGLE 11 OPERATING INSTRUCTIONS 12 GENERAL INSTRUCTIONS 12 FRONT PANEL CONTROL 13 HOW TO ADJUST A SETTINGS 15 PLUG AND PLAY 18 TECHNICAL SUPPORT (FAQ 19 Q & A FOR GENERAL PROBLEMS 19 ERROR MESSAGE & POSSIBLE SOLUTIONS 21 APPENDIX ...23 SPECIFICATIONS 23 4
User's Manual TABLE OF CONTENTS SAFETY NOTICE 5 PRECAUTIONS 5 SPECIAL NOTES ON LCD MONITORS 6 BEFORE YOU OPERATE THE MONITOR 7 FEATURES...7 CHECKING THE CONTENTS OF THE PACKAGE 7 INSTALLATION INSTRUCTIONS 8 POWER...8 MAKING CONNECTIONS 9 ADJUSTING THE VIEWING ANGLE 11 OPERATING INSTRUCTIONS 12 GENERAL INSTRUCTIONS 12 FRONT PANEL CONTROL 13 HOW TO ADJUST A SETTINGS 15 PLUG AND PLAY 18 TECHNICAL SUPPORT (FAQ 19 Q & A FOR GENERAL PROBLEMS 19 ERROR MESSAGE & POSSIBLE SOLUTIONS 21 APPENDIX ...23 SPECIFICATIONS 23 4
User Manual
Page 6
User's Manual SPECIAL NOTES ON LCD MONITORS The following symptoms are normal with LCD monitor and do not indicate a problem. • Due to the nature of 99.99% or more. Turn off the Power Switch and then turn it on ....ORG. 6 It may include blemishes of 0.01% or less such as a missing pixel or a pixel lit all of the time. • Due to repair the monitor yourself. FOR MORE INFORMATION, CONTACT THE ELECTRONIC INDUSTRIES ALLIANCE AT WWW.EIAE.ORG. In this case, the screen is displayed for repair. Lamp Disposal LAMP...
User's Manual SPECIAL NOTES ON LCD MONITORS The following symptoms are normal with LCD monitor and do not indicate a problem. • Due to the nature of 99.99% or more. Turn off the Power Switch and then turn it on ....ORG. 6 It may include blemishes of 0.01% or less such as a missing pixel or a pixel lit all of the time. • Due to repair the monitor yourself. FOR MORE INFORMATION, CONTACT THE ELECTRONIC INDUSTRIES ALLIANCE AT WWW.EIAE.ORG. In this case, the screen is displayed for repair. Lamp Disposal LAMP...
User Manual
Page 7
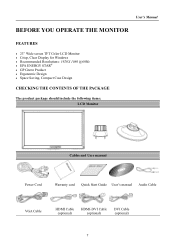
User's Manual BEFORE YOU OPERATE THE MONITOR FEATURES • 23" Wide screen TFT Color LCD Monitor • Crisp, Clear Display for Windows • Recommended Resolutions: 1920X 1080 @60Hz • EPA ENERGY STAR® • GP Green Product • Ergonomic Design • Space Saving, Compact Case Design CHECKING THE CONTENTS OF THE PACKAGE The product package should include the following items: LCD Monitor Cables and User manual Power Cord Warranty card Quick Start Guide User's manual Audio Cable VGA Cable HDMI Cable (optional) HDMI-DVI Cable (optional) DVI Cable (optional) 7
User's Manual BEFORE YOU OPERATE THE MONITOR FEATURES • 23" Wide screen TFT Color LCD Monitor • Crisp, Clear Display for Windows • Recommended Resolutions: 1920X 1080 @60Hz • EPA ENERGY STAR® • GP Green Product • Ergonomic Design • Space Saving, Compact Case Design CHECKING THE CONTENTS OF THE PACKAGE The product package should include the following items: LCD Monitor Cables and User manual Power Cord Warranty card Quick Start Guide User's manual Audio Cable VGA Cable HDMI Cable (optional) HDMI-DVI Cable (optional) DVI Cable (optional) 7
User Manual
Page 8
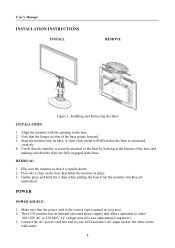
...that the clips are unattached. REMOVAL: 1. User's Manual INSTALLATION INSTRUCTIONS INSTALL REMOVE Figure.1. POWER POWER SOURCE: 1. Verify that the monitor is the correct type required in your LCD monitor's AC-input socket, the other end to wall-outlet. 8 Press the 2 clips on the base that allows operation in the ...base. 2. This LCD monitor has an Internal universal power supply that holds the monitor in the base. Snap the monitor into its base. Connect the AC-power cord one end to the base by looking at the...
...that the clips are unattached. REMOVAL: 1. User's Manual INSTALLATION INSTRUCTIONS INSTALL REMOVE Figure.1. POWER POWER SOURCE: 1. Verify that the monitor is the correct type required in your LCD monitor's AC-input socket, the other end to wall-outlet. 8 Press the 2 clips on the base that allows operation in the ...base. 2. This LCD monitor has an Internal universal power supply that holds the monitor in the base. Snap the monitor into its base. Connect the AC-power cord one end to the base by looking at the...
User Manual
Page 9
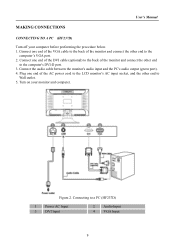
Plug one end of the DVI cable (optional) to the back of the monitor and connect the other end to Wall outlet. 5. Figure.2. Connect one end of the monitor and connect the other end to the computer's DVI-D port. 3. Connecting to the computer's VGA port. 2. Turn on your computer before ...performing the procedure below. 1. Connect one end of the VGA cable to the back of the AC power cord to the LCD monitor's AC input socket, and the other end to a PC (HF237D) 1 Power AC Input 3 DVI Input 2 Audio Input 4 VGA Input 9 User's Manual MAKING CONNECTIONS...
Plug one end of the DVI cable (optional) to the back of the monitor and connect the other end to Wall outlet. 5. Figure.2. Connect one end of the monitor and connect the other end to the computer's DVI-D port. 3. Connecting to the computer's VGA port. 2. Turn on your computer before ...performing the procedure below. 1. Connect one end of the VGA cable to the back of the AC power cord to the LCD monitor's AC input socket, and the other end to a PC (HF237D) 1 Power AC Input 3 DVI Input 2 Audio Input 4 VGA Input 9 User's Manual MAKING CONNECTIONS...
User Manual
Page 10
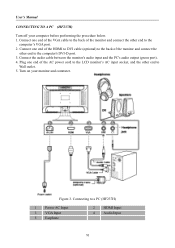
Figure.3. Plug one end of the AC power cord to the LCD monitor's AC input socket, and the other end to a PC (HF237H) 1 Power AC Input 3 VGA Input 5 Earphone 2 HDMI Input 4 Audio Input 10 Turn on your computer ... Wall outlet. 5. Connect one end of the HDMI to DVI cable (optional) to the back of the monitor and connect the other end to the computer's VGA port. 2. Connect the audio cable between the monitor's audio input and the PC's audio output (green port). 4. Connect one end of the VGA cable to...
Figure.3. Plug one end of the AC power cord to the LCD monitor's AC input socket, and the other end to a PC (HF237H) 1 Power AC Input 3 VGA Input 5 Earphone 2 HDMI Input 4 Audio Input 10 Turn on your computer ... Wall outlet. 5. Connect one end of the HDMI to DVI cable (optional) to the back of the monitor and connect the other end to the computer's VGA port. 2. Connect the audio cable between the monitor's audio input and the PC's audio output (green port). 4. Connect one end of the VGA cable to...

User Manual
Page 11
...; Be careful not to 15°. Figure.4. Monitor Angle NOTES: • Do not touch the LCD screen when you change the angle. User's Manual ADJUSTING THE VIEWING ANGLE • For optimal viewing it is recommended to look at the full face of the monitor, then adjust the monitor's angle to your own preference. •...
...; Be careful not to 15°. Figure.4. Monitor Angle NOTES: • Do not touch the LCD screen when you change the angle. User's Manual ADJUSTING THE VIEWING ANGLE • For optimal viewing it is recommended to look at the full face of the monitor, then adjust the monitor's angle to your own preference. •...


