User Manual
Page 2
... use . b. Failure to follow this instruction manual cannot cover all safety messages that follow the warnings and instructions may ignite the dust or fumes. Always wear ANSI-approved eye protection during setup and use this product, but must be understood by the operator that may result in electric shock, fire and/or serious injury. Table of contents Safety 2 Specifications 5 Setup 6 Maintenance 11 Parts List and Diagram 14 Warranty 16 SAFETy SETUP MAINTENANcE...
... use . b. Failure to follow this instruction manual cannot cover all safety messages that follow the warnings and instructions may ignite the dust or fumes. Always wear ANSI-approved eye protection during setup and use this product, but must be understood by the operator that may result in electric shock, fire and/or serious injury. Table of contents Safety 2 Specifications 5 Setup 6 Maintenance 11 Parts List and Diagram 14 Warranty 16 SAFETy SETUP MAINTENANcE...
User Manual
Page 3
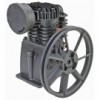
... a 3 HP electric motor and pulley (both not included) which can turn the Air Compressor Pump Pulley at any other reproductive harm). (California Health & Safety code § 25249.5, et seq.) MAINTENANcE PARTS LIST Item 67697 For technical questions, please call 1-800-444-3353. check for a similarly rated pump on the Compressor Pump. SAFETy SETUP General Safety Warnings (continued) 3. Maintain the compressor Pump. This will work to persons. 5. compressor Pump use of accessories or attachments not recommended by a safety guard...
... a 3 HP electric motor and pulley (both not included) which can turn the Air Compressor Pump Pulley at any other reproductive harm). (California Health & Safety code § 25249.5, et seq.) MAINTENANcE PARTS LIST Item 67697 For technical questions, please call 1-800-444-3353. check for a similarly rated pump on the Compressor Pump. SAFETy SETUP General Safety Warnings (continued) 3. Maintain the compressor Pump. This will work to persons. 5. compressor Pump use of accessories or attachments not recommended by a safety guard...
User Manual
Page 4
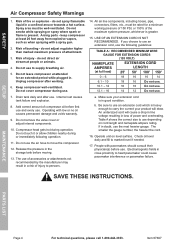
... first use and every use the next heavier gauge. An undersized cord will draw. Table A shows the correct size to use the air hose to use an extension cord, use the following operation. 11. Arcing parts - Risk of injury - Do not cover compressor during or immediately following guidelines: TABLE A: REcOMMENDED MINIMUM WIRE GAUGE FOR EXTENSION cORDS (120 VOLT) NAMEPLATE AMPERES (at people or animals. 4. do not direct air stream at full load) EXTENSION cORD...
... first use and every use the next heavier gauge. An undersized cord will draw. Table A shows the correct size to use the air hose to use an extension cord, use the following operation. 11. Arcing parts - Risk of injury - Do not cover compressor during or immediately following guidelines: TABLE A: REcOMMENDED MINIMUM WIRE GAUGE FOR EXTENSION cORDS (120 VOLT) NAMEPLATE AMPERES (at people or animals. 4. do not direct air stream at full load) EXTENSION cORD...
User Manual
Page 5
...-1/4" H 89 dB @ 1m MAINTENANcE PARTS LIST Item 67697 For technical questions, please call 1-800-444-3353. If damaged, have a proper outlet installed by a service facility before use the motor if the power cord or plug is properly grounded. Oil Lubricated Required HP 3 HP motor Rated Air Pressure 145 PSI Maximum Speed 1050 RPM Air Outlet 3/4" -16 UNF Air Delivery @ 1050 RPM Lubrication Oil Type Pump Pulley Belt Type Mounting Hole Pattern Recommended Mounting Bolts Overall Dimensions Sound Level 11...
...-1/4" H 89 dB @ 1m MAINTENANcE PARTS LIST Item 67697 For technical questions, please call 1-800-444-3353. If damaged, have a proper outlet installed by a service facility before use the motor if the power cord or plug is properly grounded. Oil Lubricated Required HP 3 HP motor Rated Air Pressure 145 PSI Maximum Speed 1050 RPM Air Outlet 3/4" -16 UNF Air Delivery @ 1050 RPM Lubrication Oil Type Pump Pulley Belt Type Mounting Hole Pattern Recommended Mounting Bolts Overall Dimensions Sound Level 11...
User Manual
Page 6
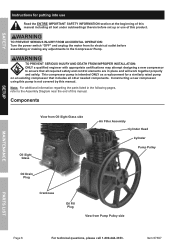
... AccIDENTAL OPERATION: Turn the power switch "OFF" and unplug the motor from Pump Pulley side MAINTENANcE PARTS LIST Page 6 For technical questions, please call 1-800-444-3353. This compressor pump is not covered by this manual. components View from Oil Sight Glass side Oil Sight Glass Air Filter Assembly cylinder Head cylinder Pump Pulley Oil Drain Plug crankcase Oil Fill Plug View from its electrical outlet before set up or use Read the ENTIRE IMPORTANT SAFETy...
... AccIDENTAL OPERATION: Turn the power switch "OFF" and unplug the motor from Pump Pulley side MAINTENANcE PARTS LIST Page 6 For technical questions, please call 1-800-444-3353. This compressor pump is not covered by this manual. components View from Oil Sight Glass side Oil Sight Glass Air Filter Assembly cylinder Head cylinder Pump Pulley Oil Drain Plug crankcase Oil Fill Plug View from its electrical outlet before set up or use Read the ENTIRE IMPORTANT SAFETy...
User Manual
Page 7
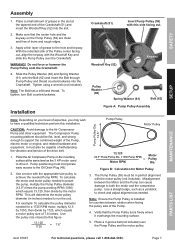
... is installed for Motor Pulley 3. Tighten using a wrench (not included). Woodruff Key (52) Keyway Pulley Washer (60) Spring Washer (61) Bolt (62) Installation Figure A: Pump Pulley Assembly Note: Depending on the Pump Pulley (59) are clean and free of the Pump, electric motor or engine, and related hardware and equipment. This will determine the motor pulley diameter (in the slot at the same level as the 3 HP motor used to the Air Compressor Pump...
... is installed for Motor Pulley 3. Tighten using a wrench (not included). Woodruff Key (52) Keyway Pulley Washer (60) Spring Washer (61) Bolt (62) Installation Figure A: Pump Pulley Assembly Note: Depending on the Pump Pulley (59) are clean and free of the Pump, electric motor or engine, and related hardware and equipment. This will determine the motor pulley diameter (in the slot at the same level as the 3 HP motor used to the Air Compressor Pump...
User Manual
Page 8
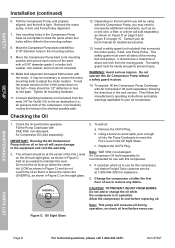
... center dot (LOW as needed accessories. 13. Remove the Oil Fill Plug. change the oil while the compressor is recommended for this compressor. 4. Allow the compressor to prevent injury. Check the oil level before replacing oil. To add oil: a. OVERFILL FULL LOW cAUTION! Figure c: Oil Sight Glass MAINTENANcE PARTS LIST Page 8 For technical questions, please call Harbor Freight Tools customer service at mid span. Avoid serious injuries. This safety guard must be 1/2" deflection...
... center dot (LOW as needed accessories. 13. Remove the Oil Fill Plug. change the oil while the compressor is recommended for this compressor. 4. Allow the compressor to prevent injury. Check the oil level before replacing oil. To add oil: a. OVERFILL FULL LOW cAUTION! Figure c: Oil Sight Glass MAINTENANcE PARTS LIST Page 8 For technical questions, please call Harbor Freight Tools customer service at mid span. Avoid serious injuries. This safety guard must be 1/2" deflection...
User Manual
Page 9
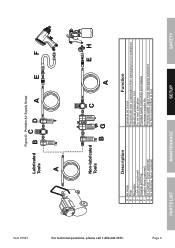
...) E Coupler and Plug F Leader Hose (optional) G Air Cleaner / Dryer (optional) H Air Adjusting Valve (optional) Function Connects air to tool Prevents dirt and condensation from damaging tool or workpiece Adjusts air pressure to tool For air tool lubrication Provides quick connection and release Increases coupler life Prevents water vapor from damaging workpiece For fine tuning airflow at tool PARTS LIST MAINTENANcE SETUP SAFETy Page 9 Item 67697 Figure D: Portable Air Supply Setup Lubricated Tools BC D A E F A For technical questions...
...) E Coupler and Plug F Leader Hose (optional) G Air Cleaner / Dryer (optional) H Air Adjusting Valve (optional) Function Connects air to tool Prevents dirt and condensation from damaging tool or workpiece Adjusts air pressure to tool For air tool lubrication Provides quick connection and release Increases coupler life Prevents water vapor from damaging workpiece For fine tuning airflow at tool PARTS LIST MAINTENANcE SETUP SAFETy Page 9 Item 67697 Figure D: Portable Air Supply Setup Lubricated Tools BC D A E F A For technical questions...
User Manual
Page 10
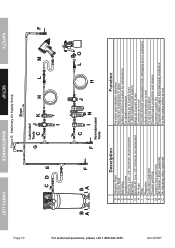
SAFETy SETUP MAINTENANcE PARTS LIST Page 10 Figure E: Stationary Air Supply Setup Slope Lubricated G Tools C J K H L M F CD E I Filter J Regulator K Lubricator (optional) L Coupler and Plug M Leader Hose (optional) N Air Cleaner / Dryer (optional) O Air Adjusting Valve (optional) Function For noise and vibration reduction Secures air compressor in place Isolates sections of system for maintenance For vibration reduction Distributes air to branch lines To drain moisture from system Brings air to point of...
SAFETy SETUP MAINTENANcE PARTS LIST Page 10 Figure E: Stationary Air Supply Setup Slope Lubricated G Tools C J K H L M F CD E I Filter J Regulator K Lubricator (optional) L Coupler and Plug M Leader Hose (optional) N Air Cleaner / Dryer (optional) O Air Adjusting Valve (optional) Function For noise and vibration reduction Secures air compressor in place Isolates sections of system for maintenance For vibration reduction Distributes air to branch lines To drain moisture from system Brings air to point of...
User Manual
Page 11
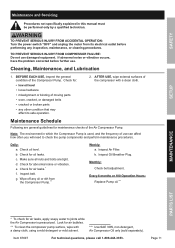
... used, and the frequency of the Air Compressor Pump. Make sure all nuts and bolts are general guidelines for oil leaks. e. Monthly: Check belt adjustment. SAFETy SETUP Maintenance and Servicing Procedures not specifically explained in which the Compressor Pump is pressurized. Note: The environment in this manual must be performed only by a qualified technician. c. d. Check oil level. TO PREVENT SERIOUS INJURy FROM AccIDENTAL OPERATION: Turn the power switch "OFF" and unplug the motor...
... used, and the frequency of the Air Compressor Pump. Make sure all nuts and bolts are general guidelines for oil leaks. e. Monthly: Check belt adjustment. SAFETy SETUP Maintenance and Servicing Procedures not specifically explained in which the Compressor Pump is pressurized. Note: The environment in this manual must be performed only by a qualified technician. c. d. Check oil level. TO PREVENT SERIOUS INJURy FROM AccIDENTAL OPERATION: Turn the power switch "OFF" and unplug the motor...
User Manual
Page 12
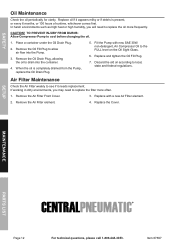
... to cool before changing the oil. 1. If working in dirty environments, you will need to drain into the Pump. 3. Remove the Air Filter element. 4. Item 67697 TO PREVENT INJURy FROM BURNS: Allow compressor Pump to local, state and federal regulations. Place a container under the Oil Drain Plug. 2. Remove the Air Filter Front Cover. 3. Remove the Oil Drain Plug, allowing the oil to replace the filter more frequently...
... to cool before changing the oil. 1. If working in dirty environments, you will need to drain into the Pump. 3. Remove the Air Filter element. 4. Item 67697 TO PREVENT INJURy FROM BURNS: Allow compressor Pump to local, state and federal regulations. Place a container under the Oil Drain Plug. 2. Remove the Air Filter Front Cover. 3. Remove the Oil Drain Plug, allowing the oil to replace the filter more frequently...
User Manual
Page 13
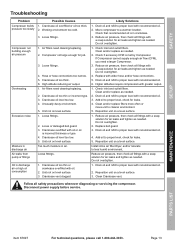
... with a soap solution for air leaks and tighten as needed . Replace belt guard. 3. SAFETy SETUP Troubleshooting Problem Compressor builds pressure too slowly Compressor not building enough air pressure Overheating Excessive noise Moisture in discharge air Air leaks from pump or fittings Oil in crankcase. 3. Unusually dusty environment. 5. Clean and/or replace as needed . Reposition unit on level surface. 3. Loose or damaged belt guard. 3. Check that recommended oil is met by Compressor. Unit not on a level...
... with a soap solution for air leaks and tighten as needed . Replace belt guard. 3. SAFETy SETUP Troubleshooting Problem Compressor builds pressure too slowly Compressor not building enough air pressure Overheating Excessive noise Moisture in discharge air Air leaks from pump or fittings Oil in crankcase. 3. Unusually dusty environment. 5. Clean and/or replace as needed . Reposition unit on level surface. 3. Loose or damaged belt guard. 3. Check that recommended oil is met by Compressor. Unit not on a level...
User Manual
Page 14
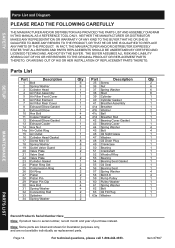
... PARTS LIST AND ASSEMBLY DIAGRAM IN THIS MANUAL AS A REFERENCE TOOL ONLY. Parts List Part Description 1 Bolt 2 Spring Washer 3 Cylinder Head 4 Air Filter Assembly 5 Air Filter Front Cover 6 Air Filter Element 7 Air Filter Rear Cover 8 Exhaust Elbow Gasket 9 Exhaust Elbow 10 Hex Bolt 11 Copper Washer 12 Exhaust Elbow Gasket 13 Exhaust Cooler 14 Hex Nut 14a Air Outlet Ring 15 Air Outlet 16 Cylinder Head Gasket 17 Screw M4 x 10 18 Spring Washer 19 Outlet Valve Guard 20 Valve Plate...
... PARTS LIST AND ASSEMBLY DIAGRAM IN THIS MANUAL AS A REFERENCE TOOL ONLY. Parts List Part Description 1 Bolt 2 Spring Washer 3 Cylinder Head 4 Air Filter Assembly 5 Air Filter Front Cover 6 Air Filter Element 7 Air Filter Rear Cover 8 Exhaust Elbow Gasket 9 Exhaust Elbow 10 Hex Bolt 11 Copper Washer 12 Exhaust Elbow Gasket 13 Exhaust Cooler 14 Hex Nut 14a Air Outlet Ring 15 Air Outlet 16 Cylinder Head Gasket 17 Screw M4 x 10 18 Spring Washer 19 Outlet Valve Guard 20 Valve Plate...
User Manual
Page 15
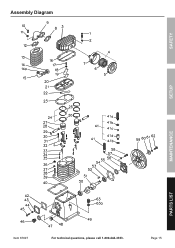
Page 15 Assembly Diagram SAFETy SETUP MAINTENANcE PARTS LIST Item 67697 For technical questions, please call 1-800-444-3353.
Page 15 Assembly Diagram SAFETy SETUP MAINTENANcE PARTS LIST Item 67697 For technical questions, please call 1-800-444-3353.
User Manual
Page 16
... defect, we will return repaired products at our election or we may elect to refund the purchase price if we determine there is free from defects in no defect, or that this warranty, the product or part must be liable for death...installation, normal wear and tear, or to you must accompany the merchandise. Limited 90 Day Warranty Harbor Freight Tools Co. This warranty gives you specific legal rights and you with transportation charges prepaid. Proof of purchase date and an explanation of the complaint must bear the cost of our product. We will either repair or replace...
... defect, we will return repaired products at our election or we may elect to refund the purchase price if we determine there is free from defects in no defect, or that this warranty, the product or part must be liable for death...installation, normal wear and tear, or to you must accompany the merchandise. Limited 90 Day Warranty Harbor Freight Tools Co. This warranty gives you specific legal rights and you with transportation charges prepaid. Proof of purchase date and an explanation of the complaint must bear the cost of our product. We will either repair or replace...


