Harbor Freight Tools 68886 - 180 Amp MIG/Flux Wire Feed Welder Support and Manuals
Get Help and Manuals for this Harbor Freight Tools item

View All Support Options Below
Free Harbor Freight Tools 68886 manuals!
Problems with Harbor Freight Tools 68886?
Ask a Question
Free Harbor Freight Tools 68886 manuals!
Problems with Harbor Freight Tools 68886?
Ask a Question
Popular Harbor Freight Tools 68886 Manual Pages
User Manual - Page 3

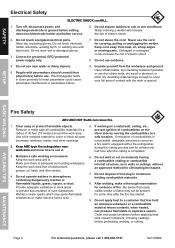
...Industrial Hygiene or Environmental Services check the operation ...and general area. Keep head out of ears. Follow OSHA guidelines for the specific welding situation.
Wear ANSI-approved welding eye protection featuring at arc, or ... hold molten metal or sparks.
3. Do not breathe exhaust fumes.
4. SAFETY
SETUP
BASIC WELDING
Fume and Gas Safety
FUMES AND GASES can be linked to exposure
...
User Manual - Page 4
...ground before setting down torch/electrode holder and before use. Do not use the cord for a radius of contact with pacemakers should consult their physician(s) before service.
6. SETUP
BASIC WELDING...
1. Do not expose welders to prevent accumulation of fire. Do not touch energized electrical parts. Do not touch electrode holder, electrode, welding torch, or welding wire with a fire...
User Manual - Page 6

...the tool should be used, provided it repaired by a qualified electrician, do not use...codes and ordinances.
3. If the plug will need to be attached to 50 A)
Extension Cords
Do not use adapter plugs.
1.
Do not use on a 50 A circuit. If the tool must never be installed by qualified service personnel; Do not patch cords of the following UL-listed, 3 wire cords as a replacement...
User Manual - Page 8

... its edges. A 250 VAC plug will need to be installed by a certified electrician before set up to the Face Shield by a certified electrician. NOTE ...for up to handle the electrical requirements of this manual including all text under subheadings therein before use of... Turn the Power Switch off and unplug the welder before setup. A different 250 VAC plug and outlet combination may be ...
User Manual - Page 9

..., and upper Spool Plate. Page 9
To prevent wire feed problems, set the Spool so that it before proceeding.
2. wire must unwind ...
Item 68886
For technical questions, please call 1-888-866-5797. If replacing a Spool, remove the old Spool and all remaining wire from the ...SETUP
BASIC WELDING
Wire Spool Installation
1.
Turn the welder OFF and unplug it will unwind clockwise....
User Manual - Page 16

... Torch is energized whenever the Power Switch is on . Adjust this according to the weld settings chart to cool with delayed action type circuit breaker or fuses.
Power Switch: This turns ... in overheating the welder. The wire and welding current feeds to prevent needless wear. SAFETY
SETUP
Control Panel Layout
Overload Indicator
Torch Cable
Power Switch
Ground Cable
I O
MIG 180 WIRE ...
User Manual - Page 17

...welder can produce a particular welding current without overheating. The settings should only be used again, use shorter welding periods ...the Overload Indicator lights, then the welder automatically returns to service after every 2 minutes of continuous welding.
Proper welding takes ...technical questions, please call 1-888-866-5797. SAFETY
SETUP
Duty Cycle (Duration of Use)
Avoid damage to ...
User Manual - Page 18

...6
1/8″ 3.2mm
D 7
Metal Thickness
3/16″
1/4″
4.8mm 6.4mm
E 9
SETUP
BASIC WELDING
WELDING TIPS
MIG Weld Settings
DCEP
GAS
Polarity
Metal Thickness
Material Being
Welded
Mild Steel
Wire Type
Solid (E70S-6)
Wire Shielding Suggested
...Diameter Gas
Settings
.023″ .030″ .035″
25% CO2...
User Manual - Page 19

... to bare metal. clamps
workpieces
Clean surfaces to WIRE FEED WELDER ITEM 68886 the desired settings. Set the Wire Speed Dial and the Current Switch to bare metal. Page 19 there must... near the weld area, or to bare metal on the weld surfaces, only bare metal.
2. SAFETY
SETUP
Setting Up The Weld
1. Clamp Ground Cable to metal work bench where the workpiece is clamped.
Make practice ...
User Manual - Page 22

...help prevent needless wear. Torch
concrete slab
(or other heat-proof, non-conductive surface)
7. SAFETY
SETUP
BASIC WELDING
Note: If Welder is complete, lift the Torch and welding wire clearly away from any... 22
For technical questions, please call 1-888-866-5797.
Weld will shut off .
Set the Torch down on an electrically non-conductive, heat-resistant surface, such as explained on...
User Manual - Page 23

...clear from flux core wire will be covered by adjusting your weld technique to remedy any problems found.
dead-blow hammer
clamp
SCRAP workpiece
GOOD WELD bends and is not intended to test...to examine a weld's appearance after it is performed on top.
weld bead
spatter
base metal
SETUP
BASIC WELDING
Cleaning the Weld
TO PREVENT SERIOUS INJURY: Continue to damage the weld or base ...
User Manual - Page 25

... briefly at weld: Reduce wire feed speed.
SAFETY
Weld Problems
Penetration (Workpiece Heat Control)
EXCESS PENETRATION OR BURN-THROUGH
... AWAY TO SHOW WELD Slag is a necessary part of weld puddle.
Dirty workpiece: Clean workpiece down ...questions, please call 1-888-866-5797.
Page 25
MAINTENANCE SETUP
BASIC WELDING
WELDING TIPS
PROFILE VIEWS
POSSIBLE CAUSES AND SOLUTIONS...
User Manual - Page 26

...speed. 5. Burn-Through
Base material melts away, leaving a hole in the bead.
SAFETY
SETUP
Porosity
Small cavities or holes in the weld. Insufficient shielding gas (MIG only): Increase ...6.
Make certain that welding speed is set correctly for type of gas. Welding speed too slow:
Increase welding speed and ensure that wire is a problem. Item 68886
TOP VIEW
POSSIBLE CAUSES AND...
User Manual - Page 27
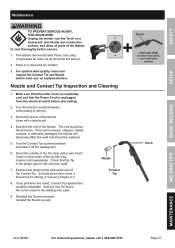
...parts of the tip with a tip cleaner (sold separately). Store in it.
8. Make sure that the entire Torch is completely cool and that the Power Cord is uneven, chipped, melted, cracked, or otherwise damaged, the Nozzle will adversely effect the weld and should be replaced...problems are noted, Contact Tip replacement...cool thoroughly before service.
1. The ...5797. SAFETY
SETUP
BASIC WELDING
...
User Manual - Page 29

...PARTS LIST AND ASSEMBLY DIAGRAM IN THIS MANUAL AS A REFERENCE TOOL ONLY. SAFETY
SETUP
Troubleshooting (continued)
IMPORTANT!
IN FACT, THE MANUFACTURER AND/OR DISTRIBUTOR EXPRESSLY STATES THAT ALL REPAIRS AND PARTS REPLACEMENTS...HIS OR HER REPAIRS TO THE ORIGINAL PRODUCT OR REPLACEMENT PARTS THERETO, OR ARISING OUT OF HIS OR HER INSTALLATION OF REPLACEMENT PARTS THERETO. Tripped ...
Harbor Freight Tools 68886 Reviews
We have not received any reviews for Harbor Freight Tools yet.