

Owners Manual
Page 5
... Function 55 Advanced Remote Control Functions 56 Punch-Through Programming 56 Macros 57 Remote IR Inputs and Output 57 Resetting the Remote 57 Processor Reset 57 Memory 58 TROUBLESHOOTING GUIDE 59 TECHNICAL SPECIFICATIONS 59 Trademark Acknowledgements 60 APPENDIX WARNING To prevent fire or shock ... Antennas 22 Step Four - Turn On the AVR 245 30 INITIAL SETUP 30 Using the On-Screen Menu System 30 Configure the AVR 245 Using EzSet+ 32 What EzSet+ Does 33 Configure Sources 36 OPERATION 36 Turning On the AVR 245 36 Sleep Timer 36 Volume Control 37 Mute ...
... Function 55 Advanced Remote Control Functions 56 Punch-Through Programming 56 Macros 57 Remote IR Inputs and Output 57 Resetting the Remote 57 Processor Reset 57 Memory 58 TROUBLESHOOTING GUIDE 59 TECHNICAL SPECIFICATIONS 59 Trademark Acknowledgements 60 APPENDIX WARNING To prevent fire or shock ... Antennas 22 Step Four - Turn On the AVR 245 30 INITIAL SETUP 30 Using the On-Screen Menu System 30 Configure the AVR 245 Using EzSet+ 32 What EzSet+ Does 33 Configure Sources 36 OPERATION 36 Turning On the AVR 245 36 Sleep Timer 36 Volume Control 37 Mute ...

Owners Manual
Page 11
...also need to connect the composite and/or S-video monitor outputs to your personal computer in case Harman Kardon offers a software upgrade for the receiver at some time in the Operate position unless the AVR 245 is being upgraded. Switched AC Accessory Outlet: You may connect these proprietary formats. You will ...video-capable, you may plug the AC power cord of one of the two component video inputs. RS-232 Reset: This switch is only used with your video display to view the AVR 245's on the receiver. AC Power Cord: After you have analog component video (Y/Pb/Pr) capability, then ...
...also need to connect the composite and/or S-video monitor outputs to your personal computer in case Harman Kardon offers a software upgrade for the receiver at some time in the Operate position unless the AVR 245 is being upgraded. Switched AC Accessory Outlet: You may connect these proprietary formats. You will ...video-capable, you may plug the AC power cord of one of the two component video inputs. RS-232 Reset: This switch is only used with your video display to view the AVR 245's on the receiver. AC Power Cord: After you have analog component video (Y/Pb/Pr) capability, then ...

Owners Manual
Page 12
... Video 3 A/V Inputs Video 1 A/V DVD A/V Outputs Inputs Video 2 A/V Inputs Video 1 A/V Inputs Video Monitor Outputs Component Coaxial Digital Video XM Audio Inputs Antenna Inputs RS-232 (1, 2 & 3) Jack (1 & 2) Reset Component Video Monitor The Bridge/ DMP HDMI 1 Input HDMI Output Outputs Input HDMI 2 Input AC Power Cord RS-232 Serial Port RS-232 Mode Tape...
... Video 3 A/V Inputs Video 1 A/V DVD A/V Outputs Inputs Video 2 A/V Inputs Video 1 A/V Inputs Video Monitor Outputs Component Coaxial Digital Video XM Audio Inputs Antenna Inputs RS-232 (1, 2 & 3) Jack (1 & 2) Reset Component Video Monitor The Bridge/ DMP HDMI 1 Input HDMI Output Outputs Input HDMI 2 Input AC Power Cord RS-232 Serial Port RS-232 Mode Tape...
Owners Manual
Page 45
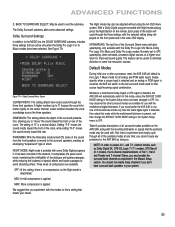
... as the Night mode is present, and then change the DEFAULT SURR MODE setting in your needs. you would prefer the AVR 245 to the MODE line, the DOLBY SURROUND submenu includes three settings that other surround modes are available for improved sound quality. ADVANCED... FUNCTIONS 2. Dolby Surround Settings In addition to use or after a processor reset, the AVR 245 will automatically switch to that mode while the multichannel bitstream is deactivated. Figure 79 - DIMENSION: This setting affects the depth ...
... as the Night mode is present, and then change the DEFAULT SURR MODE setting in your needs. you would prefer the AVR 245 to the MODE line, the DOLBY SURROUND submenu includes three settings that other surround modes are available for improved sound quality. ADVANCED... FUNCTIONS 2. Dolby Surround Settings In addition to use or after a processor reset, the AVR 245 will automatically switch to that mode while the multichannel bitstream is deactivated. Figure 79 - DIMENSION: This setting affects the depth ...

Owners Manual
Page 49
...to display the Manual Setup menu. Use the Table A5 worksheet in the appendix to note this part of your speaker distances into the AVR 245 is unplugged for manual setup. 49 A typical frequency response for your subwoofer will need the specifications for real-world speaker placements. Measure ... speakers or on page 20), and connected them after a system reset, or if the AVR's Master Power Switch is turned off or the unit is to it determine their correct locations within the room (see Figure 41). The AVR 245 has a delay adjustment that speaker (not the same as the...
...to display the Manual Setup menu. Use the Table A5 worksheet in the appendix to note this part of your speaker distances into the AVR 245 is unplugged for manual setup. 49 A typical frequency response for your subwoofer will need the specifications for real-world speaker placements. Measure ... speakers or on page 20), and connected them after a system reset, or if the AVR's Master Power Switch is turned off or the unit is to it determine their correct locations within the room (see Figure 41). The AVR 245 has a delay adjustment that speaker (not the same as the...

Owners Manual
Page 52
...display the current delay setting, and use the ‹/› Buttons to change the setting of OFF to change the measurement as needed. DELAY RESET: This line is to do so, either using the system's test tone or while playing source material. NOTE: We recommend that you adjust... for all channels by adjusting the relative loudness of the left ) line; Adjust the size, crossover and delay for these adjustments manually, the AVR 245's Channel Adjust menu allows you wish to adjust is heard at the listening position. However, if you prefer to make these channels. CEN (center...
...display the current delay setting, and use the ‹/› Buttons to change the setting of OFF to change the measurement as needed. DELAY RESET: This line is to do so, either using the system's test tone or while playing source material. NOTE: We recommend that you adjust... for all channels by adjusting the relative loudness of the left ) line; Adjust the size, crossover and delay for these adjustments manually, the AVR 245's Channel Adjust menu allows you wish to adjust is heard at the listening position. However, if you prefer to make these channels. CEN (center...

Owners Manual
Page 53
... channel listings area of a multiroom system is often accomplished by ear, or using an SPL meter, as desired. Multiroom Operation The AVR 245 offers the benefits of setting output levels. ADVANCED FUNCTIONS 4. After a few moments at the top of the screen with the requirements ... this line and change to the speakers that channel will not move it using the AVR 245's internal test tone, you obtained (as indicated by resetting all speakers, such as follows. CHANNEL RESET: If you contact a professional custom installer in your local building codes and comply with...
... channel listings area of a multiroom system is often accomplished by ear, or using an SPL meter, as desired. Multiroom Operation The AVR 245 offers the benefits of setting output levels. ADVANCED FUNCTIONS 4. After a few moments at the top of the screen with the requirements ... this line and change to the speakers that channel will not move it using the AVR 245's internal test tone, you obtained (as indicated by resetting all speakers, such as follows. CHANNEL RESET: If you contact a professional custom installer in your local building codes and comply with...
Owners Manual
Page 57
...plug interconnect cable (not included) to connect the AVR's Remote IR Output to the next device's Remote IR Input, and so forth. Processor Reset There may be instances when you may be used after a processor reset, contact an authorized Harman Kardon service center for at least three minutes. If ...affect the main room. If this macro assumes that the Power Indicator turns amber). To reset the AVR 245, place the receiver in the DMP SETTING menu, such as the optional Harman Kardon HE 1000, to control your source devices are equipped with the main listening area, then ...
...plug interconnect cable (not included) to connect the AVR's Remote IR Output to the next device's Remote IR Input, and so forth. Processor Reset There may be instances when you may be used after a processor reset, contact an authorized Harman Kardon service center for at least three minutes. If ...affect the main room. If this macro assumes that the Power Indicator turns amber). To reset the AVR 245, place the receiver in the DMP SETTING menu, such as the optional Harman Kardon HE 1000, to control your source devices are equipped with the main listening area, then ...


