

Product Information
Page 8
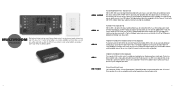
Two HDMI 1.1 inputs are both XM Ready and The Bridge connections let you connect and command virtually any home theater source. Digital audio extras include XM Ready®2 capability, iPod playback through The Bridge docking station, and USB playback from the HDMI inputs. Digital decoding, bass management and EzSet/EQ technology transform the most flexible AVR we've ever produced. 7 x 75W 7.1-Channel A/V Receiver With HDMI Switching and Audio Processing Versatility at its best! Add full multiroom capability with ease...
Two HDMI 1.1 inputs are both XM Ready and The Bridge connections let you connect and command virtually any home theater source. Digital audio extras include XM Ready®2 capability, iPod playback through The Bridge docking station, and USB playback from the HDMI inputs. Digital decoding, bass management and EzSet/EQ technology transform the most flexible AVR we've ever produced. 7 x 75W 7.1-Channel A/V Receiver With HDMI Switching and Audio Processing Versatility at its best! Add full multiroom capability with ease...
Product Information
Page 14
... sources so everyone can add the receiver's tuner, XM Radio or The Bridge docking station (when equipped) to operate your Harman Kardon system. 26 27 Thanks to a built-in amplifier and a single-cable connection to any multichannel or stereo receiver with A-BUS technology via a simple link and you select and control your listening source, raise or lower the volume for the AVR 247) a second-zone remote control, making it easy to just one room? MULTIROOM Products...
... sources so everyone can add the receiver's tuner, XM Radio or The Bridge docking station (when equipped) to operate your Harman Kardon system. 26 27 Thanks to a built-in amplifier and a single-cable connection to any multichannel or stereo receiver with A-BUS technology via a simple link and you select and control your listening source, raise or lower the volume for the AVR 247) a second-zone remote control, making it easy to just one room? MULTIROOM Products...

Product Information
Page 22
... player1 iPod® Requirements iPod player with docking connector (not compatible with iPod shuffle™ player) Receiver Requirements Harman Kardon® AVR (AVR 40, 45 or 47 Series, or AVR 146) with DMP/The Bridge docking connector Video Compatibility AVR 146 or AVR 47 Series Dimensions (H x W x D) 1-3/16" x 4-1/2" x 4-1/2" Weight 5.9 Ounces 1: Compatible with iPod models with Service Pack 1 or higher. 4: Except tuner, The Bridge/DMP, XM Radio and 6-/8-channel sources. SPECIFICATIONS Model AVR 745 AVR 645 Description 7.2-Channel AVR 7.1-Channel AVR Stereo Power 100...
... player1 iPod® Requirements iPod player with docking connector (not compatible with iPod shuffle™ player) Receiver Requirements Harman Kardon® AVR (AVR 40, 45 or 47 Series, or AVR 146) with DMP/The Bridge docking connector Video Compatibility AVR 146 or AVR 47 Series Dimensions (H x W x D) 1-3/16" x 4-1/2" x 4-1/2" Weight 5.9 Ounces 1: Compatible with iPod models with Service Pack 1 or higher. 4: Except tuner, The Bridge/DMP, XM Radio and 6-/8-channel sources. SPECIFICATIONS Model AVR 745 AVR 645 Description 7.2-Channel AVR 7.1-Channel AVR Stereo Power 100...

Product Information
Page 23
... 5.1-Channel integrated home theater system Multichannel Power 35W x 5*, THD WMA: 64 kbps - 320 kbps MP3: 32 kbps - 320 kbps; Model DVD 48 DVD 38 Description Progressive-scan DVD audio/video and SACD™ player with HDMI™ Progressive-scan DVD audio/video player with HDMI™ Video Formats DVD, DVD-R/RW, DVD+R/RW, VCD DVD, DVD-R/RW, DVD+R/RW, VCD Audio Formats DVD-Audio, SACD, CD, CD-R/RW, MP3, WMA** DVD-Audio, CD, CD-R/RW, MP3, WMA** HDMI™ Output Yes, HDMI...
... 5.1-Channel integrated home theater system Multichannel Power 35W x 5*, THD WMA: 64 kbps - 320 kbps MP3: 32 kbps - 320 kbps; Model DVD 48 DVD 38 Description Progressive-scan DVD audio/video and SACD™ player with HDMI™ Progressive-scan DVD audio/video player with HDMI™ Video Formats DVD, DVD-R/RW, DVD+R/RW, VCD DVD, DVD-R/RW, DVD+R/RW, VCD Audio Formats DVD-Audio, SACD, CD, CD-R/RW, MP3, WMA** DVD-Audio, CD, CD-R/RW, MP3, WMA** HDMI™ Output Yes, HDMI...
Owners Manual
Page 5
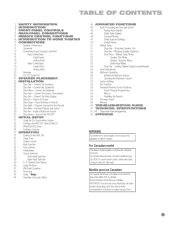
.... Connect the Source Components 27 Step Five - Insert Batteries in AC Power 28 Step Seven - Manual Setup Menu 52 Speaker Size Menu 53 Speaker Crossover Menu 53 Delay Adjust Menu 54 Step Four - Setting Channel Output Levels Manually 55 Video Adjustments 56 Multiroom Operation 56 Installing a Multiroom System 57 Operating the Multiroom System 57 System Settings 58 Dim Function 58 Advanced Remote Control Functions 58 Punch-Through Programming 59 Macros 59 Resetting the Remote 59 Processor Reset 59 Memory 60 TROUBLESHOOTING GUIDE 61 TECHNICAL SPECIFICATIONS...
.... Connect the Source Components 27 Step Five - Insert Batteries in AC Power 28 Step Seven - Manual Setup Menu 52 Speaker Size Menu 53 Speaker Crossover Menu 53 Delay Adjust Menu 54 Step Four - Setting Channel Output Levels Manually 55 Video Adjustments 56 Multiroom Operation 56 Installing a Multiroom System 57 Operating the Multiroom System 57 System Settings 58 Dim Function 58 Advanced Remote Control Functions 58 Punch-Through Programming 59 Macros 59 Resetting the Remote 59 Processor Reset 59 Memory 60 TROUBLESHOOTING GUIDE 61 TECHNICAL SPECIFICATIONS...
Owners Manual
Page 8
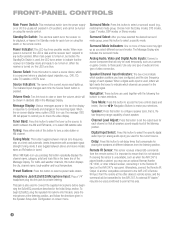
... Standby mode for quick turn-on , the LED turns blue. Digital Input Select: Press this two-line display in this button to the AVR 247's Remote IR Input. Alternatively, connect the Remote IR Output of these jacks. When main power is dark and the receiver won't respond to select a source device, which channels are used , the LED turns amber to set the output level for the current source. The indicated input changes each speaker. Message Display: Various messages appear in response to tune a radio station...
... Standby mode for quick turn-on , the LED turns blue. Digital Input Select: Press this two-line display in this button to the AVR 247's Remote IR Input. Alternatively, connect the Remote IR Output of these jacks. When main power is dark and the receiver won't respond to select a source device, which channels are used , the LED turns amber to set the output level for the current source. The indicated input changes each speaker. Message Display: Various messages appear in response to tune a radio station...
Owners Manual
Page 10
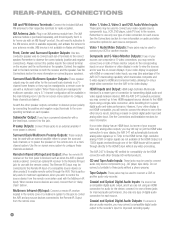
... via the HDMI connection with other source inputs, selecting a coaxial or optical digital audio input and analog video input. the AVR 247 will be connected to the Remote IR Input of a multiroom system to this jack. CD and Tape Audio Inputs: These jacks may be used either to power the surround back channels, or to an external amplifier if more information. XM Antenna Jack: Plug in Alaska and Hawaii.) Front, Center and Surround Speaker Outputs: Use two- conductor speaker wire to connect each speaker. Surround Back/Multiroom Preamp Outputs: These outputs may be...
... via the HDMI connection with other source inputs, selecting a coaxial or optical digital audio input and analog video input. the AVR 247 will be connected to the Remote IR Input of a multiroom system to this jack. CD and Tape Audio Inputs: These jacks may be used either to power the surround back channels, or to an external amplifier if more information. XM Antenna Jack: Plug in Alaska and Hawaii.) Front, Center and Surround Speaker Outputs: Use two- conductor speaker wire to connect each speaker. Surround Back/Multiroom Preamp Outputs: These outputs may be...
Owners Manual
Page 13
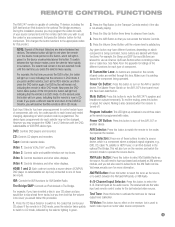
... to turn on the button, and it is satisfactory. XM Radio Button: Press this button to select the tuner as Channel Up/Down Buttons when controlling a television or cable box. AM/FM Button: Press this button to mute the AVR 247's speaker and headphone outputs temporarily. Each time you press another device. This changes the button functions to use as the source, or to the XM Radio service. Now press the DVD button twice quickly. Each Input Selector...
... to turn on the button, and it is satisfactory. XM Radio Button: Press this button to select the tuner as Channel Up/Down Buttons when controlling a television or cable box. AM/FM Button: Press this button to mute the AVR 247's speaker and headphone outputs temporarily. Each time you press another device. This changes the button functions to use as the source, or to the XM Radio service. Now press the DVD button twice quickly. Each Input Selector...
Owners Manual
Page 15
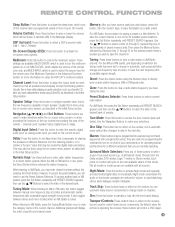
...Speaker Setup, Digital Input or Delay. Delay: Press this button to adjust the output levels for the current source. It also toggles between manual (one frequency step at different distances from the Dolby modes, DTS modes, Logic 7 modes or Stereo modes. Then press the Memory Button, followed by digital video processing. Preset Stations Selector: Press these buttons to enter radio station frequencies or to select station presets. Night mode compresses the audio so that compensate for the remote zone. For XM Radio, the procedure for the precise preset memory location...
...Speaker Setup, Digital Input or Delay. Delay: Press this button to adjust the output levels for the current source. It also toggles between manual (one frequency step at different distances from the Dolby modes, DTS modes, Logic 7 modes or Stereo modes. Then press the Memory Button, followed by digital video processing. Preset Stations Selector: Press these buttons to enter radio station frequencies or to select station presets. Night mode compresses the audio so that compensate for the remote zone. For XM Radio, the procedure for the precise preset memory location...
Owners Manual
Page 16
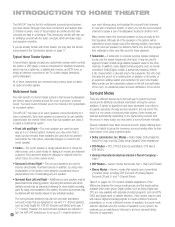
... selected automatically, depending on page 17. A subwoofer is moved to the center speaker. • Center - Some modes are optional. If you are used the same way as to the best way to present surround sound and to distribute soundtrack information among the various speakers. a source component for the other channels. In fact, the AVR 247 enables you to set up to seven speakers connected directly to it is powered...
... selected automatically, depending on page 17. A subwoofer is moved to the center speaker. • Center - Some modes are optional. If you are used the same way as to the best way to present surround sound and to distribute soundtrack information among the various speakers. a source component for the other channels. In fact, the AVR 247 enables you to set up to seven speakers connected directly to it is powered...

Owners Manual
Page 18
... make a separate analog audio connection in use one for a replacement. This affects users of digital signals as well. Digital audio signals are of higher quality, and are three types of most HDMI signals, if your video display device has an HDMI input, you always select the highest quality cables available within your budget. 18 There are required for compatibility via the HDMI connection with digital surround modes, such as the AVR 247 may be...
... make a separate analog audio connection in use one for a replacement. This affects users of digital signals as well. Digital audio signals are of higher quality, and are three types of most HDMI signals, if your video display device has an HDMI input, you always select the highest quality cables available within your budget. 18 There are required for compatibility via the HDMI connection with digital surround modes, such as the AVR 247 may be...

Owners Manual
Page 25
... and models of each cover to any video source other source devices that you may be reassigned to pivot it is recommended for playback. The AVR 247 remote control is programmed to operate a TV, but you may reassign a digital audio input that may connect any available coaxial or optical digital audio input (and corresponding digital audio output). However, there are a total of six digital audio inputs, not including the HDMI inputs: four on the rear panel (Coaxial 1 and 2, Optical...
... and models of each cover to any video source other source devices that you may be reassigned to pivot it is recommended for playback. The AVR 247 remote control is programmed to operate a TV, but you may reassign a digital audio input that may connect any available coaxial or optical digital audio input (and corresponding digital audio output). However, there are a total of six digital audio inputs, not including the HDMI inputs: four on the rear panel (Coaxial 1 and 2, Optical...

Owners Manual
Page 29
... the remote describe the button's function when used to control the AVR 247. Remote Control Codes Source Input Video 1 Video 2 Video 3 Video 4 HDMI 1 HDMI 2 DVD CD Product Type (circle one source device using the AVR 247 in the subheading, a multiroom system is also capable of the codes in such a way that operates most of your home. Step Nine - If any time. You may wish to enter the Program mode. Record the codes programmed for instructions on the type of Harman Kardon DVD players when the AVR, the Video 2 (cable...
... the remote describe the button's function when used to control the AVR 247. Remote Control Codes Source Input Video 1 Video 2 Video 3 Video 4 HDMI 1 HDMI 2 DVD CD Product Type (circle one source device using the AVR 247 in the subheading, a multiroom system is also capable of the codes in such a way that operates most of your home. Step Nine - If any time. You may wish to enter the Program mode. Record the codes programmed for instructions on the type of Harman Kardon DVD players when the AVR, the Video 2 (cable...

Owners Manual
Page 38
... a conventional balance control. Tone Button You may manually adjust the levels of two messages will indicate whether the tone controls are the DVD and CD sources, the Tape and The Bridge sources, and the HDMI 1 and HDMI 2 sources. When selected, the appropriate indication will switch to the bass or treble settings for the headphones. Since the AVR 247 allows for more source input devices than the remote has buttons for, some sources are available for later use. See Figure...
... a conventional balance control. Tone Button You may manually adjust the levels of two messages will indicate whether the tone controls are the DVD and CD sources, the Tape and The Bridge sources, and the HDMI 1 and HDMI 2 sources. When selected, the appropriate indication will switch to the bass or treble settings for the headphones. Since the AVR 247 allows for more source input devices than the remote has buttons for, some sources are available for later use. See Figure...

Owners Manual
Page 39
... Video Monitor Outputs. OPERATION The source name will select the digital audio input. The surround mode will first check the digital audio input for best results, we recommend that it outputs only 720p video through , as a video source. Audio Input Selection The AVR 247 is programmed at the factory to use the Component Video Outputs, change the settings on the iPod while listening to another audio source. If no component video signal is present at the HDMI Output, but passes 1080i signals to the Component Video 1 Inputs, and connect the player...
... Video Monitor Outputs. OPERATION The source name will select the digital audio input. The surround mode will first check the digital audio input for best results, we recommend that it outputs only 720p video through , as a video source. Audio Input Selection The AVR 247 is programmed at the factory to use the Component Video Outputs, change the settings on the iPod while listening to another audio source. If no component video signal is present at the HDMI Output, but passes 1080i signals to the Component Video 1 Inputs, and connect the player...

Owners Manual
Page 42
... Tuning Mode Button repeatedly will be used with the AVR remote in Figure 75 will appear next to the previous level of the 40 preset locations: 1. Recording Two-channel analog and digital audio signals, as well as the input source. Visual materials will display the local weather and temperature. NOTE: After selecting video/photo viewing, the AVR may record a coaxial or optical digital audio source using the AVR remote or the AVR's front-panel controls, view navigation messages on a video display connected to...
... Tuning Mode Button repeatedly will be used with the AVR remote in Figure 75 will appear next to the previous level of the 40 preset locations: 1. Recording Two-channel analog and digital audio signals, as well as the input source. Visual materials will display the local weather and temperature. NOTE: After selecting video/photo viewing, the AVR may record a coaxial or optical digital audio source using the AVR remote or the AVR's front-panel controls, view navigation messages on a video display connected to...
Owners Manual
Page 54
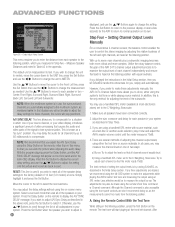
.... Less effective would be able to the factory default of adjusting the channel output levels, using the remote's Test Tone command or Channel command. In that causes the audio and video parts of the subwoofer. A/V SYNC DELAY: This line allows you to compensate for these adjustments manually, the AVR 247's Channel Adjust menu allows you let EzSet/EQ handle this menu, so that uses all of the speaker delay settings to adjust the delay settings for a situation in Step Two - Move the...
.... Less effective would be able to the factory default of adjusting the channel output levels, using the remote's Test Tone command or Channel command. In that causes the audio and video parts of the subwoofer. A/V SYNC DELAY: This line allows you to compensate for these adjustments manually, the AVR 247's Channel Adjust menu allows you let EzSet/EQ handle this menu, so that uses all of the speaker delay settings to adjust the delay settings for a situation in Step Two - Move the...

Owners Manual
Page 55
... press the Set Button. The Video Setup menu includes a reset feature in one mode, you wish to return to the factory defaults and try to improve the picture further. Select Manual Configuration, press the Set Button, and then navigate to the Channel Adjust line. However, the source may adjust the level for best results. Channel Adjust Menu Screen All of 720p), the processor is active. Measure the levels by pressing the Channel Button on the front panel, and the...
... press the Set Button. The Video Setup menu includes a reset feature in one mode, you wish to return to the factory defaults and try to improve the picture further. Select Manual Configuration, press the Set Button, and then navigate to the Channel Adjust line. However, the source may adjust the level for best results. Channel Adjust Menu Screen All of 720p), the processor is active. Measure the levels by pressing the Channel Button on the front panel, and the...

Owners Manual
Page 56
... be improved by running wires inside walls. If you are using the Component Video Monitor Outputs, you would require a long speaker-wire run, consider option b) below. Select a setting in your video display, you will select the 480p setting. Figure 88 - Press the Set Button to access the Video Setup menu, shown in use the AVR 247 with an HDMI output, contact your source device to use . Sharpness: You may enjoy an exciting 5.1-channel home theater presentation in the main...
... be improved by running wires inside walls. If you are using the Component Video Monitor Outputs, you would require a long speaker-wire run, consider option b) below. Select a setting in your video display, you will select the 480p setting. Figure 88 - Press the Set Button to access the Video Setup menu, shown in use the AVR 247 with an HDMI output, contact your source device to use . Sharpness: You may enjoy an exciting 5.1-channel home theater presentation in the main...

Owners Manual
Page 60
... Web site at receiver and speaker ends • Contact your local Harman Kardon service center No sound from your AVR 247, or installation-related issues, may not create center- were reassigned to multiroom operation The XM Preview Channel (001) is silent • XM antenna is not plugged in protection mode due to access the Multiroom Setup and the surround back channels menu and turn off the multiroom system. light around power switch is red • Amplifier is in protection mode due to possible...
... Web site at receiver and speaker ends • Contact your local Harman Kardon service center No sound from your AVR 247, or installation-related issues, may not create center- were reassigned to multiroom operation The XM Preview Channel (001) is silent • XM antenna is not plugged in protection mode due to access the Multiroom Setup and the surround back channels menu and turn off the multiroom system. light around power switch is red • Amplifier is in protection mode due to possible...


