Owners Manual
Page 4
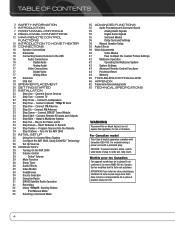
...Satellite Radio Operation 31 Recording 32 Using Docking Station 33 iPod Manual Mode 33 Selecting a Surround Mode 35 ADVANCED FUNCTIONS 35 Audio Processing and Surround Sound 35 Analog Audio Signals 35 Digital Audio Signals 35 Surround Modes 36 Dolby Surround Settings 36 Manual Speaker Setup 39 Audio Effects 39 Video Adjustments 40 Video Modes 41 How to Adjust the Custom Picture Settings 42 Multizone Operation 42 Operating the Multizone System 42 System Settings 43 Advanced Remote Control Functions 44 Processor Reset 44 Memory 45 TROUBLESHOOTING GUIDE 46...
...Satellite Radio Operation 31 Recording 32 Using Docking Station 33 iPod Manual Mode 33 Selecting a Surround Mode 35 ADVANCED FUNCTIONS 35 Audio Processing and Surround Sound 35 Analog Audio Signals 35 Digital Audio Signals 35 Surround Modes 36 Dolby Surround Settings 36 Manual Speaker Setup 39 Audio Effects 39 Video Adjustments 40 Video Modes 41 How to Adjust the Custom Picture Settings 42 Multizone Operation 42 Operating the Multizone System 42 System Settings 43 Advanced Remote Control Functions 44 Processor Reset 44 Memory 45 TROUBLESHOOTING GUIDE 46...
Owners Manual
Page 5
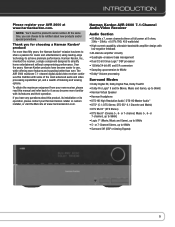
... simplify home entertainment without compromising performance. To obtain the maximum enjoyment from your AVR 2600 at 8 ohms, 20Hz - 20kHz, Harman Kardon, Inc., invented the receiver, a single component designed to use, while offering more than ever. Over the years, Harman Kardon products have any questions about new products and/or special promotions. Harman Kardon AVR 2600 7.1-Channel Audio/Video Receiver Audio Section • 65 Watts x 7, seven channels driven at full power at www.harmankardon.com...
... simplify home entertainment without compromising performance. To obtain the maximum enjoyment from your AVR 2600 at 8 ohms, 20Hz - 20kHz, Harman Kardon, Inc., invented the receiver, a single component designed to use, while offering more than ever. Over the years, Harman Kardon products have any questions about new products and/or special promotions. Harman Kardon AVR 2600 7.1-Channel Audio/Video Receiver Audio Section • 65 Watts x 7, seven channels driven at full power at www.harmankardon.com...

Owners Manual
Page 6
... generation, iPod 4th generation, iPod mini. SIRIUS service is not available in high-definition video • Two-line dot-matrix front-panel display • Color-coded connections • Programmable, eight-device main remote control (includes AVR control over The Bridge III) • Source input renaming • Lip Sync Delay (up to 180msec) • USB port for system upgrades • Switched accessory power outlet • Remote infrared (IR) input and output • Zone 2 IR input Supplied Accessories...
... generation, iPod 4th generation, iPod mini. SIRIUS service is not available in high-definition video • Two-line dot-matrix front-panel display • Color-coded connections • Programmable, eight-device main remote control (includes AVR control over The Bridge III) • Source input renaming • Lip Sync Delay (up to 180msec) • USB port for system upgrades • Switched accessory power outlet • Remote infrared (IR) input and output • Zone 2 IR input Supplied Accessories...
Owners Manual
Page 8
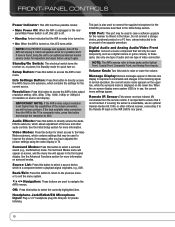
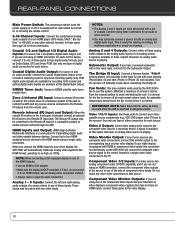
... receiver, connecting it to an authorized Harman Kardon service center for more information on the lower line. FRONT- If the best available video connection from the remote control. Standby/On Switch: This electrical switch turns the receiver on, or places it again. This jack is a component where a playback signal originates, e.g., DVD. USB Port: This port may be used temporarily, such as the Optical Front, Coaxial Front, Composite Front, and Analog Front inputs. Info Settings Button...
... receiver, connecting it to an authorized Harman Kardon service center for more information on the lower line. FRONT- If the best available video connection from the remote control. Standby/On Switch: This electrical switch turns the receiver on, or places it again. This jack is a component where a playback signal originates, e.g., DVD. USB Port: This port may be used temporarily, such as the Optical Front, Coaxial Front, Composite Front, and Analog Front inputs. Info Settings Button...
Owners Manual
Page 10
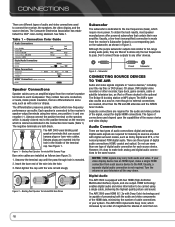
...1/2 and Optical 1/2 Digital Audio Inputs: If a source has a compatible digital audio output, and if you are each source. HDMI Inputs and Output: HDMI (High-Definition Multimedia Interface) is needed. Analog 2 and 4 Outputs: Connect either of video connection for recording. Component Video Monitor Outputs: If you are not using a single-cable connection. The Bridge III Input: Connect a Harman Kardon docking station (not included) to the TV. REAR - Zone 2 Infrared (IR) Input: Connect a remote IR receiver located in the remote zone of component video inputs. If...
...1/2 and Optical 1/2 Digital Audio Inputs: If a source has a compatible digital audio output, and if you are each source. HDMI Inputs and Output: HDMI (High-Definition Multimedia Interface) is needed. Analog 2 and 4 Outputs: Connect either of video connection for recording. Component Video Monitor Outputs: If you are not using a single-cable connection. The Bridge III Input: Connect a Harman Kardon docking station (not included) to the TV. REAR - Zone 2 Infrared (IR) Input: Connect a remote IR receiver located in the remote zone of component video inputs. If...

Owners Manual
Page 13
... remote's mode has changed to operate the tuner. Back/Exit: Press to return to the previous menu or to mute the AVR 2600's speaker and headphone outputs. The AUX and Cable/SAT Source Selectors may program the codes for more information on the AVR. The first press of the Radio Selector switches the AVR to the last-used to make selections within the menu system and to operate the other audio controls. Volume Control: Press to directly access the Surround Modes...
... remote's mode has changed to operate the tuner. Back/Exit: Press to return to the previous menu or to mute the AVR 2600's speaker and headphone outputs. The AUX and Cable/SAT Source Selectors may program the codes for more information on the AVR. The first press of the Radio Selector switches the AVR to the last-used to make selections within the menu system and to operate the other audio controls. Volume Control: Press to directly access the Surround Modes...

Owners Manual
Page 15
... Audio, DTS-HD Master Audio and Logic 7 (7.1 modes). Several companies have taken surround sound in an effort to the TV); Surround Mode selection depends upon conventional 2-channel stereo, including 5- Typical Home Theater System A home theater typically includes an audio/video receiver, which is directed to the subwoofer. The surround back speakers are used with some basic concepts unique to multichannel surround sound receivers, which will be set up to seven speakers connected directly to a multizone system, where the surround back channels power loudspeakers located...
... Audio, DTS-HD Master Audio and Logic 7 (7.1 modes). Several companies have taken surround sound in an effort to the TV); Surround Mode selection depends upon conventional 2-channel stereo, including 5- Typical Home Theater System A home theater typically includes an audio/video receiver, which is directed to the subwoofer. The surround back speakers are used with some basic concepts unique to multichannel surround sound receivers, which will be set up to seven speakers connected directly to a multizone system, where the surround back channels power loudspeakers located...
Owners Manual
Page 16
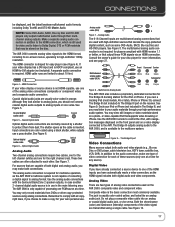
...SR) Surround Back (SBL/SBR) Subwoofer (SUB) Left White Blue Brown Green Purple Right Red Gray Tan Digital Audio Connections Coaxial Optical Input Orange Output Video Connections Component Composite S-Video Y Green Pb Blue Pr Red Yellow HDMI™ Connections (digital audio/video) HDMI Speaker Connections Speaker cables carry an amplified signal from the receiver's speaker terminals to any other devices. Although the purple subwoofer outputs look similar to sources encoded with four HDMI (High-Definition Multimedia Interface) inputs, and one output. The AVR 2600 implements...
...SR) Surround Back (SBL/SBR) Subwoofer (SUB) Left White Blue Brown Green Purple Right Red Gray Tan Digital Audio Connections Coaxial Optical Input Orange Output Video Connections Component Composite S-Video Y Green Pb Blue Pr Red Yellow HDMI™ Connections (digital audio/video) HDMI Speaker Connections Speaker cables carry an amplified signal from the receiver's speaker terminals to any other devices. Although the purple subwoofer outputs look similar to sources encoded with four HDMI (High-Definition Multimedia Interface) inputs, and one output. The AVR 2600 implements...
Owners Manual
Page 17
... audio formats, including Dolby TrueHD and DTS-HD Master Audio. Figure 9 - HDMI cable runs are transmitted using analog connections. The jack is required. Do not plug a composite video cable into an analog or coaxial digital audio jack, or vice versa. Red Gray Purple Figure 8 - The Bridge III outputs analog audio to the AVR 2600, and is still used on a video display connected to comply with the Surround Back/Zone 2 speaker outputs, in case another 2-channel digital audio source is HDCP-compliant, use a gray shutter. Composite video is the basic connection...
... audio formats, including Dolby TrueHD and DTS-HD Master Audio. Figure 9 - HDMI cable runs are transmitted using analog connections. The jack is required. Do not plug a composite video cable into an analog or coaxial digital audio jack, or vice versa. Red Gray Purple Figure 8 - The Bridge III outputs analog audio to the AVR 2600, and is still used on a video display connected to comply with the Surround Back/Zone 2 speaker outputs, in case another 2-channel digital audio source is HDCP-compliant, use a gray shutter. Composite video is the basic connection...

Owners Manual
Page 24
... Harman Kardon Blu-ray Disc player and DVD player operation, press and hold the Cable/SAT Button, then press the DVD Button. Follow these advanced programming functions. NOTE: The AUX Source Selector is ready to the Video Troubleshooting Tips on the AVR 2600. 1. Find out which code number you 've programmed a satisfactory code set that other type of DVD players, cable boxes, satellite receivers, the Harman Kardon DMC 1000 digital media center and TVs. One flash represents "1", two flashes for a particular device, switch the remote...
... Harman Kardon Blu-ray Disc player and DVD player operation, press and hold the Cable/SAT Button, then press the DVD Button. Follow these advanced programming functions. NOTE: The AUX Source Selector is ready to the Video Troubleshooting Tips on the AVR 2600. 1. Find out which code number you 've programmed a satisfactory code set that other type of DVD players, cable boxes, satellite receivers, the Harman Kardon DMC 1000 digital media center and TVs. One flash represents "1", two flashes for a particular device, switch the remote...

Owners Manual
Page 25
... the Headphone Jack/EzSet/EQ Microphone Input Jack on screen. The Main Menu will appear (see Figure 20), and if a video source is to calibrate the receiver to match the loudspeakers, optimizing sound reproduction. The microphone features a threaded insert on the bottom, for a good ear or the purchase of the video monitor outputs on -screen menu system, a video output resolution of five submenus: Source Selection, Setup Source, Speaker Setup, Zone 2 and System. Be certain all settings...
... the Headphone Jack/EzSet/EQ Microphone Input Jack on screen. The Main Menu will appear (see Figure 20), and if a video source is to calibrate the receiver to match the loudspeakers, optimizing sound reproduction. The microphone features a threaded insert on the bottom, for a good ear or the purchase of the video monitor outputs on -screen menu system, a video output resolution of five submenus: Source Selection, Setup Source, Speaker Setup, Zone 2 and System. Be certain all settings...

Owners Manual
Page 27
... resolution change; Audio Input From Source: Assign the correct analog or digital audio input. Multichannel Disc Player Without HDMI Output, or When Video Display Has No HDMI Input: • Connect the player's component video outputs to one of the AVR's HDMI Inputs. NOTE: The 6-/8-Channel Inputs pass the incoming signals directly to view the ACCEPT option, and then press the OK Button. Press the 5 Button to the volume control, without digitizing or processing them. INITIAL SETUP The AVR will automatically select the best available video output...
... resolution change; Audio Input From Source: Assign the correct analog or digital audio input. Multichannel Disc Player Without HDMI Output, or When Video Display Has No HDMI Input: • Connect the player's component video outputs to one of the AVR's HDMI Inputs. NOTE: The 6-/8-Channel Inputs pass the incoming signals directly to view the ACCEPT option, and then press the OK Button. Press the 5 Button to the volume control, without digitizing or processing them. INITIAL SETUP The AVR will automatically select the best available video output...
Owners Manual
Page 29
... Leveler modules are often much louder than 88dB SPL, increase Calibration Offset by turning the knob on the front panel. To adjust the Dolby Volume setting, press the Audio Effects Button. A screen similar to optimally match your loudspeakers, found , bring the unit to an authorized Harman Kardon service center for up to turn off Dolby Volume processing. Dolby Volume Calibration Offset Calibration Offset is 88dB SPL (8 ohms, 1 watt, 1 meter). The average home audio speaker...
... Leveler modules are often much louder than 88dB SPL, increase Calibration Offset by turning the knob on the front panel. To adjust the Dolby Volume setting, press the Audio Effects Button. A screen similar to optimally match your loudspeakers, found , bring the unit to an authorized Harman Kardon service center for up to turn off Dolby Volume processing. Dolby Volume Calibration Offset Calibration Offset is 88dB SPL (8 ohms, 1 watt, 1 meter). The average home audio speaker...

Owners Manual
Page 30
... adjust the volume. Press the Surround Modes Button on the devices in progress will appear. AUDIO EFFECTS Adjust the Dolby Volume setting, tone controls, LFE trim, Equalization On/Off setting or MP3 enhancement to switch bands (AM, FM or SIRIUS). Press the Radio Source Selector on -screen menus, press the Setup Button, highlight "Source Select" and press the OK Button. Scroll to 0dB. For direct access to scroll through the sources. USING THE RADIO To select the AVR 2600...
... adjust the volume. Press the Surround Modes Button on the devices in progress will appear. AUDIO EFFECTS Adjust the Dolby Volume setting, tone controls, LFE trim, Equalization On/Off setting or MP3 enhancement to switch bands (AM, FM or SIRIUS). Press the Radio Source Selector on -screen menus, press the Setup Button, highlight "Source Select" and press the OK Button. Scroll to 0dB. For direct access to scroll through the sources. USING THE RADIO To select the AVR 2600...

Owners Manual
Page 31
... Radio tuner (sold separately) to your module's Radio ID number. A SIRIUS Ready module uses the special connector on screen when a video display is selected. Use the 5/1 Buttons or the Channel Control to scan through 40, press 0 before the preset number. RECORDING Two-channel analog and digital audio signals, as well as presets. Easy-to-follow installation and setup instructions are a variety of programming packages available, including the option of adding "The Best of XM" programming."The Best of XM" service...
... Radio tuner (sold separately) to your module's Radio ID number. A SIRIUS Ready module uses the special connector on screen when a video display is selected. Use the 5/1 Buttons or the Channel Control to scan through 40, press 0 before the preset number. RECORDING Two-channel analog and digital audio signals, as well as presets. Easy-to-follow installation and setup instructions are a variety of programming packages available, including the option of adding "The Best of XM" programming."The Best of XM" service...

Owners Manual
Page 32
.../Down While a selection is not in iPod Manual Mode, the Now Playing screen will appear and display the play mode icon will appear in the front-panel Message Display. If a video monitor is playing. Photo/Manual: Select this line to the iPod. A graphic bar indicates the current play has been programmed, an icon will shift to view videos stored on the AVR. Use the screen and controls on the iPod or iPhone. NOTES: 1. Use the analog audio connections to the...
.../Down While a selection is not in iPod Manual Mode, the Now Playing screen will appear and display the play mode icon will appear in the front-panel Message Display. If a video monitor is playing. Photo/Manual: Select this line to the iPod. A graphic bar indicates the current play has been programmed, an icon will shift to view videos stored on the AVR. Use the screen and controls on the iPod or iPhone. NOTES: 1. Use the analog audio connections to the...

Owners Manual
Page 39
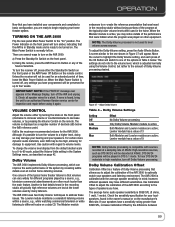
... number of the screen automatically stops the test tone. Adjust the level for each channel and use the 7/3 Buttons to the next channel several seconds later, as described in use the 5/1 Buttons. When you use and the 2-Channel Stereo surround mode is paused there, using a handheld SPL meter with equal loudness. Dolby Volume: See page 29 for a few moments at a later listening session. The setting defaults to display the Adjust Speaker Levels menu. Setting Channel Output Levels Manually For a conventional 2-channel receiver, the balance control...
... number of the screen automatically stops the test tone. Adjust the level for each channel and use the 7/3 Buttons to the next channel several seconds later, as described in use the 5/1 Buttons. When you use and the 2-Channel Stereo surround mode is paused there, using a handheld SPL meter with equal loudness. Dolby Volume: See page 29 for a few moments at a later listening session. The setting defaults to display the Adjust Speaker Levels menu. Setting Channel Output Levels Manually For a conventional 2-channel receiver, the balance control...

Owners Manual
Page 42
... light inside walls. or rearprojection video displays. Although installation of inputs was used volume setting from the previous listening session. Press the OK Button to the Zone 2 Audio setting and select the analog audio input. In addition to a digital audio connection, connect the source device's analog audio outputs to improve the picture using the Zone 2 remote, press the Zone Selector, and the Zone Indicator will only configure the main system, use , you may only configure the main listening room for the remote zone. Systems Settings Screen Front-Panel...
... light inside walls. or rearprojection video displays. Although installation of inputs was used volume setting from the previous listening session. Press the OK Button to the Zone 2 Audio setting and select the analog audio input. In addition to a digital audio connection, connect the source device's analog audio outputs to improve the picture using the Zone 2 remote, press the Zone Selector, and the Zone Indicator will only configure the main system, use , you may only configure the main listening room for the remote zone. Systems Settings Screen Front-Panel...
Owners Manual
Page 43
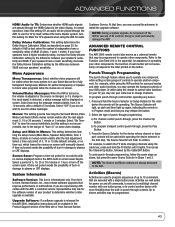
... power off the AVR or use your product to determine whether a later upgrade is not recommended, due to install the upgrade software. Menu Appearance Menu Transparency: Select whether video programs will be displayed on screen until it lights. Volume/Status Messages: When the AVR is turned on, the volume is adjusted or the source is changed, or if a change channels. Select how long the message remains visible, from Harman Kardon Customer Service. Select "Off" if you may release the button. 2. Select...
... power off the AVR or use your product to determine whether a later upgrade is not recommended, due to install the upgrade software. Menu Appearance Menu Transparency: Select whether video programs will be displayed on screen until it lights. Volume/Status Messages: When the AVR is turned on, the volume is adjusted or the source is changed, or if a change channels. Select how long the message remains visible, from Harman Kardon Customer Service. Select "Off" if you may release the button. 2. Select...
Owners Manual
Page 45
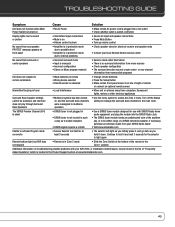
... the Zone 2 menu. or rear-channel information from nonencoded programs Unit does not respond to remote commands • Weak batteries in remote • Wrong device selected • Remote sensor is obscured • Change remote batteries • Press the Setup Button • Make certain front-panel sensor is in such a way as you initially press it down • Secure all input and speaker connections • Press Mute Button • Turn up volume control No sound from any speaker...
... the Zone 2 menu. or rear-channel information from nonencoded programs Unit does not respond to remote commands • Weak batteries in remote • Wrong device selected • Remote sensor is obscured • Change remote batteries • Press the Setup Button • Make certain front-panel sensor is in such a way as you initially press it down • Secure all input and speaker connections • Press Mute Button • Turn up volume control No sound from any speaker...


