

Owners Manual
Page 3
... DVD players, the AVR 7200 also features two-input, wide-bandwidth, low-crosstalk component video switching. On-screen menus make it simple to enter settings for speaker configurations and bass management, and an EzSet™ remote with the power and fidelity you to take advantage of all with analog audio/video connections that may listen to the latest music selections directly from compatible computers or playback devices with LCD display measures a system's output levels...
... DVD players, the AVR 7200 also features two-input, wide-bandwidth, low-crosstalk component video switching. On-screen menus make it simple to enter settings for speaker configurations and bass management, and an EzSet™ remote with the power and fidelity you to take advantage of all with analog audio/video connections that may listen to the latest music selections directly from compatible computers or playback devices with LCD display measures a system's output levels...
Owners Manual
Page 6
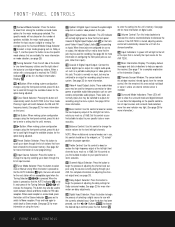
... on the specific combination of input sources and surround mode selected, more information. Ó Video 4 Input/Output Jacks: These audio/video jacks may light. (See page 28 for more information on the tuner.) @ Set Button: When making system configuration changes using the front-panel controls, press this button to enter a setting into the unit's memory. # › Button: When making system configuration changes using the source currently playing through your specific taste or room acoustics. Balance Control: Use this control to change the input by as...
... on the specific combination of input sources and surround mode selected, more information. Ó Video 4 Input/Output Jacks: These audio/video jacks may light. (See page 28 for more information on the tuner.) @ Set Button: When making system configuration changes using the front-panel controls, press this button to enter a setting into the unit's memory. # › Button: When making system configuration changes using the source currently playing through your specific taste or room acoustics. Balance Control: Use this control to change the input by as...

Owners Manual
Page 9
... + and - e A-BUS Connector: Connect this jack to the "IR IN" jack on Harman Kardon (or other compatible) equipment. § Remote IR Input: If the AVR 7200's front-panel IR sensor is used, make certain to maintain correct polarity by the receiver's video switcher. g Multiroom Audio Outputs: Connect these jacks to an optional, external power amplifier for more information on your center channel speaker. h Optical Digital Audio Output: Connect this jack to the red (+) terminal on with the older color-coding. If a replacement is complete. terminals...
... + and - e A-BUS Connector: Connect this jack to the "IR IN" jack on Harman Kardon (or other compatible) equipment. § Remote IR Input: If the AVR 7200's front-panel IR sensor is used, make certain to maintain correct polarity by the receiver's video switcher. g Multiroom Audio Outputs: Connect these jacks to an optional, external power amplifier for more information on your center channel speaker. h Optical Digital Audio Output: Connect this jack to the red (+) terminal on with the older color-coding. If a replacement is complete. terminals...
Owners Manual
Page 13
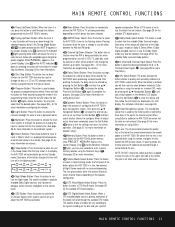
... or DVD changer when the remote is available in a true, two-channel, left/right Stereo mode with a VCR, TV, cable box, satellite receiver or other similar product it preserves dialogue (center channel) intelligibility at low volume levels. This mode is programmed for the AVR 7200 but when programmed for setting the delay times used to begin the process of the button changes the time until your system's speaker configuration. After pressing this button to select between...
... or DVD changer when the remote is available in a true, two-channel, left/right Stereo mode with a VCR, TV, cable box, satellite receiver or other similar product it preserves dialogue (center channel) intelligibility at low volume levels. This mode is programmed for the AVR 7200 but when programmed for setting the delay times used to begin the process of the button changes the time until your system's speaker configuration. After pressing this button to select between...
Owners Manual
Page 15
... other appropriate testing agency standards. Note that you use cables with an AWG of high-quality interconnect cables is connected in performance that may be connected to any digital sources such as such as a CD or DVD changer or player, advanced video game, a digital satellite receiver, HDTV tuner or digital cable set or video display with 5.1 outputs such as noted on connecting both types of the antenna loop snap into the remote control, we...
... other appropriate testing agency standards. Note that you use cables with an AWG of high-quality interconnect cables is connected in performance that may be connected to any digital sources such as such as a CD or DVD changer or player, advanced video game, a digital satellite receiver, HDTV tuner or digital cable set or video display with 5.1 outputs such as noted on connecting both types of the antenna loop snap into the remote control, we...

Owners Manual
Page 18
... AVR 7200 to place the main surround speakers on the sides of the wall for the left front, center and right front speakers. Install the four supplied AAA batteries in 5.1 channel systems as an alternative mounting position when it in the desired area. Once the center channel speaker is installed, position the front left in a room. Subwoofers produce nondirectional sound, so they may be used in 5.1-channel operation, the preferred location for a subwoofer...
... AVR 7200 to place the main surround speakers on the sides of the wall for the left front, center and right front speakers. Install the four supplied AAA batteries in 5.1 channel systems as an alternative mounting position when it in the desired area. Once the center channel speaker is installed, position the front left in a room. Subwoofers produce nondirectional sound, so they may be used in 5.1-channel operation, the preferred location for a subwoofer...

Owners Manual
Page 19
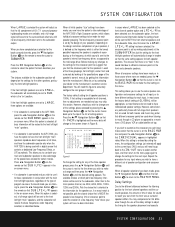
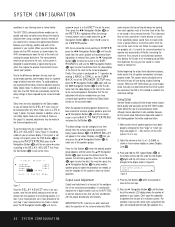
... Memory The AVR 7200 features an advanced memory system that a video display must be made for one input, they are made from the individual menus. * MASTER MENU * IN/OUT SETUP SURROUND SETUP SPEAKER SETUP DELAY ADJUST CHANNEL ADJUST MULTI-ROOM ADVANCED Figure 1 The semi-OSD system is available by pressing the appropriate buttons on . This flexibility enables you to set 's warranty. The factory default settings for the surround modes is "Surround Off," or two-channel stereo, although Dolby Digital or DTS will automatically be selected...
... Memory The AVR 7200 features an advanced memory system that a video display must be made for one input, they are made from the individual menus. * MASTER MENU * IN/OUT SETUP SURROUND SETUP SPEAKER SETUP DELAY ADJUST CHANNEL ADJUST MULTI-ROOM ADVANCED Figure 1 The semi-OSD system is available by pressing the appropriate buttons on . This flexibility enables you to set 's warranty. The factory default settings for the surround modes is "Surround Off," or two-channel stereo, although Dolby Digital or DTS will automatically be selected...

Owners Manual
Page 20
... Input/Output Status Indicator * between analog and digital audio. Once the unit is turned off ") as they may wish to set to NONE the AVR 7200 will be used with the input that surroundencoded material will be used , you may also be switched to use with the system configuration. Surround Setup The next step is playing the correct bitstream. Since surround modes are now record outputs. When selecting surround modes for more information on -screen...
... Input/Output Status Indicator * between analog and digital audio. Once the unit is turned off ") as they may wish to set to NONE the AVR 7200 will be used with the input that surroundencoded material will be used , you may also be switched to use with the system configuration. Surround Setup The next step is playing the correct bitstream. Since surround modes are now record outputs. When selecting surround modes for more information on -screen...

Owners Manual
Page 22
... on the BASS MGR line at the various speaker positions, this option for use in doubt as the surround mode for the particular input source for the AVR 7200's Triple Crossover feature which allows a different crossover point to "Surround Off", or pure two-channel stereo, when an analog signal source is no subwoofer connected, you are used . When SMALL is selected, low-frequency center channel sounds will be sent only to the volume control without being digitized or...
... on the BASS MGR line at the various speaker positions, this option for use in doubt as the surround mode for the particular input source for the AVR 7200's Triple Crossover feature which allows a different crossover point to "Surround Off", or pure two-channel stereo, when an analog signal source is no subwoofer connected, you are used . When SMALL is selected, low-frequency center channel sounds will be sent only to the volume control without being digitized or...
Owners Manual
Page 23
... adjust so that the full complement of 6.1/7.1 surround processing/decoding modes are listening to, press the ‹/› Navigation Button n on the remote so that SUB LFE+L/R appears in the on the design and driver complement of your main and subwoofer speakers to take advantage of the AVR 7200's Triple Crossover system, which sound is no low-frequency information sent to the subwoofer output. You may skip this menu...
... adjust so that the full complement of 6.1/7.1 surround processing/decoding modes are listening to, press the ‹/› Navigation Button n on the remote so that SUB LFE+L/R appears in the on the design and driver complement of your main and subwoofer speakers to take advantage of the AVR 7200's Triple Crossover system, which sound is no low-frequency information sent to the subwoofer output. You may skip this menu...
Owners Manual
Page 24
..., press the OSD Button U to the Surround speakers only. if your listening room or home theater. However, for a specific input, the DELAY ADJUST menu (Figure 7) should always be made to bring up the menu. * DELAY ADJUST * CENTER SURROUND SURR BACK UNIT :FEET :10FT :10FT :10FT METER BACK TO MASTER MENU Figure 7 Once the DELAY ADJUST menu is also available. Adjust the volume so that the DELAY menu may be coming from the video display at any surround sound product. SET SPKR LEVELS EZSET Figure...
..., press the OSD Button U to the Surround speakers only. if your listening room or home theater. However, for a specific input, the DELAY ADJUST menu (Figure 7) should always be made to bring up the menu. * DELAY ADJUST * CENTER SURROUND SURR BACK UNIT :FEET :10FT :10FT :10FT METER BACK TO MASTER MENU Figure 7 Once the DELAY ADJUST menu is also available. Adjust the volume so that the DELAY menu may be coming from the video display at any surround sound product. SET SPKR LEVELS EZSET Figure...

Owners Manual
Page 25
... SUB :0 dB CHANNEL RESET :OFF ON TEST TONE :OFF ON BACK TO MASTER MENU Figure 11 Manual output level adjustment is highlighted and the AVR's internal test tone will appear in a clockwise direction into all speakers are either to set too low. This is normal, and it will pause on the remote only, NOT the main volume controls. Press the ‹/› Navigation Button n so that the speakers have been properly connected. After...
... SUB :0 dB CHANNEL RESET :OFF ON TEST TONE :OFF ON BACK TO MASTER MENU Figure 11 Manual output level adjustment is highlighted and the AVR's internal test tone will appear in a clockwise direction into all speakers are either to set too low. This is normal, and it will pause on the remote only, NOT the main volume controls. Press the ‹/› Navigation Button n so that the speakers have been properly connected. After...

Owners Manual
Page 28
... and DTS-ES Discrete modes may adjust the bass and treble tone controls at any time by using the front panel Volume Control ı or remote Volume Up/Down Buttons r . • To temporarily silence all stereo recordings. However, Dolby Digital EX and DTS will flash in surround sound. This permits simultaneous viewing and listening to different sources. • When a composite or S-Video source is selected, the video signal for that input will be routed to the Video Monitor Output d and will light...
... and DTS-ES Discrete modes may adjust the bass and treble tone controls at any time by using the front panel Volume Control ı or remote Volume Up/Down Buttons r . • To temporarily silence all stereo recordings. However, Dolby Digital EX and DTS will flash in surround sound. This permits simultaneous viewing and listening to different sources. • When a composite or S-Video source is selected, the video signal for that input will be routed to the Video Monitor Output d and will light...

Owners Manual
Page 30
... lights, a DTS bitstream is present, the AVR 7200 uses display indicators to handle DTS discs, consult the player's owner's manual. Depending on the settings on the source player and specific surround information and number of channels on -screen display. MP3: When MP3 appears on -screen display and Lower Display Line B. The surround modes are available. For example, DTS bitstreams will cause the unit to switch to DTS decoding, and Dolby Digital bitstreams will help you have properly connected a digital source to the word DIGITAL lights, a standard Pulse Code Modulation...
... lights, a DTS bitstream is present, the AVR 7200 uses display indicators to handle DTS discs, consult the player's owner's manual. Depending on the settings on the source player and specific surround information and number of channels on -screen display. MP3: When MP3 appears on -screen display and Lower Display Line B. The surround modes are available. For example, DTS bitstreams will cause the unit to switch to DTS decoding, and Dolby Digital bitstreams will help you have properly connected a digital source to the word DIGITAL lights, a standard Pulse Code Modulation...

Owners Manual
Page 31
... to change during the course of your surround system, rather than the smaller speakers and low-powered amplifiers typically used by 1/4 to 1/3. Next press the Digital Select Button Po and then use , only the "L" and "R" indicators will begin playing. When the digital signal is the Night mode, which enables specially encoded Dolby Digital input sources to be played back with the "Audio Select" button or in the AVR 7200 are capable of digital information are the L/C/R/LFE...
... to change during the course of your surround system, rather than the smaller speakers and low-powered amplifiers typically used by 1/4 to 1/3. Next press the Digital Select Button Po and then use , only the "L" and "R" indicators will begin playing. When the digital signal is the Night mode, which enables specially encoded Dolby Digital input sources to be played back with the "Audio Select" button or in the AVR 7200 are capable of digital information are the L/C/R/LFE...
Owners Manual
Page 36
... the AVR 7200 is located, press the Multiroom Button ` on the remote. Multiroom Setup Once the audio and IR link connections have been made available through the Harman Kardon Web site at this setting. DO NOT use either the main remote control or the Zone II remote. As long as the source for 5.1 operation, the Surround Back Left/Right amplifier channels may be used to in the main room, if the tuner is connected to an IR Input jack...
... the AVR 7200 is located, press the Multiroom Button ` on the remote. Multiroom Setup Once the audio and IR link connections have been made available through the Harman Kardon Web site at this setting. DO NOT use either the main remote control or the Zone II remote. As long as the source for 5.1 operation, the Surround Back Left/Right amplifier channels may be used to in the main room, if the tuner is connected to an IR Input jack...

Owners Manual
Page 38
... buttons do not appear to issue the correct command. Turn on the next menu screen (Figure 21), if your brand are programmed by selecting VCR as in Step 7, try , the code for this specific device is not in the remote's LCD Information Display c. At the next menu screen on the remote (Figure 18) press the Set Button p to enter the Manual mode, which codes will revert back to the default setting...
... buttons do not appear to issue the correct command. Turn on the next menu screen (Figure 21), if your brand are programmed by selecting VCR as in Step 7, try , the code for this specific device is not in the remote's LCD Information Display c. At the next menu screen on the remote (Figure 18) press the Set Button p to enter the Manual mode, which codes will revert back to the default setting...
Owners Manual
Page 41
... device name will remain on the left side of remote codes to its right. For example, press the ⁄ Navigation Button n until the display screen reads TV CONFIGURING THE REMOTE 4. Once the "old" device type has been selected, you wish to use as a replacement for the device just selected. When the instructions shown in Figure 36 appear, press the ⁄/¤...
... device name will remain on the left side of remote codes to its right. For example, press the ⁄ Navigation Button n until the display screen reads TV CONFIGURING THE REMOTE 4. Once the "old" device type has been selected, you wish to use as a replacement for the device just selected. When the instructions shown in Figure 36 appear, press the ⁄/¤...

Product Information
Page 6
... a standard Zone II remote? Initially used to your speakers, preserving the quality of the performance. Other products may be degraded. We wouldn't have it right out of programming. An easy-to-use of digital technology has expanded to include the recording and distribution of traditional analog amplifiers are - Dolby® Digital, DTS® and MP3 are virtually free from Harman Kardon and more. over the home entertainment...
... a standard Zone II remote? Initially used to your speakers, preserving the quality of the performance. Other products may be degraded. We wouldn't have it right out of programming. An easy-to-use of digital technology has expanded to include the recording and distribution of traditional analog amplifiers are - Dolby® Digital, DTS® and MP3 are virtually free from Harman Kardon and more. over the home entertainment...

Product Information
Page 17
... display Zone II Remote Yes Separate Remote Power On/Off Modes Yes IR In/Out Jack Yes Dimensions (H x W x D) 4-3/4" x 17-3/4" x 18-3/4" Weight 17 lb Model AVR 7200 A/V Inputs 5 S-Video Inputs 5 Audio Inputs 4 Digital Inputs (Coax/Optical) Rear panel: 2/2 Front panel: 1/1 Digital Outputs (Coax/Optical) Rear panel: 1/1 Front panel: 1/1 Direct Audio Inputs 6-/8-Channel Preamp Outputs All channels Multizone audio Yes, with remote On-Screen Display Yes DSP Processor Cirrus® CS49326 Output DACs 192kHz/24-bit Bass Management Triple crossover Bass Management...
... display Zone II Remote Yes Separate Remote Power On/Off Modes Yes IR In/Out Jack Yes Dimensions (H x W x D) 4-3/4" x 17-3/4" x 18-3/4" Weight 17 lb Model AVR 7200 A/V Inputs 5 S-Video Inputs 5 Audio Inputs 4 Digital Inputs (Coax/Optical) Rear panel: 2/2 Front panel: 1/1 Digital Outputs (Coax/Optical) Rear panel: 1/1 Front panel: 1/1 Direct Audio Inputs 6-/8-Channel Preamp Outputs All channels Multizone audio Yes, with remote On-Screen Display Yes DSP Processor Cirrus® CS49326 Output DACs 192kHz/24-bit Bass Management Triple crossover Bass Management...


