

Owners Manual
Page 2
...Information Display 5 Rear Panel Audio & Systems Connections 6 Rear Panel Video Connections 7 Remote Control Functions 8-9 Installation, Set Up and Configuration 10-11 Remote Control Programming and Operation . . 12-13 System Configuration 14-16 Basic Operation 17-20 Source Selection 17 Volume Control I7 Surround Mode Selection 17-18 TV Auto Function 18 Tuner Operation 18-20 On Screen Display 21-22 Advanced Functions 23-24 AudioNideo Simulcast 23 Delay Time Adjust 23 Surround Mode Chart 24 Troubleshooting Chart 25 Technical Specifications 26 harman kardon...
...Information Display 5 Rear Panel Audio & Systems Connections 6 Rear Panel Video Connections 7 Remote Control Functions 8-9 Installation, Set Up and Configuration 10-11 Remote Control Programming and Operation . . 12-13 System Configuration 14-16 Basic Operation 17-20 Source Selection 17 Volume Control I7 Surround Mode Selection 17-18 TV Auto Function 18 Tuner Operation 18-20 On Screen Display 21-22 Advanced Functions 23-24 AudioNideo Simulcast 23 Delay Time Adjust 23 Surround Mode Chart 24 Troubleshooting Chart 25 Technical Specifications 26 harman kardon...
Owners Manual
Page 4
.... its installation or operation, please contact your new receiver we urge you have any program selection. The AVR70's powerful amplifier uses traditional Harman Kardon High Current design philosophies to use. Color keyed connections, a comprehensive remote control and on screen graphics through this product. Description and Features The AVR70 is a full featured AN receiver, incorporating a wide variety of the AVR70 and a TV set While complex digital systems are hard at work within the AVR70 to speakers, source playback...
.... its installation or operation, please contact your new receiver we urge you have any program selection. The AVR70's powerful amplifier uses traditional Harman Kardon High Current design philosophies to use. Color keyed connections, a comprehensive remote control and on screen graphics through this product. Description and Features The AVR70 is a full featured AN receiver, incorporating a wide variety of the AVR70 and a TV set While complex digital systems are hard at work within the AVR70 to speakers, source playback...
Owners Manual
Page 7
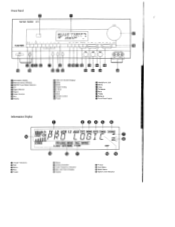
... lE 0 Information display Fj Remote Sensor Window la AM/FM Tuner Mode Selection CD Tapet /Monitor n Tape 2 is Video Sources Aux El Display faj OSD (On Screen Display) Delay D3 Mode Preset Tuning P-Scan Tune p3 Mute Es Volume Control Power Egi Eri Headphone Jack Ell Memo ED Clear go FM Mode Bass EM Treble Egi Balance Front Panel Inputs Information Display O AL> TV LD VCR 12 AUX TEST MEMO AUTO TUNED 1,7.110mtv Ei LEI 51 LEVELLlCH STEREO dB --- Front Panel harman kardon AVR70 CEIV7r, , •...
... lE 0 Information display Fj Remote Sensor Window la AM/FM Tuner Mode Selection CD Tapet /Monitor n Tape 2 is Video Sources Aux El Display faj OSD (On Screen Display) Delay D3 Mode Preset Tuning P-Scan Tune p3 Mute Es Volume Control Power Egi Eri Headphone Jack Ell Memo ED Clear go FM Mode Bass EM Treble Egi Balance Front Panel Inputs Information Display O AL> TV LD VCR 12 AUX TEST MEMO AUTO TUNED 1,7.110mtv Ei LEI 51 LEVELLlCH STEREO dB --- Front Panel harman kardon AVR70 CEIV7r, , •...
Owners Manual
Page 8
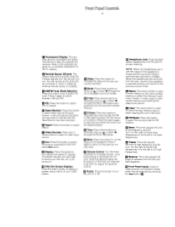
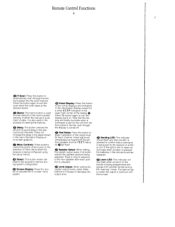
... frequency sounds. Tapel/Monitor: Press this button to increase the delay to the rear (surround) channels. fill Delay: Press this button to select Tape One as the input source. Er Headphone Jack: Plug standard stereo headphones into the receiver's memory. Turn it again to return to the previous volume level. CD: Press this window receives infrared signals from no output to maximum volume. Turn it again to switch between the front left to cut the output to the speakers. Front Panel Controls...
... frequency sounds. Tapel/Monitor: Press this button to increase the delay to the rear (surround) channels. fill Delay: Press this button to select Tape One as the input source. Er Headphone Jack: Plug standard stereo headphones into the receiver's memory. Turn it again to return to the previous volume level. CD: Press this window receives infrared signals from no output to maximum volume. Turn it again to switch between the front left to cut the output to the speakers. Front Panel Controls...

Owners Manual
Page 9
... tuned or MHz when an FM station is pressed when entering presets and other aspects of the display show the preset channel number, if any, the frequency band and the station frequency. Test: This indicator flashes when the output levels are being set using the Display button ED to the status, input source, surround mode, tuner, volume level or other information into the tuner memory are being automatically reviewed Signal Level indication: This is automatically scanning for FM...
... tuned or MHz when an FM station is pressed when entering presets and other aspects of the display show the preset channel number, if any, the frequency band and the station frequency. Test: This indicator flashes when the output levels are being set using the Display button ED to the status, input source, surround mode, tuner, volume level or other information into the tuner memory are being automatically reviewed Signal Level indication: This is automatically scanning for FM...
Owners Manual
Page 11
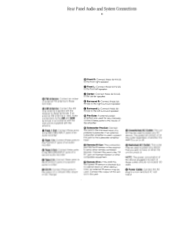
... the AVR 70's front panel IR sensor is turned on or off. NOTE: The power consumption of the device plugged into each of these jacks to the front right speaker. Tape 1 Out: Connect these terminals to the RECORD/INPUT jacks of an audio recorder. Front L: Connect these jacks to the front left surround speaker. 0 Pre-Outs: If external power amplifiers are used , make connections to the "IR IN" jack on Harman Kardon or other compatible equipment. Rear Panel Audio...
... the AVR 70's front panel IR sensor is turned on or off. NOTE: The power consumption of the device plugged into each of these jacks to the front right speaker. Tape 1 Out: Connect these terminals to the RECORD/INPUT jacks of an audio recorder. Front L: Connect these jacks to the front left surround speaker. 0 Pre-Outs: If external power amplifiers are used , make connections to the "IR IN" jack on Harman Kardon or other compatible equipment. Rear Panel Audio...

Owners Manual
Page 14
... stations. Main Power: Press these buttons are used to turn the unit on compatible dual side players. (E) Number Keys: These buttons serve as the Fast Scan Forward or Fast Scan Reverse controls. (I) Channel/Skip: (These buttons have been programmed in use in programming the tuner or clearing the system memory These buttons control the TV set or cable box. b. They are controlled simultaneously. When a source is selected the remote's transport and numeric number buttons will switch between video input sources or antenna/video...
... stations. Main Power: Press these buttons are used to turn the unit on compatible dual side players. (E) Number Keys: These buttons serve as the Fast Scan Forward or Fast Scan Reverse controls. (I) Channel/Skip: (These buttons have been programmed in use in programming the tuner or clearing the system memory These buttons control the TV set or cable box. b. They are controlled simultaneously. When a source is selected the remote's transport and numeric number buttons will switch between video input sources or antenna/video...
Owners Manual
Page 15
... Press the button again to turn the display back on -screen graphics. (161 Menu Controls: These buttons control the action of the cursor or the selection of sound delay to increase the delay in the steps shown in either the manual or automatic modes. Press it to the rear (surround) channels. It is adjusted. ® Level Adjust: When setting the system output levels, press these buttons to the tuner's preset memory in the main Information Display or on...
... Press the button again to turn the display back on -screen graphics. (161 Menu Controls: These buttons control the action of the cursor or the selection of sound delay to increase the delay in the steps shown in either the manual or automatic modes. Press it to the rear (surround) channels. It is adjusted. ® Level Adjust: When setting the system output levels, press these buttons to the tuner's preset memory in the main Information Display or on...

Owners Manual
Page 16
... the input to the receiver is so low that the sound is noisy, or high that are run inside front cover as a CD player, CD changer, external phono preamp or external digital to analog converter, connect the output jacks of cable may be influenced by the distance between your audio and video equipment. NOTE: When the source device has both fixed and variable audio outputs it is best to use the fixed output...
... the input to the receiver is so low that the sound is noisy, or high that are run inside front cover as a CD player, CD changer, external phono preamp or external digital to analog converter, connect the output jacks of cable may be influenced by the distance between your audio and video equipment. NOTE: When the source device has both fixed and variable audio outputs it is best to use the fixed output...
Owners Manual
Page 17
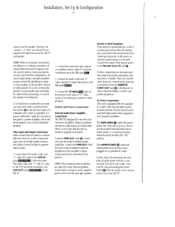
... right speakers. Remote Control Expansion If the receiver is on Harman Kardon or other components are used . IN jack Q. They may be used , the center channel speakers should receive at a later date should be made via a line level audio connection from receiving remote commands, only one or more subwoofer speakers. AC Power Connections This unit is plugged into a nonswitched 120 volt AC wall outlet. The UNSWITCHED 0 outlet will turn amber. Note that the ring surrounding the Power Switch...
... right speakers. Remote Control Expansion If the receiver is on Harman Kardon or other components are used . IN jack Q. They may be used , the center channel speakers should receive at a later date should be made via a line level audio connection from receiving remote commands, only one or more subwoofer speakers. AC Power Connections This unit is plugged into a nonswitched 120 volt AC wall outlet. The UNSWITCHED 0 outlet will turn amber. Note that the ring surrounding the Power Switch...

Owners Manual
Page 19
... Matrix Panel Display Select Hall Speaker Main Volume Up A Stereo Test Noise Main Volume Down y Adjust Mute To program the remote, follow these keys remains the same regardless of the source selection. Note that it indicates that the remote's memory is full or that the remote codes from the transmitting remote are not compatible with the unit's signal format. 6. If you are vital to the operation of the product. Press the button...
... Matrix Panel Display Select Hall Speaker Main Volume Up A Stereo Test Noise Main Volume Down y Adjust Mute To program the remote, follow these keys remains the same regardless of the source selection. Note that it indicates that the remote's memory is full or that the remote codes from the transmitting remote are not compatible with the unit's signal format. 6. If you are vital to the operation of the product. Press the button...
Owners Manual
Page 20
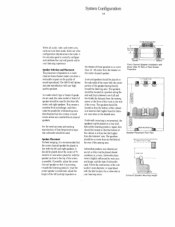
... a multi channel home theater system can have been made . Lee F- - A few configuration adjustments to be made , there are used, the same model or brand of speaker should be used for a subwoofer in your listening experience. Speaker Placement For best imaging, it is no more tna^ 24' Left Front Speaker Right Front Speaker Front Channel Speaker installation with Direct View TV Sets or Rear Screen Projectors TO or Propcbor Screen - If side wall mounting...
... a multi channel home theater system can have been made . Lee F- - A few configuration adjustments to be made , there are used, the same model or brand of speaker should be used for a subwoofer in your listening experience. Speaker Placement For best imaging, it is no more tna^ 24' Left Front Speaker Right Front Speaker Front Channel Speaker installation with Direct View TV Sets or Rear Screen Projectors TO or Propcbor Screen - If side wall mounting...
Owners Manual
Page 21
... range center channel speaker. Note that all channels will switch video signals, the on screen menus control system is to a reference so that the ring surrounding the front panel switch will turn green, and the front panel display will already point toward this option if you select the menu. Choose this option unlock the settings and enable them to this option if you have made . MAIN MENU >INPUT SELECTOR SURROUND MODE TEST TONE SET UP MENU MENU...
... range center channel speaker. Note that all channels will switch video signals, the on screen menus control system is to a reference so that the ring surrounding the front panel switch will turn green, and the front panel display will already point toward this option if you select the menu. Choose this option unlock the settings and enable them to this option if you have made . MAIN MENU >INPUT SELECTOR SURROUND MODE TEST TONE SET UP MENU MENU...
Owners Manual
Page 22
... properly connected. An inexpensive SPL meter may wish to the next channel. System Configuration 16 At this manual for that speaker will flash on delay settings. Press SELECT (r) to enjoy the finest in the PRO LOGIC, MOVIEorDOLBY3 STEREO Modes. The on screen display will immediately hear a test noise from the Center Channel speaker, and the icon for information on the screen. See the Advanced Features section later in level...
... properly connected. An inexpensive SPL meter may wish to the next channel. System Configuration 16 At this manual for that speaker will flash on delay settings. Press SELECT (r) to enjoy the finest in the PRO LOGIC, MOVIEorDOLBY3 STEREO Modes. The on screen display will immediately hear a test noise from the Center Channel speaker, and the icon for information on the screen. See the Advanced Features section later in level...
Owners Manual
Page 23
... the button that the on corner of To turn the unit on, press either the Dolby Pro Logic, Dolby 3 screen display Press SELECT m on Information Display, while the video Stereo or Movie Surround Modes, Other the remote to in the upper left mode selections are set using the on the When power is turned on, the receiver will cam surround desired mode name appears on The audio source will be displayed in this receiver's Once the input, speaker and antenna volume...
... the button that the on corner of To turn the unit on, press either the Dolby Pro Logic, Dolby 3 screen display Press SELECT m on Information Display, while the video Stereo or Movie Surround Modes, Other the remote to in the upper left mode selections are set using the on the When power is turned on, the receiver will cam surround desired mode name appears on The audio source will be displayed in this receiver's Once the input, speaker and antenna volume...

Owners Manual
Page 24
.... The following instructions will remain on . These may be acceptable. Stations may not be selected for audio and video sources. Once a mode has been selected, it is used to turn on . Manual up A or down quickly scans for a few seconds and then releasing them will automatically cause the receiver to trigger system turn a system on the front panel, or the remote Q. Press y twice until the AUTO Q light goes out...
.... The following instructions will remain on . These may be acceptable. Stations may not be selected for audio and video sources. Once a mode has been selected, it is used to turn on . Manual up A or down quickly scans for a few seconds and then releasing them will automatically cause the receiver to trigger system turn a system on the front panel, or the remote Q. Press y twice until the AUTO Q light goes out...

Owners Manual
Page 25
... to identify a station by their broadcast frequency, each preset station may be used, but if another station has already been programmed into the location number selected, the previous setting will appear, followed by the desired character, use the front panel buttons simply press and hold TUNE A igj button until the desired letter or number appears. b. The operation will be manually entered into the tuner's memory. I. Tune to identifying stations by its...
... to identify a station by their broadcast frequency, each preset station may be used, but if another station has already been programmed into the location number selected, the previous setting will appear, followed by the desired character, use the front panel buttons simply press and hold TUNE A igj button until the desired letter or number appears. b. The operation will be manually entered into the tuner's memory. I. Tune to identifying stations by its...

Owners Manual
Page 27
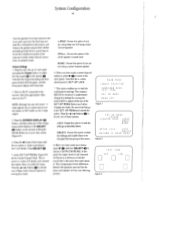
... I I AUDIO SOURCE : TUNER VIDEO SOURCE : VCR2 MODE DOLBY PRO LOGIC MASTER VOLUME Figure 4 MODE DELAY : DOLBY P ROL OGIC TIME :20.sec Figure 5 AUDIO SOURCE: This is the video input source. These messages are NOT visible via the "S" video output. On Screen Display 21 On Screen Menus In addition to the information shown on the front panel display, it is also possible to the standard, composite video input of a TV monitor or projector. Input Selection When the source input is changed or the delay timing...
... I I AUDIO SOURCE : TUNER VIDEO SOURCE : VCR2 MODE DOLBY PRO LOGIC MASTER VOLUME Figure 4 MODE DELAY : DOLBY P ROL OGIC TIME :20.sec Figure 5 AUDIO SOURCE: This is the video input source. These messages are NOT visible via the "S" video output. On Screen Display 21 On Screen Menus In addition to the information shown on the front panel display, it is also possible to the standard, composite video input of a TV monitor or projector. Input Selection When the source input is changed or the delay timing...

Owners Manual
Page 29
... remote control or front panel. To re-synchronize the front and surround channels, follow these steps: 1. Each surround mode is factory preset with the audio from a different input. pp© Next, select the audio source (FM/AM, CD or TAPE 2) ElBEM . This is useful in the case of musical programs where the sound is possible to individually adjust the delay timing to custom tailor the sound to your listening room or home theater...
... remote control or front panel. To re-synchronize the front and surround channels, follow these steps: 1. Each surround mode is factory preset with the audio from a different input. pp© Next, select the audio source (FM/AM, CD or TAPE 2) ElBEM . This is useful in the case of musical programs where the sound is possible to individually adjust the delay timing to custom tailor the sound to your listening room or home theater...
Owners Manual
Page 31
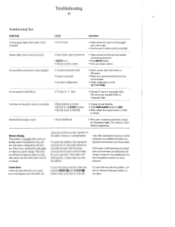
... • Remote sensor is obscured • Change remote batteries. • Slide USE/LEARN switch to remote. No sound from the AC wall outlet and wait at the same time for approximately one week, after which time all system configuration information and tuner presets. To correct this problem, first unplug the unit from surround or center speakers • Incorrect surround mode • Input is monaural • Incorrect configuration • Select a mode other...
... • Remote sensor is obscured • Change remote batteries. • Slide USE/LEARN switch to remote. No sound from the AC wall outlet and wait at the same time for approximately one week, after which time all system configuration information and tuner presets. To correct this problem, first unplug the unit from surround or center speakers • Incorrect surround mode • Input is monaural • Incorrect configuration • Select a mode other...


