
Owners Manual
Page 2
...CDR 2 Compact Disc Recorder 3 Introduction 3 Important Information on the remote ¡ - (number in a circle) indicates a rear-panel connection A - (letter in a square) indicates an indicator in an oval) indicates a button or indicator on CD Recording 4 Safety Information 5 Front-Panel Controls 7 Front-Panel Information Display 9 Rear-Panel Connections 10 Remote... Play 18 Programming Play Lists 18 Checking, Editing and Clearing Programmed Play Lists 18 Repeat Programmed Play 20 CD Recording 20 Disc Dubbing 21 CD Sync Recording 21 Recording from an External Source 22 Finalizing CD-R and CD-...
...CDR 2 Compact Disc Recorder 3 Introduction 3 Important Information on the remote ¡ - (number in a circle) indicates a rear-panel connection A - (letter in a square) indicates an indicator in an oval) indicates a button or indicator on CD Recording 4 Safety Information 5 Front-Panel Controls 7 Front-Panel Information Display 9 Rear-Panel Connections 10 Remote... Play 18 Programming Play Lists 18 Checking, Editing and Clearing Programmed Play Lists 18 Repeat Programmed Play 20 CD Recording 20 Disc Dubbing 21 CD Sync Recording 21 Recording from an External Source 22 Finalizing CD-R and CD-...
Owners Manual
Page 5
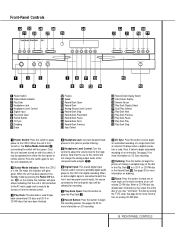
...CD Sync: Press this button to be used . When an active digital signal is in the ON mode, this switch, it twice to the CDR 2. See pages 20-22 for more information on CD Sync recording. ) Dubbing: Press this control will turn the unit completely off. 2 Status-Mode Indicator: When... the CDR 2 is connected to the headphones. See page 21 for more information on from the remote control. 3 Play Deck: This disc deck is first ...
...CD Sync: Press this button to be used . When an active digital signal is in the ON mode, this switch, it twice to the CDR 2. See pages 20-22 for more information on CD Sync recording. ) Dubbing: Press this control will turn the unit completely off. 2 Status-Mode Indicator: When... the CDR 2 is connected to the headphones. See page 21 for more information on from the remote control. 3 Play Deck: This disc deck is first ...
Owners Manual
Page 6
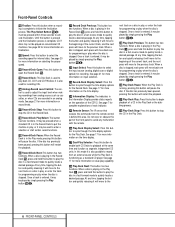
... it will move to the beginning of the front panel to avoid any malfunction with the remote. Ù Play-Deck Display Select: Press this button to cycle through the time display ...to the previous track. See page 17 for more information on conventional CD machines. See page 20 for more information on selecting the proper speed. $ Record-Deck Open: Press this button to ...recordings from analog sources such as a standard CD player. See page 17 for complete explanations of the CDR 2. See page 7 for more information on record levels. & Record-Deck Stop: Press this button ...
... it will move to the beginning of the front panel to avoid any malfunction with the remote. Ù Play-Deck Display Select: Press this button to cycle through the time display ...to the previous track. See page 17 for more information on conventional CD machines. See page 20 for more information on selecting the proper speed. $ Record-Deck Open: Press this button to ...recordings from analog sources such as a standard CD player. See page 17 for complete explanations of the CDR 2. See page 7 for more information on record levels. & Record-Deck Stop: Press this button ...

Owners Manual
Page 11
... Press this button to stop playback or recording. See page 20 for more information on . x Stop: Press this button to select the recording speed for this control to turn the CDR 2 on selecting the proper speed. Remote Control Functions a Power-On Button: Press this button to ...Automatic/Manual Track Increment Selector: Press this button when a recording is only possible on timedisplay options. See page 20 for more information on programming the CDR 2. See page 18 for more information on erasing discs. See page 22 for more information on programmed playback. ...
... Press this button to stop playback or recording. See page 20 for more information on . x Stop: Press this button to select the recording speed for this control to turn the CDR 2 on selecting the proper speed. Remote Control Functions a Power-On Button: Press this button to ...Automatic/Manual Track Increment Selector: Press this button when a recording is only possible on timedisplay options. See page 20 for more information on programming the CDR 2. See page 18 for more information on erasing discs. See page 22 for more information on programmed playback. ...

Owners Manual
Page 18
... remove a total program list when the disc is also possible by simply entering the track number using the Numeric Keys p. Repeat Programmed Play The CDR 2's programming system enables you to repeat either a single track on a disc, the entire disk, or a specially programmed passage that correspond to the... . 18 PROGRAM PLAY The first display will show the track number just entered on the remote for complete information on a disc, insert the disc, let the unit read FULL. Follow the instructions on page 20 for the Record Deck %. Thus, if you play through a program list, press the...
... remove a total program list when the disc is also possible by simply entering the track number using the Numeric Keys p. Repeat Programmed Play The CDR 2's programming system enables you to repeat either a single track on a disc, the entire disk, or a specially programmed passage that correspond to the... . 18 PROGRAM PLAY The first display will show the track number just entered on the remote for complete information on a disc, insert the disc, let the unit read FULL. Follow the instructions on page 20 for the Record Deck %. Thus, if you play through a program list, press the...
Owners Manual
Page 23
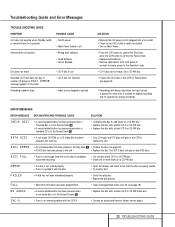
... does not operate when Standby switch or remote Power-On is pressed • No AC power • Main Power Switch is off Remote does not function • Wrong deck ... record-related button has been pressed when a standard CD is a problem with the CDR 2 • Contact an authorized Harman Kardon service depot 23 TROUBLESHOOTING GUIDE replace the disc DISC ERROR • An Unfinalized disc ... 3 seconds for digital recordings and 10 seconds for more than 20 tracks have been programmed • Clear all programmed tracks over 20 (see page 18) NO AUDIO • A record-related...
... does not operate when Standby switch or remote Power-On is pressed • No AC power • Main Power Switch is off Remote does not function • Wrong deck ... record-related button has been pressed when a standard CD is a problem with the CDR 2 • Contact an authorized Harman Kardon service depot 23 TROUBLESHOOTING GUIDE replace the disc DISC ERROR • An Unfinalized disc ... 3 seconds for digital recordings and 10 seconds for more than 20 tracks have been programmed • Clear all programmed tracks over 20 (see page 18) NO AUDIO • A record-related...
Quick Start Guide
Page 2
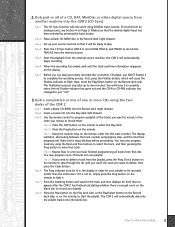
... side, or the Play/Select button on the Record deck side, or on the remote to record ALL TRACKS from that track. The CDR 2 will know it to delete, then press the Clear button. Step 3: Set up to 20 tracks into one or more CDs using the Next and Prev buttons to select... the track, and then pressing the Prog button to flash. Step 3b: Press the Prog button on the remote, enter the...
... side, or the Play/Select button on the Record deck side, or on the remote to record ALL TRACKS from that track. The CDR 2 will know it to delete, then press the Clear button. Step 3: Set up to 20 tracks into one or more CDs using the Next and Prev buttons to select... the track, and then pressing the Prog button to flash. Step 3b: Press the Prog button on the remote, enter the...


