
Owners Manual
Page 1
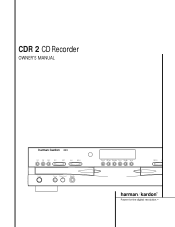
CDR 2 CD Recorder OWNER'S MANUAL ® Power for the digital revolution.™
CDR 2 CD Recorder OWNER'S MANUAL ® Power for the digital revolution.™
Owners Manual
Page 2
... 22 Erasing a Single Track 23 Troubleshooting Guide and Error Messages 24 Technical Specifications 2 TABLE OF CONTENTS Typographical Conventions In order to help you use this manual with the remote control, front-panel controls and rear-panel connections, certain conventions have been used.
... 22 Erasing a Single Track 23 Troubleshooting Guide and Error Messages 24 Technical Specifications 2 TABLE OF CONTENTS Typographical Conventions In order to help you use this manual with the remote control, front-panel controls and rear-panel connections, certain conventions have been used.
Owners Manual
Page 3
... familiar with all standard CD audio discs but CD-RW discs will not work in making audio tape or cassette recordings. Designed and engineered by Harman Kardon, the CDR 2 is the finalization process. Through the use will only play -only CD machines in this product - To make a copy ...capabilities of CD Recorders. Although CD recorders resemble play in the CDR 2 and certain other players. If you have additional questions about this manual, please contact your dealer, who is your time will pay special attention to bypass the internal DACs and use . The lightning flash with...
... familiar with all standard CD audio discs but CD-RW discs will not work in making audio tape or cassette recordings. Designed and engineered by Harman Kardon, the CDR 2 is the finalization process. Through the use will only play -only CD machines in this product - To make a copy ...capabilities of CD Recorders. Although CD recorders resemble play in the CDR 2 and certain other players. If you have additional questions about this manual, please contact your dealer, who is your time will pay special attention to bypass the internal DACs and use . The lightning flash with...
Owners Manual
Page 4
...no guar- NOTE: Changes or modifications may be installed in shipping if you do not intend to comply with this owner's manual carefully and retain it is connected. This is intended can radiate radio frequency energy and, if not installed and used to ...all discs are designed to qualified personnel only. s Connect the equipment into a wall outlet. Operation is exposed to protect your local Harman Kardon service station. Unpacking The carton and shipping materials used in a particular installation. Packing materials that harmful interference will be stored in ...
...no guar- NOTE: Changes or modifications may be installed in shipping if you do not intend to comply with this owner's manual carefully and retain it is connected. This is intended can radiate radio frequency energy and, if not installed and used to ...all discs are designed to qualified personnel only. s Connect the equipment into a wall outlet. Operation is exposed to protect your local Harman Kardon service station. Unpacking The carton and shipping materials used in a particular installation. Packing materials that harmful interference will be stored in ...
Owners Manual
Page 7
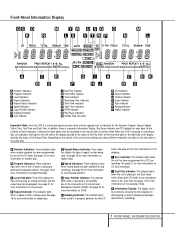
... recording, and the output level during playback. G Copy-Prohibit Indicator: This indicator lights when a recording is a dual-deck player/recorder, there are described in this manual with a common letter. See page 20 for discs playing, as well as playback decks at the same time. I Sync Indicator J Dual-Play Indicator K Information Displays...
... recording, and the output level during playback. G Copy-Prohibit Indicator: This indicator lights when a recording is a dual-deck player/recorder, there are described in this manual with a common letter. See page 20 for discs playing, as well as playback decks at the same time. I Sync Indicator J Dual-Play Indicator K Information Displays...

Owners Manual
Page 10
... Display Control c Play (CDP)-Deck Open d Play (CDP)-Deck Select e Program f Reverse Search g Single h Program Check i Previous-Track Skip j Play/Select k Random Play l Dub m Automatic/Manual Track Increment Selector n Track Increment o Finalize p Numeric Keys q A-B Repeat r Repeat s Speed Select t Record Button u Erase Button v Input Select w CD Sync x Stop y Pause z Next Track ` Dual...
... Display Control c Play (CDP)-Deck Open d Play (CDP)-Deck Select e Program f Reverse Search g Single h Program Check i Previous-Track Skip j Play/Select k Random Play l Dub m Automatic/Manual Track Increment Selector n Track Increment o Finalize p Numeric Keys q A-B Repeat r Repeat s Speed Select t Record Button u Erase Button v Input Select w CD Sync x Stop y Pause z Next Track ` Dual...

Owners Manual
Page 11
... check or edit a programmed playback sequence. h Program Check: Press this button to locate a desired passage. n Track Increment: When the Manual mode for internal dubs. The Play/Select button *j must first be played on conventional CD machines. See page 18 for more information on ...this button to turn the CDR 2 on input selection. Remote Control Functions a Power-On Button: Press this button to select between automatic and manual track increments during a recording session. See page 22 for more information on . Note that in the Record Deck %. d Play (CDP)-...
... check or edit a programmed playback sequence. h Program Check: Press this button to locate a desired passage. n Track Increment: When the Manual mode for internal dubs. The Play/Select button *j must first be played on conventional CD machines. See page 18 for more information on ...this button to turn the CDR 2 on input selection. Remote Control Functions a Power-On Button: Press this button to select between automatic and manual track increments during a recording session. See page 22 for more information on . Note that in the Record Deck %. d Play (CDP)-...
Owners Manual
Page 12
..." phono jack as an input. Depending on your receiver, preamp or surround processor. To play the output of water or damp conditions. Consult the owner's manual on your receiver or processor. If the CD player has BOTH types of outputs, you may want to connect one supplied with the CDR 2, consult... jacks marked for your select it is also recommended that the CDR 2 not be placed in a location that is an audible click. Consult the owner's manual on your receiver or processor. To make it is enough space above the unit so that discs may vary from unit to unit. If it...
..." phono jack as an input. Depending on your receiver, preamp or surround processor. To play the output of water or damp conditions. Consult the owner's manual on your receiver or processor. If the CD player has BOTH types of outputs, you may want to connect one supplied with the CDR 2, consult... jacks marked for your select it is also recommended that the CDR 2 not be placed in a location that is an audible click. Consult the owner's manual on your receiver or processor. To make it is enough space above the unit so that discs may vary from unit to unit. If it...
Owners Manual
Page 20
... must be made in some rare cases, a CD player may be finalized. It is possible to listen to protect the rights of copyright owners. To manually stop automatically when the source disc has played through to start the dub. Disc Dubbing The easiest way to make a copy of most cases, blank...
... must be made in some rare cases, a CD player may be finalized. It is possible to listen to protect the rights of copyright owners. To manually stop automatically when the source disc has played through to start the dub. Disc Dubbing The easiest way to make a copy of most cases, blank...
Owners Manual
Page 21
...as COAX, OPTICAL and ANALOG. Depending on which will be shown in the Information Display K as described above, track numbers must add track numbers manually by pressing the Play/Select button j*. Note: If there is a pause in the playback signal for more than 3 seconds for digital recordings ... start the recording. Pressing the button will cycle between the input choices, which mode of the recording and the track data. Press the Auto/Manual button m to select how tracks will then return to increase the track number. • The Auto mode will add track numbers automatically, in...
...as COAX, OPTICAL and ANALOG. Depending on which will be shown in the Information Display K as described above, track numbers must add track numbers manually by pressing the Play/Select button j*. Note: If there is a pause in the playback signal for more than 3 seconds for digital recordings ... start the recording. Pressing the button will cycle between the input choices, which mode of the recording and the track data. Press the Auto/Manual button m to select how tracks will then return to increase the track number. • The Auto mode will add track numbers automatically, in...
Quick Start Guide
Page 1
... when the red Finalize indicator has gone out and the CD-R or CD-RW indicator has changed to your newly recorded disc in the owner's manual. Next, press the Play/Select button on the Record deck side, and the CDR 2 will explain how to select the Record deck. 1. A Quick ... each deck to control by following the instructions in another machine into the CDR 2. The finalization process may take up to Make Recordings Using the Harman Kardon CDR 2 - How to two minutes. Step 3: Wait for the track and time information for the track and time data to 4x. Step 7: When the...
... when the red Finalize indicator has gone out and the CD-R or CD-RW indicator has changed to your newly recorded disc in the owner's manual. Next, press the Play/Select button on the Record deck side, and the CDR 2 will explain how to select the Record deck. 1. A Quick ... each deck to control by following the instructions in another machine into the CDR 2. The finalization process may take up to Make Recordings Using the Harman Kardon CDR 2 - How to two minutes. Step 3: Wait for the track and time information for the track and time data to 4x. Step 7: When the...
Quick Start Guide
Page 3
...". 4. If you attempt to exceed the track limit, the display will stop automatically after ten seconds of silence, and it permit you to manually increment the track number for each new track. The finalization process may take up to record more than 99 tracks onto the same blank disc... turntable); You will cause the Finalize indicator to a new track. Cue it means you wish to use Auto mode anyway, select it by using manual track increment mode, remember to press the track increment button each time the source record or tape changes to flash. Next, press the Play/Select...
...". 4. If you attempt to exceed the track limit, the display will stop automatically after ten seconds of silence, and it permit you to manually increment the track number for each new track. The finalization process may take up to record more than 99 tracks onto the same blank disc... turntable); You will cause the Finalize indicator to a new track. Cue it means you wish to use Auto mode anyway, select it by using manual track increment mode, remember to press the track increment button each time the source record or tape changes to flash. Next, press the Play/Select...

Quick Start Guide
Page 4
... the Erase button TWICE until the Erase indicator flashes and "TOC" appears in the display, e.g., "5 TRK". For further information on using your Harman Kardon CDR 2, please refer to your owner's manual, or see above), or one track, skip to erase Tracks 4 and 5 in the display). Step 3: Step 2 will also have recorded 5 tracks and...
... the Erase button TWICE until the Erase indicator flashes and "TOC" appears in the display, e.g., "5 TRK". For further information on using your Harman Kardon CDR 2, please refer to your owner's manual, or see above), or one track, skip to erase Tracks 4 and 5 in the display). Step 3: Step 2 will also have recorded 5 tracks and...


