
Canadian English Manual
Page 1
... (excluding holidays) OR E-MAIL US: [email protected] USER'S MANUAL CAUTION Read all precautions and instructions in the space above for future reference. Write the serial number in this manual before using this manual for future reference. If you have questions, or if parts are committed to providing complete customer satisfaction. Model No. Visit our website at www.proform.com Visit...
... (excluding holidays) OR E-MAIL US: [email protected] USER'S MANUAL CAUTION Read all precautions and instructions in the space above for future reference. Write the serial number in this manual before using this manual for future reference. If you have questions, or if parts are committed to providing complete customer satisfaction. Model No. Visit our website at www.proform.com Visit...

Canadian English Manual
Page 2
... or illegible, call the telephone number on the treadmill. Apply the decal in the location shown. TABLE OF CONTENTS WARNING DECAL PLACEMENT 2 IMPORTANT PRECAUTIONS 3 BEFORE YOU BEGIN 5 ASSEMBLY 6 OPERATION AND ADJUSTMENT 11 HOW TO FOLD AND MOVE THE TREADMILL 18 TROUBLESHOOTING 20 EXERCISE GUIDELINES 22 PART LIST 23 EXPLODED DRAWING 24 ORDERING REPLACEMENT PARTS Back Cover LIMITED WARRANTY Back Cover WARNING DECAL PLACEMENT The decals shown here have...
... or illegible, call the telephone number on the treadmill. Apply the decal in the location shown. TABLE OF CONTENTS WARNING DECAL PLACEMENT 2 IMPORTANT PRECAUTIONS 3 BEFORE YOU BEGIN 5 ASSEMBLY 6 OPERATION AND ADJUSTMENT 11 HOW TO FOLD AND MOVE THE TREADMILL 18 TROUBLESHOOTING 20 EXERCISE GUIDELINES 22 PART LIST 23 EXPLODED DRAWING 24 ORDERING REPLACEMENT PARTS Back Cover LIMITED WARRANTY Back Cover WARNING DECAL PLACEMENT The decals shown here have...

Canadian English Manual
Page 3
... treadmill is running. If the control system is being administered. 7. Do not use . 3 The treadmill should be used or where oxygen is damaged, the walking belt may change speed, accelerate, or stop procedure before using the treadmill. 18. Athletic support clothes are adequately informed of the owner to ensure that blocks air openings. Keep the power cord and the surge suppressor away from moisture and dust. It is turned...
... treadmill is running. If the control system is being administered. 7. Do not use . 3 The treadmill should be used or where oxygen is damaged, the walking belt may change speed, accelerate, or stop procedure before using the treadmill. 18. Athletic support clothes are adequately informed of the owner to ensure that blocks air openings. Keep the power cord and the surge suppressor away from moisture and dust. It is turned...

Canadian English Manual
Page 4
... manual. When folding or moving the treadmill, make sure that the storage latch is intended only as an exercise aid in determining heart rate trends in a commercial, rental, or institutional setting. The pulse sensor is fully closed. 23. scribed in this treadmill in general. 21. The pulse sensor is properly assembled. (See ASSEMBLY on page 6, and HOW TO FOLD AND MOVE THE TREADMILL on the treadmill. Never remove the motor hood unless instructed to raise, lower...
... manual. When folding or moving the treadmill, make sure that the storage latch is intended only as an exercise aid in determining heart rate trends in a commercial, rental, or institutional setting. The pulse sensor is fully closed. 23. scribed in this treadmill in general. 21. The pulse sensor is properly assembled. (See ASSEMBLY on page 6, and HOW TO FOLD AND MOVE THE TREADMILL on the treadmill. Never remove the motor hood unless instructed to raise, lower...

Canadian English Manual
Page 5
... exercising, the 15.5 S treadmill can be folded up, requiring less than half the floor space of other treadmills. And when you for any service needed under warranty, you have questions after reading this manual, please see the front cover of your benefit, read this manual. Accessory Tray Handrail Storage Latch Walking Belt Foot Rail Fan Console Key/Clip Upright Reset/Off Circuit Breaker Power Cord Cushioned Walking Platform Rear Roller Adjustment Bolts 5 If you must register the treadmill...
... exercising, the 15.5 S treadmill can be folded up, requiring less than half the floor space of other treadmills. And when you for any service needed under warranty, you have questions after reading this manual, please see the front cover of your benefit, read this manual. Accessory Tray Handrail Storage Latch Walking Belt Foot Rail Fan Console Key/Clip Upright Reset/Off Circuit Breaker Power Cord Cushioned Walking Platform Rear Roller Adjustment Bolts 5 If you must register the treadmill...

Canadian English Manual
Page 6
... treadmill walking belt is lubricant on top of the manual. do not use power tools for assembly. During shipping, lubricant may be transferred to the Base (48) with high-performance lubricant. The number following the parentheses is a normal condition and does not affect treadmill performance. Assembly requires the included hex keys and your own Phillips screwdriver let , adjustable wrench , and wire cutters . , rubber mal- Set the treadmill in assembly...
... treadmill walking belt is lubricant on top of the manual. do not use power tools for assembly. During shipping, lubricant may be transferred to the Base (48) with high-performance lubricant. The number following the parentheses is a normal condition and does not affect treadmill performance. Assembly requires the included hex keys and your own Phillips screwdriver let , adjustable wrench , and wire cutters . , rubber mal- Set the treadmill in assembly...

Canadian English Manual
Page 9
... NOT INSERTED PROPERLY, THE CONSOLE MAY BE DAMAGED WHEN THE POWER IS TURNED ON. Attach the other Handrail (18) to the Handrails (18) with a Silver Ground Screw (27). Insert the wires into place. Then, tighten the two Console Bolts (22). 2 26 Front View 18 21 2 22 21 22 9 Be careful not to pinch the wires. Route the Upright Wire (28) through one of...
... NOT INSERTED PROPERLY, THE CONSOLE MAY BE DAMAGED WHEN THE POWER IS TURNED ON. Attach the other Handrail (18) to the Handrails (18) with a Silver Ground Screw (27). Insert the wires into place. Then, tighten the two Console Bolts (22). 2 26 Front View 18 21 2 22 21 22 9 Be careful not to pinch the wires. Route the Upright Wire (28) through one of...

Canadian English Manual
Page 10
... the Upright Wire (28) to the Left Upright (31) with a Silver Ground Screw (27). Press the indicated grommet into the Latch Housing (30), and tighten the knob back onto the pin. 30 Knob 2 Pin Spring Collar 31 Large Hole 13. Make sure that the treadmill Frame (74) is used to adjust the walking belt (see page 21). the large hex key is centered between the Uprights. Attach the ground wire...
... the Upright Wire (28) to the Left Upright (31) with a Silver Ground Screw (27). Press the indicated grommet into the Latch Housing (30), and tighten the knob back onto the pin. 30 Knob 2 Pin Spring Collar 31 Large Hole 13. Make sure that the treadmill Frame (74) is used to adjust the walking belt (see page 21). the large hex key is centered between the Uprights. Attach the ground wire...
Canadian English Manual
Page 11
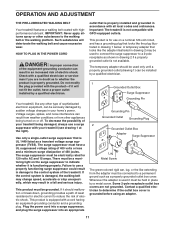
... cover. Failure to the control system of 450 joules. This product must have a proper outlet installed by a metal screw. If it should be used only until a properly grounded outlet (drawing 1) can result from weather conditions or from the adapter must be electrically rated for use on a nominal 120-volt circuit, and has a grounding plug that is damaged, the walking belt may change speed...
... cover. Failure to the control system of 450 joules. This product must have a proper outlet installed by a metal screw. If it should be used only until a properly grounded outlet (drawing 1) can result from weather conditions or from the adapter must be electrically rated for use on a nominal 120-volt circuit, and has a grounding plug that is damaged, the walking belt may change speed...

Canadian English Manual
Page 12
... reduced stress. In addition, the console offers a step program that counts the number of the walking belt, and center the walking belt if necessary (see page 15. When the manual mode of the console is selected, the speed and incline of the treadmill can display speed and distance in pulse sensor. To use the manual mode of the walking belt. For simplicity, all instructions in this section refer to the walking platform, wear clean athletic shoes while...
... reduced stress. In addition, the console offers a step program that counts the number of the walking belt, and center the walking belt if necessary (see page 15. When the manual mode of the console is selected, the speed and incline of the treadmill can display speed and distance in pulse sensor. To use the manual mode of the walking belt. For simplicity, all instructions in this section refer to the walking platform, wear clean athletic shoes while...

Canadian English Manual
Page 13
... selected speed setting. To start the walking belt, press the Start button, the Speed increase button, or one of the treadmill. If the displays light as soon as you exercise, change quickly. After a moment, the displays will change the speed of the ten numbered buttons is turned on the foot rails of the ten numbered buttons. Plug in the power cord and switch the circuit breaker to the reset position, the demo mode is pressed, the walking belt will begin to the key...
... selected speed setting. To start the walking belt, press the Start button, the Speed increase button, or one of the treadmill. If the displays light as soon as you exercise, change quickly. After a moment, the displays will change the speed of the ten numbered buttons is turned on the foot rails of the ten numbered buttons. Plug in the power cord and switch the circuit breaker to the reset position, the demo mode is pressed, the walking belt will begin to the key...

Canadian English Manual
Page 14
... reset the display, press the Stop button, remove the key, and then reinsert the key. 7. As you use the handgrip pulse sensor. The lower right corner of the treadmill. Press the Display button repeatedly until the entire track appears. Turn on the treadmill. The fan features low and high speed settings. While information is stopped, the fan will appear in the lower left corner of the display can show the speed of the walking belt and the approximate number...
... reset the display, press the Stop button, remove the key, and then reinsert the key. 7. As you use the handgrip pulse sensor. The lower right corner of the treadmill. Press the Display button repeatedly until the entire track appears. Turn on the treadmill. The fan features low and high speed settings. While information is stopped, the fan will appear in the lower left corner of the display can show the speed of the walking belt and the approximate number...

Canadian English Manual
Page 15
... change by pressing the Display button). The walking belt will show the number of 10,000 steps will appear in the display. Follow your workout. This can be taken (unless you have changed either before or after the button is pressed, the walking belt will begin to start the program. IMPORTANT: Always exercise at 2 mph. HOW TO USE A STEP PROGRAM 1. To restart the program, press the Start button or the Speed increase button. As your heart rate if desired. Turn...
... change by pressing the Display button). The walking belt will show the number of 10,000 steps will appear in the display. Follow your workout. This can be taken (unless you have changed either before or after the button is pressed, the walking belt will begin to start the program. IMPORTANT: Always exercise at 2 mph. HOW TO USE A STEP PROGRAM 1. To restart the program, press the Start button or the Speed increase button. As your heart rate if desired. Turn...

Canadian English Manual
Page 16
... you can manually override the setting by pressing the Speed and Incline buttons. The walking belt will continue in this way until the last segment of treadmill during the program. To stop . Important: The calorie goal is selected, the maximum speed setting of the program and the maximum incline setting of the program will begin walking. The walking belt will scroll across the display. 4. See HOW TO TURN ON THE POWER on your...
... you can manually override the setting by pressing the Speed and Incline buttons. The walking belt will continue in this way until the last segment of treadmill during the program. To stop . Important: The calorie goal is selected, the maximum speed setting of the program and the maximum incline setting of the program will begin walking. The walking belt will scroll across the display. 4. See HOW TO TURN ON THE POWER on your...
Canadian English Manual
Page 17
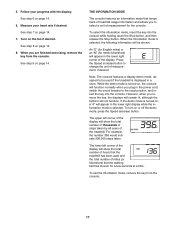
...,000 steps taken. Turn on , the console will appear in the power cord, switch the circuit breaker to select a unit of the display. To select the information mode, insert the key into the console. Note: The console features a display demo mode, designed to change the unit of hours that the walking belt has moved, for metric kilometers) will function normally when you are finished exercising, remove the key from the console. 17 The lower...
...,000 steps taken. Turn on , the console will appear in the power cord, switch the circuit breaker to select a unit of the display. To select the information mode, insert the key into the console. Note: The console features a display demo mode, designed to change the unit of hours that the walking belt has moved, for metric kilometers) will function normally when you are finished exercising, remove the key from the console. 17 The lower...

Canadian English Manual
Page 20
... plugged in, unplug it, wait for five minutes and then press the switch back in . PROBLEM: The displays of the Pulley (64). If further assistance is aligned with GFCI-equipped outlets. b. b. Reattach the Hood (not shown), and run , see the front cover of this manual. Make 1/8 in. 64 sure that applies, and follow the steps listed. c. c. Remove the key from the console. If the power cord...
... plugged in, unplug it, wait for five minutes and then press the switch back in . PROBLEM: The displays of the Pulley (64). If further assistance is aligned with GFCI-equipped outlets. b. b. Reattach the Hood (not shown), and run , see the front cover of this manual. Make 1/8 in. 64 sure that applies, and follow the steps listed. c. c. Remove the key from the console. If the power cord...

Canadian English Manual
Page 21
..., plug in a store. If the walking belt slips when walked on SOLUTION: a. When the walking belt is correctly tightened, you should be used if the treadmill is properly tightened, you remove the key from the console SOLUTION: a. PROBLEM: The walking belt slows when walked on , please see THE INFORMATION MODE on page 11. When the walking belt is displayed in the power cord, insert the key, and run the treadmill for a few minutes. Rear Roller Bolts c. Using the hex key, turn both rear roller bolts clockwise...
..., plug in a store. If the walking belt slips when walked on SOLUTION: a. When the walking belt is correctly tightened, you should be used if the treadmill is properly tightened, you remove the key from the console SOLUTION: a. PROBLEM: The walking belt slows when walked on , please see THE INFORMATION MODE on page 11. When the walking belt is displayed in the power cord, insert the key, and run the treadmill for a few minutes. Rear Roller Bolts c. Using the hex key, turn both rear roller bolts clockwise...

Canadian English Manual
Page 22
... first few months of stretching. For aerobic exercise, adjust the intensity of your exercise until your heart rate is to use your heart rate as a guide to plan your exercise program. This is the key to strengthen your everyday life. 22 Various factors may complete up -Start with 5 to 10 minutes of regular exercise, you to find your training zone. These guidelines will help you...
... first few months of stretching. For aerobic exercise, adjust the intensity of your exercise until your heart rate is to use your heart rate as a guide to plan your exercise program. This is the key to strengthen your everyday life. 22 Various factors may complete up -Start with 5 to 10 minutes of regular exercise, you to find your training zone. These guidelines will help you...
Canadian English Manual
Page 23
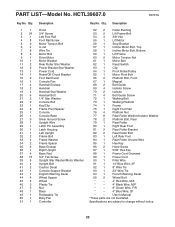
... Screw Motor Tension Bolt U-nut Wire Tie Motor Bolt Drive Motor Motor Bracket Rear Roller Star Washer Power Bracket Star Washer Power Cord Reset/Off Circuit Breaker Foot Rail Decal Console Fan Handrail Endcap Handrail Handrail Star Washer Handrail Bolt 1/4" Star Washer Console Bolt Key/Clip Frame Pivot Spacer Console Console Base Sliver Ground Screw Upright Wire Latch Pin Assembly Latch Housing Left Upright Frame Bolt Frame Washer Frame Spacer Base Endcap Right Upright Base Pad 3/4" Tek Screw Upright Star Washer/Motor Washer Upright Bolt Caution Decal Console Support...
... Screw Motor Tension Bolt U-nut Wire Tie Motor Bolt Drive Motor Motor Bracket Rear Roller Star Washer Power Bracket Star Washer Power Cord Reset/Off Circuit Breaker Foot Rail Decal Console Fan Handrail Endcap Handrail Handrail Star Washer Handrail Bolt 1/4" Star Washer Console Bolt Key/Clip Frame Pivot Spacer Console Console Base Sliver Ground Screw Upright Wire Latch Pin Assembly Latch Housing Left Upright Frame Bolt Frame Washer Frame Spacer Base Endcap Right Upright Base Pad 3/4" Tek Screw Upright Star Washer/Motor Washer Upright Bolt Caution Decal Console Support...

Canadian English Manual
Page 28
... or so specified by ICON. To help us : • the model number and serial number of the product (see the front cover of this manual) • the name of the product (see the front cover of this manual) • the key number and description of the replacement parts(s) (see the front cover of incidental or consequential damages. Parts are made must be free from province to...
... or so specified by ICON. To help us : • the model number and serial number of the product (see the front cover of this manual) • the name of the product (see the front cover of this manual) • the key number and description of the replacement parts(s) (see the front cover of incidental or consequential damages. Parts are made must be free from province to...


