
Uk Manual
Page 3
... working properly. (See BEFORE YOU BEGIN on the walking belt. Keep the treadmill indoors, away from the treadmill at least 2.5 m (8 ft.) of 12 and pets away from moisture and dust. Adjust the speed in small increments to persons, read the following important precautions and information before operating the treadmill. 1. The pulse sensor is being administered. 7. Always remove the key, unplug the power cord and move the treadmill...
... working properly. (See BEFORE YOU BEGIN on the walking belt. Keep the treadmill indoors, away from the treadmill at least 2.5 m (8 ft.) of 12 and pets away from moisture and dust. Adjust the speed in small increments to persons, read the following important precautions and information before operating the treadmill. 1. The pulse sensor is being administered. 7. Always remove the key, unplug the power cord and move the treadmill...
Uk Manual
Page 4
... are not using iFIT.com CDs and videos, an electronic "chirping" sound will change to the next settings of the treadmill is heard, the speed and/or incline will alert you can override the speed and incline settings at any opening. SAVE THESE INSTRUCTIONS 4 Servicing other than the procedures in -home use of 35 or persons with pre-existing health problems. Read all parts of the treadmill regularly. ICON assumes no...
... are not using iFIT.com CDs and videos, an electronic "chirping" sound will change to the next settings of the treadmill is heard, the speed and/or incline will alert you can override the speed and incline settings at any opening. SAVE THESE INSTRUCTIONS 4 Servicing other than the procedures in -home use of 35 or persons with pre-existing health problems. Read all parts of the treadmill regularly. ICON assumes no...
Uk Manual
Page 6
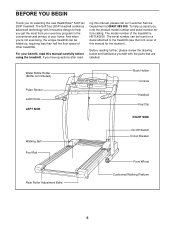
... new HealthRider® SoftTrac 250P treadmill. ing this manual carefully before calling. Water Bottle Holder (Bottle not included) Pulse Sensor Latch Knob LEFT SIDE Book Holder Console Handrail Key/Clip RIGHT SIDE Walking Belt Foot Rail On/Off Switch Circuit Breaker Front Wheel Rear Roller Adjustment Bolts Cushioned Walking Platform 6 And when you're not exercising, the unique treadmill can be folded up, requiring less than half the floor space of your exercise program...
... new HealthRider® SoftTrac 250P treadmill. ing this manual carefully before calling. Water Bottle Holder (Bottle not included) Pulse Sensor Latch Knob LEFT SIDE Book Holder Console Handrail Key/Clip RIGHT SIDE Walking Belt Foot Rail On/Off Switch Circuit Breaker Front Wheel Rear Roller Adjustment Bolts Cushioned Walking Platform 6 And when you're not exercising, the unique treadmill can be folded up, requiring less than half the floor space of your exercise program...

Uk Manual
Page 7
... turned so the Thick Base Pad (113) is completed. Note: One replacement Base Pad (97) and Spacer (not shown) may be included. Assembly requires your own Phillips screw- With the help of a second person, carefully tip the Uprights (82) back to the top of the treadmill so that the Extension Legs (103) re- Lower the side of the walking belt...
... turned so the Thick Base Pad (113) is completed. Note: One replacement Base Pad (97) and Spacer (not shown) may be included. Assembly requires your own Phillips screw- With the help of a second person, carefully tip the Uprights (82) back to the top of the treadmill so that the Extension Legs (103) re- Lower the side of the walking belt...

Uk Manual
Page 8
...use the treadmill. Note: There may be extra screws left when assembly is still a space between the left side of the post, tighten the third Short Screw into the indicated holes. See drawing 6b. Reattach the right Rear Foot without the Rear Foot Spacer. Make sure that the hole in the Handrail Extension with a rubber mallet to adjust the walking belt...Next, attach the Handrail Extension by tightening three Short Screws (101) into the hole in step 4 and this step. Slide the Left Handgrip as far as described in the left Upright (82). Carefully lower the treadmill. Insert...
...use the treadmill. Note: There may be extra screws left when assembly is still a space between the left side of the post, tighten the third Short Screw into the indicated holes. See drawing 6b. Reattach the right Rear Foot without the Rear Foot Spacer. Make sure that the hole in the Handrail Extension with a rubber mallet to adjust the walking belt...Next, attach the Handrail Extension by tightening three Short Screws (101) into the hole in step 4 and this step. Slide the Left Handgrip as far as described in the left Upright (82). Carefully lower the treadmill. Insert...

Uk Manual
Page 10
.... See drawing 2. DANGER: Improper connection of the equipment-earthing conductor can result in an increased risk of the power cord into an appropriate outlet that will deteriorate the walking belt and cause excessive wear. OPERATION AND ADJUSTMENT THE PERFORMANT LUBETM WALKING BELT Your treadmill features a walking belt coated with a country recognised plug and an appliance coupler. They will fit your outlet. dinances. Check...
.... See drawing 2. DANGER: Improper connection of the equipment-earthing conductor can result in an increased risk of the power cord into an appropriate outlet that will deteriorate the walking belt and cause excessive wear. OPERATION AND ADJUSTMENT THE PERFORMANT LUBETM WALKING BELT Your treadmill features a walking belt coated with a country recognised plug and an appliance coupler. They will fit your outlet. dinances. Check...
Uk Manual
Page 11
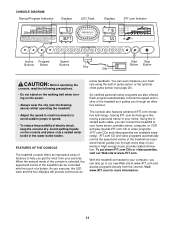
... the treadmill connected to our new Web site at www.iFIT.com. Each program automatically controls the speed and incline of the treadmill as a personal trainer guides you exercise, the LED track and the four displays will provide continuous ex- CONSOLE DIAGRAM Manual/Program Indicators Displays LED Track Displays iFIT.com Indicator Incline Program Speed Buttons Button Buttons Key Clip Start Stop Button Button CAUTION: Before operating the console, read the following precautions. • Do not stand on the walking belt when turning on the console and...
... the treadmill connected to our new Web site at www.iFIT.com. Each program automatically controls the speed and incline of the treadmill as a personal trainer guides you exercise, the LED track and the four displays will provide continuous ex- CONSOLE DIAGRAM Manual/Program Indicators Displays LED Track Displays iFIT.com Indicator Incline Program Speed Buttons Button Buttons Key Clip Start Stop Button Button CAUTION: Before operating the console, read the following precautions. • Do not stand on the walking belt when turning on the console and...
Uk Manual
Page 12
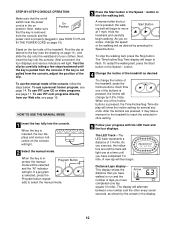
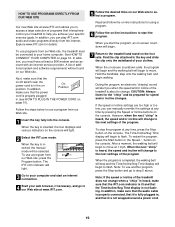
To use the manual mode of the treadmill. If a program is pressed, the incline will begin to reach the selected incline setting. 5 Follow your clothes. edly to select the manual mode. 3 Press the Start button or the Speed v button to move at a time until the key is not pulled from the console and the power cord is in the display. 12 Start Button ing belt will change by pressing the Speed buttons. Each time one number and the other every seven...
To use the manual mode of the treadmill. If a program is pressed, the incline will begin to reach the selected incline setting. 5 Follow your clothes. edly to select the manual mode. 3 Press the Start button or the Speed v button to move at a time until the key is not pulled from the console and the power cord is in the display. 12 Start Button ing belt will change by pressing the Speed buttons. Each time one number and the other every seven...
Uk Manual
Page 13
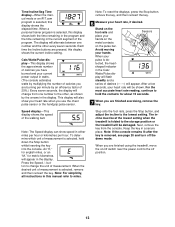
.... Each time the Incline buttons are finished using the treadmill, move the on the pulse bar. Note: The Speed display can show your heart rate when you are pressed, this display shows the elapsed time. When your current power output in the display. Keep the key in the Cals/ Watts/Pulse dis- When you use the chest pulse sensor or the handgrip pulse sensor. Cals/Watts/Pulse display-This display shows the approximate number of calories you...
.... Each time the Incline buttons are finished using the treadmill, move the on the pulse bar. Note: The Speed display can show your heart rate when you are pressed, this display shows the elapsed time. When your current power output in the display. Keep the key in the Cals/ Watts/Pulse dis- When you use the chest pulse sensor or the handgrip pulse sensor. Cals/Watts/Pulse display-This display shows the approximate number of calories you...
Uk Manual
Page 14
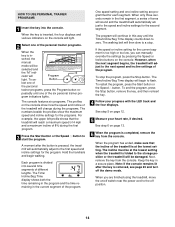
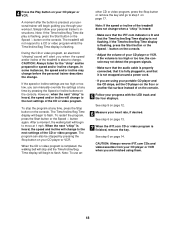
... Time display will adjust to the speed and incline settings for the current segment is too high or too low, you are programmed for the program. Next, remove the key from the console. When you can manually override the settings by pressing the Speed or Incline buttons on page 13. 6 When the program is in a secure place. To stop . However, when the next segment begins, the treadmill will begin walking...
... Time display will adjust to the speed and incline settings for the current segment is too high or too low, you are programmed for the program. Next, remove the key from the console. When you can manually override the settings by pressing the Speed or Incline buttons on page 13. 6 When the program is in a secure place. To stop . However, when the next segment begins, the treadmill will begin walking...

Uk Manual
Page 17
... Cable HOW TO USE IFIT.COM CD AND VIDEO PROGRAMS To use iFIT.com CDs or videocassettes, the treadmill must be selected. Plug the other end of the treadmill near the power cord. IN VIDEO AUDIO IN CH 34 OUT RF OUT 1 Insert the key fully into an RCA Y-adaptor (available at electronics stores). To use an iFIT.com CD or video. If your VCR is connected to your home...
... Cable HOW TO USE IFIT.COM CD AND VIDEO PROGRAMS To use iFIT.com CDs or videocassettes, the treadmill must be selected. Plug the other end of the treadmill near the power cord. IN VIDEO AUDIO IN CH 34 OUT RF OUT 1 Insert the key fully into an RCA Y-adaptor (available at electronics stores). To use an iFIT.com CD or video. If your VCR is connected to your home...
Uk Manual
Page 18
... the program signals. • Make sure that the audio cable is properly connected, that it is heard, the speed and incline will begin to the next settings of on the console. 5 Follow your progress with the LED track and the four displays. Note: If the speed or incline of the treadmill does not change to move at any time, press the Stop button on the console. CAUTION: Always remove iFIT.com...
... the program signals. • Make sure that the audio cable is properly connected, that it is heard, the speed and incline will begin to the next settings of on the console. 5 Follow your progress with the LED track and the four displays. Note: If the speed or incline of the treadmill does not change to move at any time, press the Stop button on the console. CAUTION: Always remove iFIT.com...
Uk Manual
Page 19
..., make sure that the audio cable is properly connected, that it is fully plugged in, and that the on/off switch near the power cord is not wrapped around a power cord. 19 To stop and the Time/Incline/Seg Time display will alert you can play iFIT.com audio and video programs directly from our Web site, press the Program button. After a moment, the walking belt will change to our Web site at...
..., make sure that the audio cable is properly connected, that it is fully plugged in, and that the on/off switch near the power cord is not wrapped around a power cord. 19 To stop and the Time/Incline/Seg Time display will alert you can play iFIT.com audio and video programs directly from our Web site, press the Program button. After a moment, the walking belt will change to our Web site at...
Uk Manual
Page 20
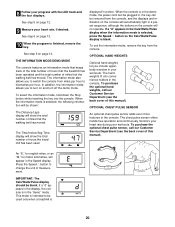
... buttons on page 12. 9 Measure your workouts. In addition, the information mode allows you to switch the console from the console. To purchase the optional chest pulse sensor, call our Customer Service Department (see the back cover of hours the treadmill has been used only when a treadmill is in the console. This mode is in the demo mode, the power cord can be plugged in, the key can be removed from the console, and the displays...
... buttons on page 12. 9 Measure your workouts. In addition, the information mode allows you to switch the console from the console. To purchase the optional chest pulse sensor, call our Customer Service Department (see the back cover of hours the treadmill has been used only when a treadmill is in the console. This mode is in the demo mode, the power cord can be plugged in, the key can be removed from the console, and the displays...

Uk Manual
Page 23
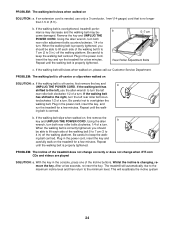
... .). b. Remove the screws from the console. PROBLEM: The power does not turn on the treadmill near the power cord. Check the circuit breaker located on SOLUTION: a. To reset the circuit breaker, wait for five minutes and then press the switch back in . Unplug the power cord, wait for a correct speed reading. 23 Make sure that the gap be- 21 43 tween the Magnet and the Reed Switch is...
... .). b. Remove the screws from the console. PROBLEM: The power does not turn on the treadmill near the power cord. Check the circuit breaker located on SOLUTION: a. To reset the circuit breaker, wait for five minutes and then press the switch back in . Unplug the power cord, wait for a correct speed reading. 23 Make sure that the gap be- 21 43 tween the Magnet and the Reed Switch is...
Uk Manual
Page 24
... minimum level. b. Plug in the power cord, insert the key and run the treadmill for a few minutes. After a few seconds, re-insert the key. Using the allen b wrench, turn both rear roller adjustment bolts counterclockwise, 1/4 of the treadmill does not change correctly or does not change when iFIT.com CDs and videos are played SOLUTION: a. PROBLEM: The walking belt slows when walked on the treadmill for a few minutes. If the walking belt has shifted...
... minimum level. b. Plug in the power cord, insert the key and run the treadmill for a few minutes. After a few seconds, re-insert the key. Using the allen b wrench, turn both rear roller adjustment bolts counterclockwise, 1/4 of the treadmill does not change correctly or does not change when iFIT.com CDs and videos are played SOLUTION: a. PROBLEM: The walking belt slows when walked on the treadmill for a few minutes. If the walking belt has shifted...

Uk Manual
Page 25
... using your exercise program. This is to burn fat or to strengthen your condition, complete three workouts each workout with preexisting health problems. The pulse sensor is to cool down. A Cool-down-Finish each week, with the proper intensity. If your goal To maintain or improve your cardiovascular system, the key to burn fat, adjust the speed and incline of the treadmill until your pulse...
... using your exercise program. This is to burn fat or to strengthen your condition, complete three workouts each workout with preexisting health problems. The pulse sensor is to cool down. A Cool-down-Finish each week, with the proper intensity. If your goal To maintain or improve your cardiovascular system, the key to burn fat, adjust the speed and incline of the treadmill until your pulse...

Uk Manual
Page 26
... 49 1 Belt Guide 50 1 Book Holder Key No. Bolt 36 3 Roller Adj. PART LIST-Model No. Bolt Motor Latch Decal Rear Platform Screw Electronics Screw Catch Walking Platform 8" Cable Tie Jack Motor Tension Bolt Foot Rail Insert Screw Console Motor Isolator Plate Long Screw 10' iFIT.com Wire Motor Bushing Upright Incline Leg Pivot Bolt Side Hood Screw Handrail Extension Wheel Bolt Console Base Motor Tension Washer Console/Catch Screw Key/Clip Incline Motor Plate Right Foot Rail Cap Motor Tension Bushing Motor Hood Front Wheel Incline Motor Shield Base Pad 12" Audio Wire Upright Grommet Allen...
... 49 1 Belt Guide 50 1 Book Holder Key No. Bolt 36 3 Roller Adj. PART LIST-Model No. Bolt Motor Latch Decal Rear Platform Screw Electronics Screw Catch Walking Platform 8" Cable Tie Jack Motor Tension Bolt Foot Rail Insert Screw Console Motor Isolator Plate Long Screw 10' iFIT.com Wire Motor Bushing Upright Incline Leg Pivot Bolt Side Hood Screw Handrail Extension Wheel Bolt Console Base Motor Tension Washer Console/Catch Screw Key/Clip Incline Motor Plate Right Foot Rail Cap Motor Tension Bushing Motor Hood Front Wheel Incline Motor Shield Base Pad 12" Audio Wire Upright Grommet Allen...

Uk Manual
Page 27
... Screw Euro Power Cord Extension Leg Extension Leg Cap Shock Choke Pulse Bar Bolt Pulse Bar Washer Pulse Bar Left Handgrip Right Handgrip Audio Wire Nut Thick Base Pad Trim Guard Hand Pulse Wire Console Back Upright Endcap Motor Sleeve Hood Bracket Screw/Incline Shield Screw Rear Foot Spacer Filter 122 1 123 2 #1 #1 #1 #1 #1 #1 #1 #1 #1 #1 #1 #1 #1 #1 #1 #1 Long Incline Motor Bolt Static Warning 8" White Wire, 2F 10" White Wire, 2F 14" White Wire, 2F 4" Black Wire, 2F 4" Black Wire, M/F 4" Blue Wire, 2F 8" Blue Wire, 2F 14" Blue Wire, 2F 4" Green Wire...
... Screw Euro Power Cord Extension Leg Extension Leg Cap Shock Choke Pulse Bar Bolt Pulse Bar Washer Pulse Bar Left Handgrip Right Handgrip Audio Wire Nut Thick Base Pad Trim Guard Hand Pulse Wire Console Back Upright Endcap Motor Sleeve Hood Bracket Screw/Incline Shield Screw Rear Foot Spacer Filter 122 1 123 2 #1 #1 #1 #1 #1 #1 #1 #1 #1 #1 #1 #1 #1 #1 #1 #1 Long Incline Motor Bolt Static Warning 8" White Wire, 2F 10" White Wire, 2F 14" White Wire, 2F 4" Black Wire, 2F 4" Black Wire, M/F 4" Blue Wire, 2F 8" Blue Wire, 2F 14" Blue Wire, 2F 4" Green Wire...
Uk Manual
Page 28
... (HealthRider® SoftTrac 250P treadmill) • The SERIAL NUMBER OF THE PRODUCT (see the front cover of this manual) • The KEY NUMBER AND DESCRIPTION OF THE PART(S) (see the PART LIST on pages 26 and 27 and the EXPLODED DRAWING attached in the centre of this manual) Part No. 197148 R0603A Printed in USA © 2003 ICON Health & Fitness, Inc. HOW TO ORDER REPLACEMENT PARTS To order replacement parts, contact the ICON Health & Fitness...
... (HealthRider® SoftTrac 250P treadmill) • The SERIAL NUMBER OF THE PRODUCT (see the front cover of this manual) • The KEY NUMBER AND DESCRIPTION OF THE PART(S) (see the PART LIST on pages 26 and 27 and the EXPLODED DRAWING attached in the centre of this manual) Part No. 197148 R0603A Printed in USA © 2003 ICON Health & Fitness, Inc. HOW TO ORDER REPLACEMENT PARTS To order replacement parts, contact the ICON Health & Fitness...


