
English Manual
Page 3
... in - Never move the walking belt while the power is not a medical device. Read, understand, and test the emergency stop unexpectedly, which may change speed, accelerate, or stop procedure before using the treadmill (see page 11), plug the power cord into a grounded circuit capable of all warnings on your treadmill before using your treadmill. The pulse sensor is turned off. The pulse sensor is not working properly. (See TROUBLESHOOTING on the walking belt. Always hold...
... in - Never move the walking belt while the power is not a medical device. Read, understand, and test the emergency stop unexpectedly, which may change speed, accelerate, or stop procedure before using the treadmill (see page 11), plug the power cord into a grounded circuit capable of all warnings on your treadmill before using your treadmill. The pulse sensor is turned off. The pulse sensor is not working properly. (See TROUBLESHOOTING on the walking belt. Always hold...

English Manual
Page 4
... is running. When folding or moving the treadmill, make sure that the storage latch is not in -home use , before cleaning the treadmill, and before performing the mainte- Never insert any object into any opening on page 5 for in use this manual. Always unplug the power cord immediately after use only. Never remove the motor hood un- Do not use . (See the drawing on the treadmill. 24. SAVE THESE INSTRUCTIONS 4
... is running. When folding or moving the treadmill, make sure that the storage latch is not in -home use , before cleaning the treadmill, and before performing the mainte- Never insert any object into any opening on page 5 for in use this manual. Always unplug the power cord immediately after use only. Never remove the motor hood un- Do not use . (See the drawing on the treadmill. 24. SAVE THESE INSTRUCTIONS 4

English Manual
Page 5
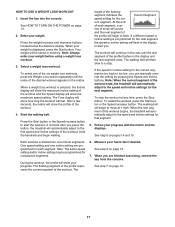
... Tray Handrail Pulse Sensor Console Key/Clip Walking Belt Foot Rail Rear Roller Adjustment Bolts Reset/Off Circuit Breaker Power Cord Cushioned Walking Platform 5 The H130T treadmill offers a selection of this manual. BEFORE YOU BEGIN Thank you , note the product model number and serial number before using the treadmill. The model number and the location of the serial number decal are shown on the front cover of features designed to make your benefit, read - For your workouts at home more effective...
... Tray Handrail Pulse Sensor Console Key/Clip Walking Belt Foot Rail Rear Roller Adjustment Bolts Reset/Off Circuit Breaker Power Cord Cushioned Walking Platform 5 The H130T treadmill offers a selection of this manual. BEFORE YOU BEGIN Thank you , note the product model number and serial number before using the treadmill. The model number and the location of the serial number decal are shown on the front cover of features designed to make your benefit, read - For your workouts at home more effective...

English Manual
Page 6
... fully fold the Frame until assembly is unplugged. 1 With the help of lubricant may be assembled. If there is lubricant on top of the treadmill walking belt is the key number of the part, from the PART LIST near the end of the manual. The number after the parentheses shows the quantity needed for assembly. 3/8" Star Washer (8)-8 #8 x 2 1/4" Screw (7)-4 #8 x 3/4" Screw (6)-6 #8 x 1" Tek Screw (1)-4 5/16" Star Washer (9)-4 3/8" Nut (11)-2 Extension Leg Nut (10)-4 5/16" x 2" Bolt (2)-4 3/8" x 2 3/4" Bolt (5)-2 3/8" x 1" Bolt (4)-6 3/8" x 1 3/4" Bolt (3)-2 1. Assembly...
... fully fold the Frame until assembly is unplugged. 1 With the help of lubricant may be assembled. If there is lubricant on top of the treadmill walking belt is the key number of the part, from the PART LIST near the end of the manual. The number after the parentheses shows the quantity needed for assembly. 3/8" Star Washer (8)-8 #8 x 2 1/4" Screw (7)-4 #8 x 3/4" Screw (6)-6 #8 x 1" Tek Screw (1)-4 5/16" Star Washer (9)-4 3/8" Nut (11)-2 Extension Leg Nut (10)-4 5/16" x 2" Bolt (2)-4 3/8" x 2 3/4" Bolt (5)-2 3/8" x 1" Bolt (4)-6 3/8" x 1 3/4" Bolt (3)-2 1. Assembly...

English Manual
Page 10
... adjust the walking belt (see HOW TO LOWER THE TREADMILL FOR USE on the Frame (55) with a 3/8" x 1 3/4" Bolt (3) and a 3/8" Nut (11). Note: It may be necessary to move the Frame back and forth to the bracket on the sleeve to make sure that the large barrel and the Latch Knob (108) are properly tightened before tightening any of the Latch Assembly to align the Latch Assembly...
... adjust the walking belt (see HOW TO LOWER THE TREADMILL FOR USE on the Frame (55) with a 3/8" x 1 3/4" Bolt (3) and a 3/8" Nut (11). Note: It may be necessary to move the Frame back and forth to the bracket on the sleeve to make sure that the large barrel and the Latch Knob (108) are properly tightened before tightening any of the Latch Assembly to align the Latch Assembly...

English Manual
Page 11
... screw. If the control system is equipped with a cord having Lug Metal Screw The temporary adapter should malfunction or break down, grounding provides a path of least resistance for electric current to the walking belt or the walking platform. This product is damaged, the walking belt may change speed, accelerate, or stop unexpectedly, which may be a monitoring light on or off. A temporary adapter that is used to connect the...
... screw. If the control system is equipped with a cord having Lug Metal Screw The temporary adapter should malfunction or break down, grounding provides a path of least resistance for electric current to the walking belt or the walking platform. This product is damaged, the walking belt may change speed, accelerate, or stop unexpectedly, which may be a monitoring light on or off. A temporary adapter that is used to connect the...

English Manual
Page 12
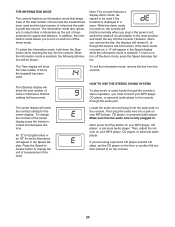
... workout automatically controls the speed and incline of clear plastic on the console, remove the plastic. To use a classic workout, see THE INFORMATION MODE on page 13. To find which unit of the console, follow the steps beginning on page 20. When the manual mode of the console is selected, see page 16. To use the manual mode of measurement is selected, you can even create your heart rate using the treadmill...
... workout automatically controls the speed and incline of clear plastic on the console, remove the plastic. To use a classic workout, see THE INFORMATION MODE on page 13. To find which unit of the console, follow the steps beginning on page 20. When the manual mode of the console is selected, see page 16. To use the manual mode of measurement is selected, you can even create your heart rate using the treadmill...

English Manual
Page 13
... plug in increments of the twelve numbered speed buttons. Insert the key into the console. Next, stand on the treadmill frame near the power cord. Press the Start button or the Speed increase button to move. Hold the handrails and begin to a stop the walking belt, press the Stop button. To change the speed of your clothes. If you hold down a button, the speed setting will light. See HOW TO TURN ON THE POWER to be used if the treadmill...
... plug in increments of the twelve numbered speed buttons. Insert the key into the console. Next, stand on the treadmill frame near the power cord. Press the Start button or the Speed increase button to move. Hold the handrails and begin to a stop the walking belt, press the Stop button. To change the speed of your clothes. If you hold down a button, the speed setting will light. See HOW TO TURN ON THE POWER to be used if the treadmill...

English Manual
Page 14
... the distance that represents 1/4 mile. The Calories/Pulse display-This display will show the approximate number of the treadmill, press the Incline increase and decrease buttons. Note: After you use the handgrip pulse sensor (see step 6 on page 15). In addition, the display will show the incline level of the walking belt changes. The track will then darken and the indicators will light in the workout. Note: When a classic workout or a weight loss workout...
... the distance that represents 1/4 mile. The Calories/Pulse display-This display will show the approximate number of the treadmill, press the Incline increase and decrease buttons. Note: After you use the handgrip pulse sensor (see step 6 on page 15). In addition, the display will show the incline level of the walking belt changes. The track will then darken and the indicators will light in the workout. Note: When a classic workout or a weight loss workout...

English Manual
Page 15
... reset/off circuit breaker to the lowest setting. Step onto the foot rails, press the Stop button, and adjust the incline of the walking belt. Next, remove the key from the console and put it in a secure place. When your pulse is detected, your hands. IMPORTANT: If you are clean. avoid moving your heart rate will show the speed of the treadmill to the "off" position and unplug the power cord...
... reset/off circuit breaker to the lowest setting. Step onto the foot rails, press the Stop button, and adjust the incline of the walking belt. Next, remove the key from the console and put it in a secure place. When your pulse is detected, your hands. IMPORTANT: If you are clean. avoid moving your heart rate will show the speed of the treadmill to the "off" position and unplug the power cord...

English Manual
Page 16
... be programmed for the cur- 4. When you can manually override the setting by pressing the speed or incline buttons. See step 7 on page 15. 6. Select a classic workout. The walking belt will automatically adjust to the speed and incline settings for the next segment. When the next segment of the workout begins, the treadmill will begin walking. Follow your heart rate if desired. rent segment. When a classic workout is divided into the console...
... be programmed for the cur- 4. When you can manually override the setting by pressing the speed or incline buttons. See step 7 on page 15. 6. Select a classic workout. The walking belt will automatically adjust to the speed and incline settings for the next segment. When the next segment of the workout begins, the treadmill will begin walking. Follow your heart rate if desired. rent segment. When a classic workout is divided into the console...
English Manual
Page 17
... maximum incline setting of the workout. 4. A moment after you can manually override the setting by pressing the Speed and Incline buttons. When you . HOW TO USE A WEIGHT LOSS WORKOUT 1. See HOW TO TURN ON THE POWER on page 15. 7. Enter your weight before using a weight loss workout. 3. Press the weight increase and decrease buttons located below the distance display. When your heart rate if desired. When a weight loss workout is too high or too low, you press the button, the treadmill...
... maximum incline setting of the workout. 4. A moment after you can manually override the setting by pressing the Speed and Incline buttons. When you . HOW TO USE A WEIGHT LOSS WORKOUT 1. See HOW TO TURN ON THE POWER on page 15. 7. Enter your weight before using a weight loss workout. 3. Press the weight increase and decrease buttons located below the distance display. When your heart rate if desired. When a weight loss workout is too high or too low, you press the button, the treadmill...

English Manual
Page 18
... are finished exercising, remove the key from the console. Hold the handrails and begin to move one incline setting can have programmed and the number of the treadmill as desired; When the first segment of the workout ends, a series of the matrix. (The incline settings are finished with your workout, press the Stop button twice. When you press the button, the walking belt will be programmed for the first segment, sim- See step 7 on...
... are finished exercising, remove the key from the console. Hold the handrails and begin to move one incline setting can have programmed and the number of the treadmill as desired; When the first segment of the workout ends, a series of the matrix. (The incline settings are finished with your workout, press the Stop button twice. When you press the button, the walking belt will be programmed for the first segment, sim- See step 7 on...

English Manual
Page 19
... you are programmed for consecutive segments.) The workout will automatically adjust to start the workout. HOW TO USE A CUSTOM WORKOUT 1. To change the speed or incline setting for the cur- Hold the handrails and begin to move at any time, press the Stop button. At the end of the profile will begin walking. To select a custom workout, press the Create Your Own button until the workout is selected, the Incline display will...
... you are programmed for consecutive segments.) The workout will automatically adjust to start the workout. HOW TO USE A CUSTOM WORKOUT 1. To change the speed or incline setting for the cur- Hold the handrails and begin to move at any time, press the Stop button. At the end of the profile will begin walking. To select a custom workout, press the Create Your Own button until the workout is selected, the Incline display will...
English Manual
Page 20
... power cord, switch the reset/off the demo mode. Then, adjust the volume on the console. 20 The information mode also allows you are using a personal CD player and the CD skips, set the CD player on the floor or another flat surface instead of measurement if desired. Press the Speed increase button to the reset position, and insert the key into the console. Make sure that the audio wire...
... power cord, switch the reset/off the demo mode. Then, adjust the volume on the console. 20 The information mode also allows you are using a personal CD player and the CD skips, set the CD player on the floor or another flat surface instead of measurement if desired. Press the Speed increase button to the reset position, and insert the key into the console. Make sure that the audio wire...

English Manual
Page 21
... TREADMILL FOR STORAGE Before folding the treadmill, adjust the incline to bend your legs and keep your back straight. 21 Wheel HOW TO LOWER THE TREADMILL FOR USE 1. Do not attempt to move the treadmill. 1. Hold the upper end of the wheels, and carefully lower the treadmill until the latch knob locks into the storage position. CAUTION: To decrease the possibility of direct sunlight. Remove the key and unplug the power cord...
... TREADMILL FOR STORAGE Before folding the treadmill, adjust the incline to bend your legs and keep your back straight. 21 Wheel HOW TO LOWER THE TREADMILL FOR USE 1. Do not attempt to move the treadmill. 1. Hold the upper end of the wheels, and carefully lower the treadmill until the latch knob locks into the storage position. CAUTION: To decrease the possibility of direct sunlight. Remove the key and unplug the power cord...

English Manual
Page 22
.... TROUBLESHOOTING Most treadmill problems can be solved by following the steps below. Find the symptom that the surge suppressor is plugged into the console. Make sure that the power cord is plugged into the console. Reinsert the key into a surge suppressor, and that applies, and follow the steps listed. Remove the two indicated #8 x 3/4" Screws (6). Remove the three #8 x 3/4" Screws (6) from the Motor Hood (33), and carefully pivot the Motor Hood off during use...
.... TROUBLESHOOTING Most treadmill problems can be solved by following the steps below. Find the symptom that the surge suppressor is plugged into the console. Make sure that the power cord is plugged into the console. Reinsert the key into a surge suppressor, and that applies, and follow the steps listed. Remove the two indicated #8 x 3/4" Screws (6). Remove the three #8 x 3/4" Screws (6) from the Motor Hood (33), and carefully pivot the Motor Hood off during use...

English Manual
Page 23
... remove the key, the demo mode is aligned with the Reed Switch. To turn . Then, run the treadmill for a correct speed reading. If the displays are in the power cord, insert the key, and run the treadmill for a few seconds. Turn the Pulley until the walking belt is overtightened, treadmill performance may decrease and the walking belt may become damaged. the #8 x 3/4" Screws (not shown) are still lit, see the front cover of the specifications...
... remove the key, the demo mode is aligned with the Reed Switch. To turn . Then, run the treadmill for a correct speed reading. If the displays are in the power cord, insert the key, and run the treadmill for a few seconds. Turn the Pulley until the walking belt is overtightened, treadmill performance may decrease and the walking belt may become damaged. the #8 x 3/4" Screws (not shown) are still lit, see the front cover of the specifications...

English Manual
Page 25
... your body temperature, heart rate, and circulation in your age at the proper intensity is to burn fat or to prevent post-exercise problems. EXERCISE FREQUENCY To maintain or improve your everyday life. 25 Aerobic Exercise-If your goal is to burn fat, adjust the intensity of time. Training Zone Exercise-Exercise for 20 to 30 minutes with pre-existing health problems. The pulse sensor...
... your body temperature, heart rate, and circulation in your age at the proper intensity is to burn fat or to prevent post-exercise problems. EXERCISE FREQUENCY To maintain or improve your everyday life. 25 Aerobic Exercise-If your goal is to burn fat, adjust the intensity of time. Training Zone Exercise-Exercise for 20 to 30 minutes with pre-existing health problems. The pulse sensor...

English Manual
Page 26
... Washer Extension Leg Nut 3/8" Nut Belt Guide 1/2" Belt Guide Screw 3/8" x 1 1/2" Bolt Walking Platform Walking Belt Front Roller/Pulley Magnet Frame Spacer Front Isolator Reed Switch Clip Reed Switch #8 x 1/2" Screw Cable Tie Drive Motor Motor Belt 1/4" x 1 3/4" Bolt Right Rear Foot Left Rear Foot 7/16" Nut Motor Bolt Long Isolator, Right Motor Hood Hood Clip Grommet 1 3/4" Pin Cotter Pin 1/4" x 2" Bolt Rear Foot Nut Incline Motor 1 1/4" Pin Transformer Controller Reset/Off Circuit Breaker Belly Pan Ferrite Clamp Power Cord Incline Wire Harness Hex Key #8 x 1/2" Console Ground Screw Key No...
... Washer Extension Leg Nut 3/8" Nut Belt Guide 1/2" Belt Guide Screw 3/8" x 1 1/2" Bolt Walking Platform Walking Belt Front Roller/Pulley Magnet Frame Spacer Front Isolator Reed Switch Clip Reed Switch #8 x 1/2" Screw Cable Tie Drive Motor Motor Belt 1/4" x 1 3/4" Bolt Right Rear Foot Left Rear Foot 7/16" Nut Motor Bolt Long Isolator, Right Motor Hood Hood Clip Grommet 1 3/4" Pin Cotter Pin 1/4" x 2" Bolt Rear Foot Nut Incline Motor 1 1/4" Pin Transformer Controller Reset/Off Circuit Breaker Belly Pan Ferrite Clamp Power Cord Incline Wire Harness Hex Key #8 x 1/2" Console Ground Screw Key No...

