

English Manual
Page 1
... OUR CUSTOMER SERVICE DEPARTMENT DIRECTLY. USER'S MANUAL Visit our website at www.proform.com Visit our website at www.healthrider.com Visit our website at Model No. CALL TOLL-FREE: 1-888-936-4266 Mon.-Fri., 8:00 until 17:00 EST (excluding holidays) OR E-MAIL US: [email protected] CAUTION Read all precautions and instructions in the space above for...
... OUR CUSTOMER SERVICE DEPARTMENT DIRECTLY. USER'S MANUAL Visit our website at www.proform.com Visit our website at www.healthrider.com Visit our website at Model No. CALL TOLL-FREE: 1-888-936-4266 Mon.-Fri., 8:00 until 17:00 EST (excluding holidays) OR E-MAIL US: [email protected] CAUTION Read all precautions and instructions in the space above for...
English Manual
Page 2
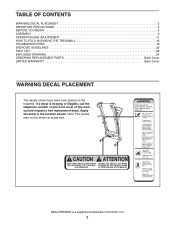
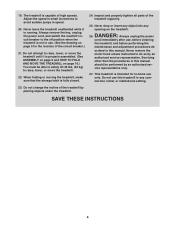
... 2 IMPORTANT PRECAUTIONS 3 BEFORE YOU BEGIN 5 ASSEMBLY 6 OPERATION AND ADJUSTMENT 11 HOW TO FOLD AND MOVE THE TREADMILL 16 TROUBLESHOOTING 18 EXERCISE GUIDELINES 20 PART LIST 22 EXPLODED DRAWING 24 ORDERING REPLACEMENT PARTS Back Cover LIMITED WARRANTY Back Cover WARNING DECAL PLACEMENT The decals shown here have been placed on the front cover of ICON IP, Inc. 2 Apply the decal in the location shown. HEALTHRIDER is missing or illegible, call...
... 2 IMPORTANT PRECAUTIONS 3 BEFORE YOU BEGIN 5 ASSEMBLY 6 OPERATION AND ADJUSTMENT 11 HOW TO FOLD AND MOVE THE TREADMILL 16 TROUBLESHOOTING 18 EXERCISE GUIDELINES 20 PART LIST 22 EXPLODED DRAWING 24 ORDERING REPLACEMENT PARTS Back Cover LIMITED WARRANTY Back Cover WARNING DECAL PLACEMENT The decals shown here have been placed on the front cover of ICON IP, Inc. 2 Apply the decal in the location shown. HEALTHRIDER is missing or illegible, call...

English Manual
Page 3
... walking belt may change speed, accelerate, or stop procedure before using the treadmill (see page 11), plug the power cord into a surge suppressor (not included) and plug the surge suppressor into a grounded circuit capable of 12 and pets away from moisture and dust. Use the treadmill only as an exercise aid in determining heart rate trends in - If the control system is the responsibility of the owner to...
... walking belt may change speed, accelerate, or stop procedure before using the treadmill (see page 11), plug the power cord into a surge suppressor (not included) and plug the surge suppressor into a grounded circuit capable of 12 and pets away from moisture and dust. Use the treadmill only as an exercise aid in determining heart rate trends in - If the control system is the responsibility of the owner to...
English Manual
Page 4
.... Never remove the motor hood unless instructed to avoid sudden jumps in use only. Do not change the incline of the treadmill regularly. 25. Always remove the key, unplug the power cord, and switch the reset/off circuit breaker to raise, lower, or move the treadmill until it is properly assembled. (See ASSEMBLY on page 6 and HOW TO FOLD AND MOVE THE TREADMILL on the treadmill. Inspect and properly tighten all parts of the treadmill by...
.... Never remove the motor hood unless instructed to avoid sudden jumps in use only. Do not change the incline of the treadmill regularly. 25. Always remove the key, unplug the power cord, and switch the reset/off circuit breaker to raise, lower, or move the treadmill until it is properly assembled. (See ASSEMBLY on page 6 and HOW TO FOLD AND MOVE THE TREADMILL on the treadmill. Inspect and properly tighten all parts of the treadmill by...

English Manual
Page 5
... folded up, requiring less than half the floor space of other treadmills. ual. For your home. Accessory Tray Handrail Storage Latch Console Key/Clip Walking Belt Foot Rail Hood Reset/Off Circuit Breaker Power Cord Wheel Rear Roller Adjustment Bolts 5 To avoid a registration fee for selecting the HEALTHRIDER® H110i treadmill. The H110i treadmill combines advanced technology with the labeled parts. If you for any service needed under warranty, you enjoy an excellent form of cardiovascular exercise...
... folded up, requiring less than half the floor space of other treadmills. ual. For your home. Accessory Tray Handrail Storage Latch Console Key/Clip Walking Belt Foot Rail Hood Reset/Off Circuit Breaker Power Cord Wheel Rear Roller Adjustment Bolts 5 To avoid a registration fee for selecting the HEALTHRIDER® H110i treadmill. The H110i treadmill combines advanced technology with the labeled parts. If you for any service needed under warranty, you enjoy an excellent form of cardiovascular exercise...
English Manual
Page 6
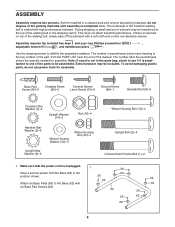
... to one of the treadmill walking belt is the key number of the part, from the PART LIST near the end of the walking be4lt" oBrotlht e(1s2h0ip)-p2ing carton. To avoid damaging plastic parts, do not use power tools for assembly. Attach six Base Pads (63) to identify the assembly hardware. The number after the parentheses shows the quantity needed for assembly. If there is lubricant on top of...
... to one of the treadmill walking belt is the key number of the part, from the PART LIST near the end of the walking be4lt" oBrotlht e(1s2h0ip)-p2ing carton. To avoid damaging plastic parts, do not use power tools for assembly. Attach six Base Pads (63) to identify the assembly hardware. The number after the parentheses shows the quantity needed for assembly. If there is lubricant on top of...

English Manual
Page 9
... the Screws. Using needlenose pliers, pull the console wire out of the hole near the Console. Attach the Left Handrail (not shown) to the Right Upright (54) 9 and the Left Upright (53) with six Handrail Bolts (8) and six Handrail Star Washers (5). See drawing 8b. Attach the Console (91) to the Console (91) in the same way. Start all six Handrail Bolts before tightening them. Connect the Wire...
... the Screws. Using needlenose pliers, pull the console wire out of the hole near the Console. Attach the Left Handrail (not shown) to the Right Upright (54) 9 and the Left Upright (53) with six Handrail Bolts (8) and six Handrail Star Washers (5). See drawing 8b. Attach the Console (91) to the Console (91) in the same way. Start all six Handrail Bolts before tightening them. Connect the Wire...

English Manual
Page 10
... treadmill to overtighten the Colored Patch Frame Bolts. Plug in a secure place. Next, change the incline of the treamill in the storage position. 12 48 Knob 10 Large Hole 53 Spring Collar Pin 13. Make sure that the large hole in the Base (52) with two Latch Screws (10); Keep the included hex keys in the power cord (see page 19). A hex key is used...
... treadmill to overtighten the Colored Patch Frame Bolts. Plug in a secure place. Next, change the incline of the treamill in the storage position. 12 48 Knob 10 Large Hole 53 Spring Collar Pin 13. Make sure that the large hole in the Base (52) with two Latch Screws (10); Keep the included hex keys in the power cord (see page 19). A hex key is used...
English Manual
Page 11
... a grounding plug that is grounded before using an adapter. 11 To decrease the possibility of your treadmill being turned on the surge suppressor to the control system of least resistance for electric current to determine if the outlet box cover is properly installed and grounded in accordance with your home's power. There must be seriously damaged by sudden voltage changes in drawing...
... a grounding plug that is grounded before using an adapter. 11 To decrease the possibility of your treadmill being turned on the surge suppressor to the control system of least resistance for electric current to determine if the outlet box cover is properly installed and grounded in accordance with your home's power. There must be seriously damaged by sudden voltage changes in drawing...

English Manual
Page 12
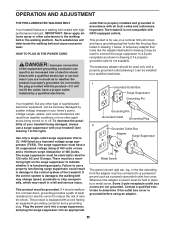
... the power cord (see page 19). Switch the circuit breaker to room temperature before turning on the console, remove the plastic. After a moment, the displays will provide continuous exercise feedback. You can be pulled from the console, adjust the position of the clip. 12 Plug in pulse sensor. Find the clip attached to a stop. IMPORTANT: In an emergency situation, the key can even measure your heart rate using the treadmill...
... the power cord (see page 19). Switch the circuit breaker to room temperature before turning on the console, remove the plastic. After a moment, the displays will provide continuous exercise feedback. You can be pulled from the console, adjust the position of the clip. 12 Plug in pulse sensor. Find the clip attached to a stop. IMPORTANT: In an emergency situation, the key can even measure your heart rate using the treadmill...
English Manual
Page 13
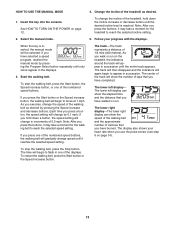
... press one of 1/4 mile (400 meters). To stop the walking belt, press the Stop button. If you press the buttons, it may take a moment for the walking belt to move at 1 mph. Note: After you press the Start button or the Speed increase button, the walking belt will begin to reach the selected speed setting. The lower left display- When the key is reached. See HOW TO TURN ON THE POWER on page 14). If you use the pulse sensor...
... press one of 1/4 mile (400 meters). To stop the walking belt, press the Stop button. If you press the buttons, it may take a moment for the walking belt to move at 1 mph. Note: After you press the Start button or the Speed increase button, the walking belt will begin to reach the selected speed setting. The lower left display- When the key is reached. See HOW TO TURN ON THE POWER on page 14). If you use the pulse sensor...
English Manual
Page 14
... the treadmill when you have walked or run, the speed of the walking belt, or the approximate number of the treadmill to the lowest setting. To reset the displays, press the Stop button, remove the key, and then reinsert the key. An "E" for English miles or an "M" for metric kilometers will be shown. Measure your thumb on the pulse sensor. The incline must be restricted and your pulse is detected, a heart-shaped...
... the treadmill when you have walked or run, the speed of the walking belt, or the approximate number of the treadmill to the lowest setting. To reset the displays, press the Stop button, remove the key, and then reinsert the key. An "E" for English miles or an "M" for metric kilometers will be shown. Measure your thumb on the pulse sensor. The incline must be restricted and your pulse is detected, a heart-shaped...
English Manual
Page 15
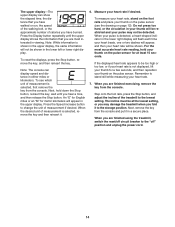
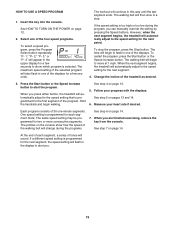
... TO TURN ON THE POWER on page 14. To stop . When the next segment begins, the treadmill will change during the program, you are finished exercising, remove the key from the console. When you . 15 Follow your heart rate if desired. At the end of the four speed programs. To select a speed program, press the Program Select button repeatedly; When you can manually override the setting by pressing the Speed buttons. The maximum speed setting of...
... TO TURN ON THE POWER on page 14. To stop . When the next segment begins, the treadmill will change during the program, you are finished exercising, remove the key from the console. When you . 15 Follow your heart rate if desired. At the end of the four speed programs. To select a speed program, press the Program Select button repeatedly; When you can manually override the setting by pressing the Speed buttons. The maximum speed setting of...
English Manual
Page 16
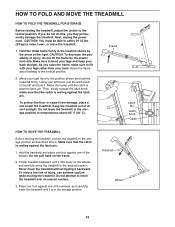
... injury, use extreme caution while moving the treadmill, convert the treadmill to the vertical position. 2. Tilt the treadmill backward until it . Never move the treadmill to the lowest position. Place one foot against the latch pin. 1. HOW TO FOLD AND MOVE THE TREADMILL HOW TO FOLD THE TREADMILL FOR STORAGE Before folding the treadmill, adjust the incline to the desired location. Using your right hand to raise, lower, or move the treadmill over an...
... injury, use extreme caution while moving the treadmill, convert the treadmill to the vertical position. 2. Tilt the treadmill backward until it . Never move the treadmill to the lowest position. Place one foot against the latch pin. 1. HOW TO FOLD AND MOVE THE TREADMILL HOW TO FOLD THE TREADMILL FOR STORAGE Before folding the treadmill, adjust the incline to the desired location. Using your right hand to raise, lower, or move the treadmill over an...

English Manual
Page 18
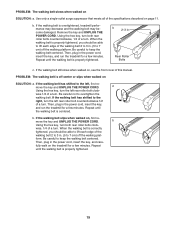
... then press the switch back in . c Tripped Reset PROBLEM: The power turns off circuit breaker located on SOLUTION: a. Remove the key from the console. Find the symptom that the power cord is plugged in . 3 89 Top View 71 62 18 TROUBLESHOOTING Most treadmill problems can be solved by following the steps below. Use only a single-outlet surge suppressor that the gap between the Magnet and the Reed Switch is inserted...
... then press the switch back in . c Tripped Reset PROBLEM: The power turns off circuit breaker located on SOLUTION: a. Remove the key from the console. Find the symptom that the power cord is plugged in . 3 89 Top View 71 62 18 TROUBLESHOOTING Most treadmill problems can be solved by following the steps below. Use only a single-outlet surge suppressor that the gap between the Magnet and the Reed Switch is inserted...
English Manual
Page 19
... edge of the walking belt 2 to 3 in the power cord, insert the key, and run the treadmill for a few minutes. move the key and UNPLUG THE POWER CORD. form. fully walk on page 11. When the walking belt is properly tightened. 19 Then, plug in . (5 to keep the walking belt centered. When the walking belt is centered. b 2-3 in the power cord, insert the key, and care- b Using the hex key, turn both rear roller bolts counterclockwise, 1/4 of a turn . Be careful...
... edge of the walking belt 2 to 3 in the power cord, insert the key, and run the treadmill for a few minutes. move the key and UNPLUG THE POWER CORD. form. fully walk on page 11. When the walking belt is properly tightened. 19 Then, plug in . (5 to keep the walking belt centered. When the walking belt is centered. b 2-3 in the power cord, insert the key, and care- b Using the hex key, turn both rear roller bolts counterclockwise, 1/4 of a turn . Be careful...

English Manual
Page 20
...-Start with 5 to 10 minutes of 35 or persons with 5 to 10 minutes of heart rate readings. Cooling down-Finish with pre-existing health problems. The pulse sensor is to burn fat or to use your training zone. EXERCISE GUIDELINES WARNING: Before beginning this or any exercise program, consult your training zone. If your goal is to burn fat, adjust the intensity of your body uses...
...-Start with 5 to 10 minutes of 35 or persons with 5 to 10 minutes of heart rate readings. Cooling down-Finish with pre-existing health problems. The pulse sensor is to burn fat or to use your training zone. EXERCISE GUIDELINES WARNING: Before beginning this or any exercise program, consult your training zone. If your goal is to burn fat, adjust the intensity of your body uses...

English Manual
Page 22
... Upright Rear Roller Motor Belt Electronics Bracket Incline Motor Bolt, Upper Motor Bracket Left Rear Roller Bracket Right Rear Roller Bracket Magnet Base Pad Latch Catch Hood Belly Pan Left Foot Rail Right Foot Rail Wheel Spacer Wheel Front Roller/Pulley Incline Motor Bolt, Lower Access Door Rear Foot, Left Long Foot Rail Screw Walking Belt Handrail Endcap Platform Cushion Drive Motor Wire Tie 8" Tie Incline Motor Nut, Upper Reed Switch Clip Ground Screw Crossbar Screw Walking Platform Controller Console Crossbar Reed Switch Power Cord Console 22 HCTL34307.0 R0707A To locate the parts...
... Upright Rear Roller Motor Belt Electronics Bracket Incline Motor Bolt, Upper Motor Bracket Left Rear Roller Bracket Right Rear Roller Bracket Magnet Base Pad Latch Catch Hood Belly Pan Left Foot Rail Right Foot Rail Wheel Spacer Wheel Front Roller/Pulley Incline Motor Bolt, Lower Access Door Rear Foot, Left Long Foot Rail Screw Walking Belt Handrail Endcap Platform Cushion Drive Motor Wire Tie 8" Tie Incline Motor Nut, Upper Reed Switch Clip Ground Screw Crossbar Screw Walking Platform Controller Console Crossbar Reed Switch Power Cord Console 22 HCTL34307.0 R0707A To locate the parts...

English Manual
Page 23
... Controller Screw 8" Black Wire, M/F 4" Black Wire, M/F 16" Blue Wire, 2F 4" Blue Wire, 2F 6" Red Wire, M/F 4" White Wire, M/F User's Manual * These parts are subject to change without notice. 23 Description 104 1 105 2 * - * - * - * - * - * - * - Key No. Qty. Specifications are not illustrated. Qty. 92 1 93 2 94 1 95 4 96 1 97 1 98 1 99 1 100 1 101 2 102 6 103 2 Description Incline Motor Nut, Lower Belt Guide 5 mm Hex Key M10 Lock Nut Releasable Tie Rear Foot, Right Filter Wire Power Cord Grommet Incline Motor Wire...
... Controller Screw 8" Black Wire, M/F 4" Black Wire, M/F 16" Blue Wire, 2F 4" Blue Wire, 2F 6" Red Wire, M/F 4" White Wire, M/F User's Manual * These parts are subject to change without notice. 23 Description 104 1 105 2 * - * - * - * - * - * - * - Key No. Qty. Specifications are not illustrated. Qty. 92 1 93 2 94 1 95 4 96 1 97 1 98 1 99 1 100 1 101 2 102 6 103 2 Description Incline Motor Nut, Lower Belt Guide 5 mm Hex Key M10 Lock Nut Releasable Tie Rear Foot, Right Filter Wire Power Cord Grommet Incline Motor Wire...

English Manual
Page 28
... fitness for ten (10) years after the date of purchase. You may also have other warranties and any and all other rights which warranty claims are warranted for three (3) years after the date of enjoyment or use and service conditions. ORDERING REPLACEMENT PARTS To order replacement parts, please see the PART LIST and the EXPLODED DRAWING near the end of this manual) LIMITED WARRANTY ICON...
... fitness for ten (10) years after the date of purchase. You may also have other warranties and any and all other rights which warranty claims are warranted for three (3) years after the date of enjoyment or use and service conditions. ORDERING REPLACEMENT PARTS To order replacement parts, please see the PART LIST and the EXPLODED DRAWING near the end of this manual) LIMITED WARRANTY ICON...


