

English Manual
Page 3
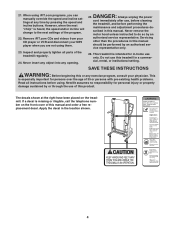
... the treadmill on /off . The treadmill is capable of the treadmill is not working properly. (See TROUBLESHOOTING on page 24.) You must be on the walking belt. When connecting the power cord (see page 10), plug the power cord into an earthed circuit. Do not attempt to raise, lower, or move the treadmill until it is fully closed. 19. The sensors are recommended for speed and/or incline changes. A 13...
... the treadmill on /off . The treadmill is capable of the treadmill is not working properly. (See TROUBLESHOOTING on page 24.) You must be on the walking belt. When connecting the power cord (see page 10), plug the power cord into an earthed circuit. Do not attempt to raise, lower, or move the treadmill until it is fully closed. 19. The sensors are recommended for speed and/or incline changes. A 13...
English Manual
Page 4
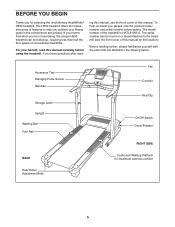
... speed and incline settings at the right have been placed on the front cover of the program. 22. NOT SHOWN AT ACTUAL SIZE 4 Never remove the motor hood unless instructed to the next settings of this treadmill in -home use this manual and order a free replacement decal. When using iFIT.com programs, you are not using . scribed in the location shown. 21. Inspect and properly tighten all instructions before performing the maintenance and adjustment procedures de- Remove iFIT...
... speed and incline settings at the right have been placed on the front cover of the program. 22. NOT SHOWN AT ACTUAL SIZE 4 Never remove the motor hood unless instructed to the next settings of this treadmill in -home use this manual and order a free replacement decal. When using iFIT.com programs, you are not using . scribed in the location shown. 21. Inspect and properly tighten all instructions before performing the maintenance and adjustment procedures de- Remove iFIT...
English Manual
Page 5
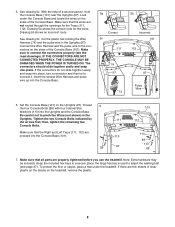
... read this manual. The model number of this manual carefully before calling. For your home. ing this manual, see the front cover of this manual for maximum exercise comfort 5 Accessory Tray Handgrip Pulse Sensor Handrail Storage Latch Upright Walking Belt Foot Rail BACK Rear Roller Adjustment Bolts Fan Console Key/Clip On/Off Switch Circuit Breaker RIGHT SIDE Cushioned Walking Platform for the location). If you achieve your fitness goals in the drawing below. The H500 treadmill offers...
... read this manual. The model number of this manual carefully before calling. For your home. ing this manual, see the front cover of this manual for maximum exercise comfort 5 Accessory Tray Handgrip Pulse Sensor Handrail Storage Latch Upright Walking Belt Foot Rail BACK Rear Roller Adjustment Bolts Fan Console Key/Clip On/Off Switch Circuit Breaker RIGHT SIDE Cushioned Walking Platform for the location). If you achieve your fitness goals in the drawing below. The H500 treadmill offers...
English Manual
Page 8
... to adjust the walking belt (see the inset drawings). Be careful not to connect it. If the connectors do not slide together easily and snap into place, turn a connector and then try to pinch the Wires (not shown) in the Uprights. To protect the floor or carpet, place a mat under the Console Base and locate the wires on the treadmill, remove the...
... to adjust the walking belt (see the inset drawings). Be careful not to connect it. If the connectors do not slide together easily and snap into place, turn a connector and then try to pinch the Wires (not shown) in the Uprights. To protect the floor or carpet, place a mat under the Console Base and locate the wires on the treadmill, remove the...

English Manual
Page 9
... chest pulse sensor does not function properly, try relocating the treadmill. • The CR2032 battery may need to be caused by shallow ridges). For the console to display heart rate readings, the user must be flush with the front of the chest strap to work with the console. The chest pulse sensor should be within arm's length of the console. • The chest pulse sensor is removed and the electrode areas are wearing the chest pulse sensor...
... chest pulse sensor does not function properly, try relocating the treadmill. • The CR2032 battery may need to be caused by shallow ridges). For the console to display heart rate readings, the user must be flush with the front of the chest strap to work with the console. The chest pulse sensor should be within arm's length of the console. • The chest pulse sensor is removed and the electrode areas are wearing the chest pulse sensor...
English Manual
Page 11
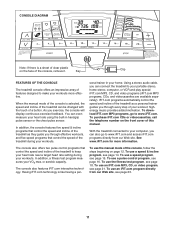
... the chest pulse sensor. IFIT.com programs automatically control the speed and incline of the treadmill as they guide you through effective workouts, and five speed programs that control the speed of the treadmill during your heart rate using the built-in your VO2 max, or aerobic capacity. To download iFIT.com MP3 programs, go to www.iFIT.com and access iFIT.com programs directly from our Web site, see page 14. In addition, a fitness test program measures your home. To use a speed program...
... the chest pulse sensor. IFIT.com programs automatically control the speed and incline of the treadmill as they guide you through effective workouts, and five speed programs that control the speed of the treadmill during your heart rate using the built-in your VO2 max, or aerobic capacity. To download iFIT.com MP3 programs, go to www.iFIT.com and access iFIT.com programs directly from our Web site, see page 14. In addition, a fitness test program measures your home. To use a speed program...
English Manual
Page 12
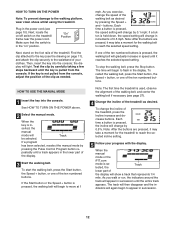
... change by pressing the Pulse Control Program button re- If the Start button or the Speed + button is held down, the speed setting will change in the display. Each time a button is pulled from the console, adjust the position of the treadmill, press the Incline increase and decrease buttons. If one of the display. 3 Start the walking belt. To restart the walking belt, press the Start button, the Speed + button, or one of the ten numbered buttons. dicators will light. Next, locate the on/off switch...
... change by pressing the Pulse Control Program button re- If the Start button or the Speed + button is held down, the speed setting will change in the display. Each time a button is pulled from the console, adjust the position of the treadmill, press the Incline increase and decrease buttons. If one of the display. 3 Start the walking belt. To restart the walking belt, press the Start button, the Speed + button, or one of the ten numbered buttons. dicators will light. Next, locate the on/off switch...

English Manual
Page 13
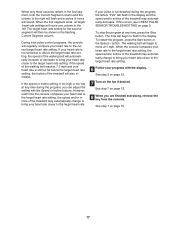
... When your heart rate will be shown. Note: The console can display speed and distance in this section refer to change the unit of measurement, see THE INFORMATION MODE/DEMO MODE on page 24. To use the handgrip pulse sensor, see page 9. To turn on the fan, press the Fan button. The display will also show the speed of the walking belt, the approximate number of calories you are finished exercising, remove the key from...
... When your heart rate will be shown. Note: The console can display speed and distance in this section refer to change the unit of measurement, see THE INFORMATION MODE/DEMO MODE on page 24. To use the handgrip pulse sensor, see page 9. To turn on the fan, press the Fan button. The display will also show the speed of the walking belt, the approximate number of calories you are finished exercising, remove the key from...

English Manual
Page 15
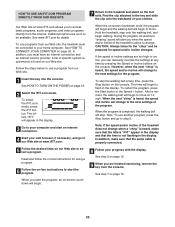
... demo mode. See page 24 and turn off switch to start the program. When you are finished using the treadmill, switch the on page 13. 7 When you are finished exercising, remove the key from the console and put it in the display for a few seconds. The display will also show the first seven speed settings of the program. 3 Press the Start button or the Speed + button to the "off" position and unplug the power cord...
... demo mode. See page 24 and turn off switch to start the program. When you are finished using the treadmill, switch the on page 13. 7 When you are finished exercising, remove the key from the console and put it in the display for a few seconds. The display will also show the first seven speed settings of the program. 3 Press the Start button or the Speed + button to the "off" position and unplug the power cord...

English Manual
Page 16
... the chest pulse sensor. You must wear the chest pulse sensor to use a pulse control program. 2 Insert the key into 40 oneminute segments. HOW TO USE A PULSE CONTROL PROGRAM Pulse control program 2 will automatically adjust to the first speed and incline settings of the program. Note: If the maximum target heart rate setting is programmed for the entire program. The same target heart rate setting is programmed for all segments. (Note: For a shorter workout, simply stop the program before it ends.) Pulse control program 3 is divided into the console.
... the chest pulse sensor. You must wear the chest pulse sensor to use a pulse control program. 2 Insert the key into 40 oneminute segments. HOW TO USE A PULSE CONTROL PROGRAM Pulse control program 2 will automatically adjust to the first speed and incline settings of the program. Note: If the maximum target heart rate setting is programmed for the entire program. The same target heart rate setting is programmed for all segments. (Note: For a shorter workout, simply stop the program before it ends.) Pulse control program 3 is divided into the console.
English Manual
Page 17
... exercising, remove the key from the console. If this occurs, see CHEST PULSE SENSOR TROUBLESHOOTING on the fan if desired. To restart the program, press the Start button or the Speed + button. See step 5 on page 12. 7 Turn on page 9. When the console compares your heart rate to the target heart rate setting, the speed and/or incline of the treadmill may automatically change to bring your heart rate is too far below the target heart rate setting, the incline of the treadmill...
... exercising, remove the key from the console. If this occurs, see CHEST PULSE SENSOR TROUBLESHOOTING on the fan if desired. To restart the program, press the Start button or the Speed + button. See step 5 on page 12. 7 Turn on page 9. When the console compares your heart rate to the target heart rate setting, the speed and/or incline of the treadmill may automatically change to bring your heart rate is too far below the target heart rate setting, the incline of the treadmill...

English Manual
Page 18
... display. The program is not detected for several seconds during the program, the program may stop and your VO2 max will slow to use the fitness test program. 2 Insert the key into the console. You must wear the chest pulse sensor to use the program. 1 Put on the treadmill. See step 7 on another day. To select the fitness test program, press the Fitness Test Program button. 4 Enter your approximate VO2 max, or aerobic capacity. Note: Pressing the Start button...
... display. The program is not detected for several seconds during the program, the program may stop and your VO2 max will slow to use the fitness test program. 2 Insert the key into the console. You must wear the chest pulse sensor to use the program. 1 Put on the treadmill. See step 7 on another day. To select the fitness test program, press the Fitness Test Program button. 4 Enter your approximate VO2 max, or aerobic capacity. Note: Pressing the Start button...

English Manual
Page 21
... video program, the treadmill must be prepared for speed and/or incline changes. Follow the steps below . A moment after the Play button is about to your MP3 player, CD player, or VCR. Note: If the time is connected to change . 21 IN VIDEO AUDIO IN CH 34 OUT RF OUT B Audio Cable RCA Y-adapter Wire removed from AUDIO OUT jack B 2 Select the iFIT.com mode. To select the iFIT.com mode, press the iFIT button...
... video program, the treadmill must be prepared for speed and/or incline changes. Follow the steps below . A moment after the Play button is about to your MP3 player, CD player, or VCR. Note: If the time is connected to change . 21 IN VIDEO AUDIO IN CH 34 OUT RF OUT B Audio Cable RCA Y-adapter Wire removed from AUDIO OUT jack B 2 Select the iFIT.com mode. To select the iFIT.com mode, press the iFIT button...

English Manual
Page 22
... walking belt will begin to the next settings of the treadmill does not change when a "chirp" is heard: • Make sure that the letters "iFIT" appear in the display and that the audio cable is heard, the speed and/or incline will stop the walking belt at any time by pressing the Speed or Incline buttons on the fan if desired. When the program is heard, the speed and/or incline...
... walking belt will begin to the next settings of the treadmill does not change when a "chirp" is heard: • Make sure that the letters "iFIT" appear in the display and that the audio cable is heard, the speed and/or incline will stop the walking belt at any time by pressing the Speed or Incline buttons on the fan if desired. When the program is heard, the speed and/or incline...
English Manual
Page 23
... programs, audio programs, and video programs directly from our Web site. 1 Insert the key into the console. In addition, make sure that the letters "iFIT" appear in the display. See HOW TO CONNECT YOUR COMPUTER on page 12. 2 Select the iFIT.com mode. See HOW TO TURN ON THE POWER on page 20. To select the iFIT.com mode, press the iFIT button. If the speed or incline settings are soon to use another program, press...
... programs, audio programs, and video programs directly from our Web site. 1 Insert the key into the console. In addition, make sure that the letters "iFIT" appear in the display. See HOW TO CONNECT YOUR COMPUTER on page 12. 2 Select the iFIT.com mode. See HOW TO TURN ON THE POWER on page 20. To select the iFIT.com mode, press the iFIT button. If the speed or incline settings are soon to use another program, press...

English Manual
Page 27
... decrease and the walking belt may become damaged. b 5-7 cm Rear Roller Bolts c. Plug in the power cord, insert the key, and walk on the treadmill for a few min- b. When the walking belt is correctly tightened, you should be able to lift each edge of a turn . Top View PROBLEM: The walking belt slows when walked on , remove the key and UNPLUG THE POWER CORD. b. When the walking belt is off . 93 97 Locate the Reed Switch (22) and the...
... decrease and the walking belt may become damaged. b 5-7 cm Rear Roller Bolts c. Plug in the power cord, insert the key, and walk on the treadmill for a few min- b. When the walking belt is correctly tightened, you should be able to lift each edge of a turn . Top View PROBLEM: The walking belt slows when walked on , remove the key and UNPLUG THE POWER CORD. b. When the walking belt is off . 93 97 Locate the Reed Switch (22) and the...

English Manual
Page 29
... system, your exercise must exercise at least one day of the treadmill until your training zone for exercise. The sensors are not medical devices. For maximum fat burning, adjust the speed and incline of rest between workouts. This is in your condition, complete three workouts each workout with preexisting health problems. The pulse sensors are intended only as a guide. This increases the demand on the heart to pump...
... system, your exercise must exercise at least one day of the treadmill until your training zone for exercise. The sensors are not medical devices. For maximum fat burning, adjust the speed and incline of rest between workouts. This is in your condition, complete three workouts each workout with preexisting health problems. The pulse sensors are intended only as a guide. This increases the demand on the heart to pump...

English Manual
Page 30
Bolt 63 1 Rear Roller 64 1 Hex Key 65 1 Chest Pulse Sensor 66 1 Left Rear Foot 67 1 Right Foot Rail 68 1 Walking Belt 69 1 Latch Warning Decal 70 1 Chest Pulse Sensor Strap 71 2 Idler Washer 72 1 Idler Pulley 73 2 Small Star Washer 74 1 Wire Harness 75 1 Idler Pulley Bolt 76 1 Right Handrail 77 1 Ground Wire 78 2 Small Nut 79 2 Idler Pivot Bolt/Lift Motor Bolt, Bottom 80 4 Extension Leg Bolt 81 1 Left Top Handgrip 82 1 Latch Assembly 83 1 Controller Wire 84...
Bolt 63 1 Rear Roller 64 1 Hex Key 65 1 Chest Pulse Sensor 66 1 Left Rear Foot 67 1 Right Foot Rail 68 1 Walking Belt 69 1 Latch Warning Decal 70 1 Chest Pulse Sensor Strap 71 2 Idler Washer 72 1 Idler Pulley 73 2 Small Star Washer 74 1 Wire Harness 75 1 Idler Pulley Bolt 76 1 Right Handrail 77 1 Ground Wire 78 2 Small Nut 79 2 Idler Pivot Bolt/Lift Motor Bolt, Bottom 80 4 Extension Leg Bolt 81 1 Left Top Handgrip 82 1 Latch Assembly 83 1 Controller Wire 84...
English Manual
Page 31
... 106 1 Fan 107 1 Console 108 21 Screw 109 2 Motor Bracket Bolt 110 1 Pulse Bar 111 1 Right Accessory Tray 112 1 Left Accessory Tray 113 4 Internal Star Washer 114 1 Latch Insert 115 2 Extension Leg Key No. Key No. Description 116 2 Base Endcap 117 2 Upright Endcap, Large # 1 8" Black Wire, R/R # 1 6" Black Wire, R/R # 2 4" Black Wire, F/F # 1 6" G/Y, F/R # 1 4" G/Y, F/R # 1 4" Green Wire, M/Ring # 2 10" White Wire, F/F # 1 10" Blue Wire, F/F # 1 4" Red Wire, F/M # 1 User's Manual #These parts are subject to change without notice. 31
... 106 1 Fan 107 1 Console 108 21 Screw 109 2 Motor Bracket Bolt 110 1 Pulse Bar 111 1 Right Accessory Tray 112 1 Left Accessory Tray 113 4 Internal Star Washer 114 1 Latch Insert 115 2 Extension Leg Key No. Key No. Description 116 2 Base Endcap 117 2 Upright Endcap, Large # 1 8" Black Wire, R/R # 1 6" Black Wire, R/R # 2 4" Black Wire, F/F # 1 6" G/Y, F/R # 1 4" G/Y, F/R # 1 4" Green Wire, M/Ring # 2 10" White Wire, F/F # 1 10" Blue Wire, F/F # 1 4" Red Wire, F/M # 1 User's Manual #These parts are subject to change without notice. 31
English Manual
Page 34
.... All repairs for commercial or rental purposes; products used as store display models. This warranty gives you . You may also have other consequential damages of this manual) • the KEY NUMBER AND DESCRIPTION OF THE PART(S) (see the front cover of this manual and the PART LIST on how long an implied warranty lasts. Shanghi Newlife Fitness Equipment, Inc. HOW TO ORDER REPLACEMENT PARTS To order replacement parts, contact...
.... All repairs for commercial or rental purposes; products used as store display models. This warranty gives you . You may also have other consequential damages of this manual) • the KEY NUMBER AND DESCRIPTION OF THE PART(S) (see the front cover of this manual and the PART LIST on how long an implied warranty lasts. Shanghi Newlife Fitness Equipment, Inc. HOW TO ORDER REPLACEMENT PARTS To order replacement parts, contact...


