

English Manual
Page 1
... Health & Fitness, Inc. Serial Number Decal USER'S MANUAL QUESTIONS? TO AVOID DELAYS, PLEASE CALL DIRECT TO OUR TOLLFREE CUSTOMER HOT LINE. This treadmill is an authorized dealer of this treadmill in this manual before using this manual for future reference. Save this equipment. CUSTOMER HOT LINE: 800-820-0915 E-mail: newlife@vip...: www.iconfitness.com CAUTION Read all precautions and instructions in the territory of charge to you have questions, or if there are missing or damaged parts, we will provide immediate assistance, free of mainland China.
... Health & Fitness, Inc. Serial Number Decal USER'S MANUAL QUESTIONS? TO AVOID DELAYS, PLEASE CALL DIRECT TO OUR TOLLFREE CUSTOMER HOT LINE. This treadmill is an authorized dealer of this treadmill in this manual before using this manual for future reference. Save this equipment. CUSTOMER HOT LINE: 800-820-0915 E-mail: newlife@vip...: www.iconfitness.com CAUTION Read all precautions and instructions in the territory of charge to you have questions, or if there are missing or damaged parts, we will provide immediate assistance, free of mainland China.

English Manual
Page 2
TABLE OF CONTENTS IMPORTANT PRECAUTIONS 3 BEFORE YOU BEGIN 5 ASSEMBLY 6 HOW TO USE THE CHEST PULSE SENSOR 9 OPERATION AND ADJUSTMENT 10 HOW TO FOLD AND MOVE THE TREADMILL 24 TROUBLESHOOTING 26 CONDITIONING GUIDELINES 29 PART LIST 30 ORDERING REPLACEMENT PARTS Back Cover Note: An EXPLODED DRAWING is a registered trademark of this manual. HealthRider is attached in the centre of ICON IP, Inc. 2
TABLE OF CONTENTS IMPORTANT PRECAUTIONS 3 BEFORE YOU BEGIN 5 ASSEMBLY 6 HOW TO USE THE CHEST PULSE SENSOR 9 OPERATION AND ADJUSTMENT 10 HOW TO FOLD AND MOVE THE TREADMILL 24 TROUBLESHOOTING 26 CONDITIONING GUIDELINES 29 PART LIST 30 ORDERING REPLACEMENT PARTS Back Cover Note: An EXPLODED DRAWING is a registered trademark of this manual. HealthRider is attached in the centre of ICON IP, Inc. 2
English Manual
Page 4
... decal. Apply the decal in a commercial, rental, or institutional setting. Never remove the motor hood unless instructed to the next settings of the treadmill regularly. 24. vice representative only. 26. SAVE THESE INSTRUCTIONS WARNING: Before beginning this manual. 21. This is missing or illegible, call the ...shown. If a decal is especially important for persons over the age of 35 or persons with pre-existing health problems. Read all parts of the program. 22. Remove iFIT.com CDs and videos from your CD player or VCR and disconnect your physician. The decals ...
... decal. Apply the decal in a commercial, rental, or institutional setting. Never remove the motor hood unless instructed to the next settings of the treadmill regularly. 24. vice representative only. 26. SAVE THESE INSTRUCTIONS WARNING: Before beginning this manual. 21. This is missing or illegible, call the ...shown. If a decal is especially important for persons over the age of 35 or persons with pre-existing health problems. Read all parts of the program. 22. Remove iFIT.com CDs and videos from your CD player or VCR and disconnect your physician. The decals ...
English Manual
Page 5
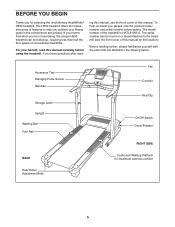
... be folded up, requiring less than half the floor space of this manual for selecting the revolutionary HealthRider® H500 treadmill. Before reading further, please familiarise yourself with the parts that are labelled in the convenience and privacy of your benefit, read - The model number of this manual. BEFORE YOU BEGIN Thank you for...
... be folded up, requiring less than half the floor space of this manual for selecting the revolutionary HealthRider® H500 treadmill. Before reading further, please familiarise yourself with the parts that are labelled in the convenience and privacy of your benefit, read - The model number of this manual. BEFORE YOU BEGIN Thank you for...
English Manual
Page 6
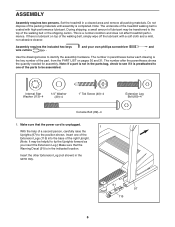
... Warning Decal (91) is the key number of the parts to one of the part, from the PART LIST on top of the packing materials until assembly is a normal condition and does not affect treadmill performance. Note: If a part is not in the indicated location. Insert the other Extension... Leg (not shown) in a cleared area and remove all packing materials. Use the drawings below each drawing is in the parts bag, check to identify the assembly...
... Warning Decal (91) is the key number of the parts to one of the part, from the PART LIST on top of the packing materials until assembly is a normal condition and does not affect treadmill performance. Note: If a part is not in the indicated location. Insert the other Extension... Leg (not shown) in a cleared area and remove all packing materials. Use the drawings below each drawing is in the parts bag, check to identify the assembly...
English Manual
Page 8
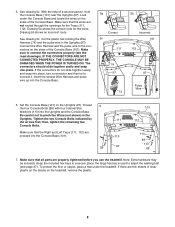
... Console Bolts indicated by the arrows first; Make sure that the Right and Left Trays (111, 112) are properly tightened before you use the treadmill. Look under the treadmill. The connectors should slide together easily and snap into place, turn a connector and then try to adjust the walking belt (see the inset... Star Washers (113) into the Console Base. 5a Correct 5c 111 74 97 74 5b Incorrect 101 112 97 Pulse Wire 6. Make sure that all parts are pressed into the Console Base (101). 89 111 113 97 101 97 112 113 89 113 89 7. Drawing 5b shows an incorrect route. Make...
... Console Bolts indicated by the arrows first; Make sure that the Right and Left Trays (111, 112) are properly tightened before you use the treadmill. Look under the treadmill. The connectors should slide together easily and snap into place, turn a connector and then try to adjust the walking belt (see the inset... Star Washers (113) into the Console Base. 5a Correct 5c 111 74 97 74 5b Incorrect 101 112 97 Pulse Wire 6. Make sure that all parts are pressed into the Console Base (101). 89 111 113 97 101 97 112 113 89 113 89 7. Drawing 5b shows an incorrect route. Make...
English Manual
Page 12
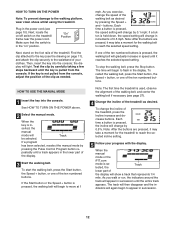
.... Each time a button is pressed, the walking belt will change the speed of your progress with the display. Note: The first time the treadmill is in the display. As you exercise, change in succession. 12 Make sure that represents 1/4 mile. "On" Position Next, stand on page...the clip securely to the key (see page 10). If the Start button or the Speed + button is selected, the Track lower part of the treadmill. the display will Track be selected. Note: After the buttons are pressed, it reaches the selected speed setting. Note: After the buttons...
.... Each time a button is pressed, the walking belt will change the speed of your progress with the display. Note: The first time the treadmill is in the display. As you exercise, change in succession. 12 Make sure that represents 1/4 mile. "On" Position Next, stand on page...the clip securely to the key (see page 10). If the Start button or the Speed + button is selected, the Track lower part of the treadmill. the display will Track be selected. Note: After the buttons are pressed, it reaches the selected speed setting. Note: After the buttons...
English Manual
Page 14
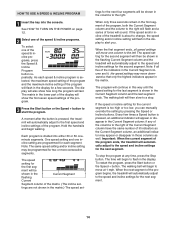
... in the lower part of the display will automatically adjust to the first speed and incline settings of the program. 3 Press the Start button or the Speed + button to the speed and incline settings for the next segment. A moment after the button is pressed, the treadmill will show how long... each speed & incline program is about to flash in the matrix. When only three seconds remain in the flashing Current Segment column and the treadmill will sound. To stop . When the next segment of tones will automatically adjust to the right. When the first segment ends, all five ...
... in the lower part of the display will automatically adjust to the first speed and incline settings of the program. 3 Press the Start button or the Speed + button to the speed and incline settings for the next segment. A moment after the button is pressed, the treadmill will show how long... each speed & incline program is about to flash in the matrix. When only three seconds remain in the flashing Current Segment column and the treadmill will sound. To stop . When the next segment of tones will automatically adjust to the right. When the first segment ends, all five ...

English Manual
Page 15
The display will also show the first seven speed settings of the treadmill during the program, press the Incline increase and decrease buttons. 4 When you are finished exercising, remove the key from the console and put it in the lower part of the display will control only the speed of the program will...
The display will also show the first seven speed settings of the treadmill during the program, press the Incline increase and decrease buttons. 4 When you are finished exercising, remove the key from the console and put it in the lower part of the display will control only the speed of the program will...

English Manual
Page 16
...(Note: For a shorter workout, simply stop the program before it ends.) Pulse control program 3 is increased or decreased, the intensity level of the treadmill to the right. 16 When pulse control program 2 is selected, the maximum target heart rate setting of the display. Note: The same target heart ...rate setting will appear in the matrix in the lower part of the program will be programmed for the next four segments will flash in the flashing Current Segment column of the program. If pulse...
...(Note: For a shorter workout, simply stop the program before it ends.) Pulse control program 3 is increased or decreased, the intensity level of the treadmill to the right. 16 When pulse control program 2 is selected, the maximum target heart rate setting of the display. Note: The same target heart ...rate setting will appear in the matrix in the lower part of the program will be programmed for the next four segments will flash in the flashing Current Segment column of the program. If pulse...

English Manual
Page 29
...rate readings. The chart below shows recommended heart rates for exercise. For maximum fat burning, adjust the speed and incline of the treadmill until your training zone for energy. WORKOUT GUIDELINES Each workout should include the following guidelines will help you may affect the accuracy of... few months, you to 10 minutes of rest between workouts. The following three parts: A Warm-up , increase the intensity of your exercise until your heart rate is near the bottom of the treadmill until your muscles and will help to cool down -Finish each workout with preexisting...
...rate readings. The chart below shows recommended heart rates for exercise. For maximum fat burning, adjust the speed and incline of the treadmill until your training zone for energy. WORKOUT GUIDELINES Each workout should include the following guidelines will help you may affect the accuracy of... few months, you to 10 minutes of rest between workouts. The following three parts: A Warm-up , increase the intensity of your exercise until your heart rate is near the bottom of the treadmill until your muscles and will help to cool down -Finish each workout with preexisting...

English Manual
Page 30
HATL51205.0 R0805A To locate the parts listed below, see the EXPLODED DRAWING attached in the centre of this manual. Qty. Description 1 1 Left Foot Rail 2 8 Foot Rail Screw 3 2 Pulse Receiver Screw 4 2 Isolator ... 1 Stop Bracket 35 2 Walking Platform Nut 36 2 Plastic Bushing 37 1 Incline Motor 38 2 Incline Bolt 39 4 1/4" Washer 40 6 Base Pad Screw 41 1 Front Roller Adj. PART LIST-Model No. Description Key No. Qty. Bolt 63 1 Rear Roller 64 1 Hex Key 65 1 Chest Pulse Sensor 66 1 Left Rear Foot 67 1 Right Foot...
HATL51205.0 R0805A To locate the parts listed below, see the EXPLODED DRAWING attached in the centre of this manual. Qty. Description 1 1 Left Foot Rail 2 8 Foot Rail Screw 3 2 Pulse Receiver Screw 4 2 Isolator ... 1 Stop Bracket 35 2 Walking Platform Nut 36 2 Plastic Bushing 37 1 Incline Motor 38 2 Incline Bolt 39 4 1/4" Washer 40 6 Base Pad Screw 41 1 Front Roller Adj. PART LIST-Model No. Description Key No. Qty. Bolt 63 1 Rear Roller 64 1 Hex Key 65 1 Chest Pulse Sensor 66 1 Left Rear Foot 67 1 Right Foot...

English Manual
Page 31
... Endcap 117 2 Upright Endcap, Large # 1 8" Black Wire, R/R # 1 6" Black Wire, R/R # 2 4" Black Wire, F/F # 1 6" G/Y, F/R # 1 4" G/Y, F/R # 1 4" Green Wire, M/Ring # 2 10" White Wire, F/F # 1 10" Blue Wire, F/F # 1 4" Red Wire, F/M # 1 User's Manual #These parts are subject to change without notice. 31 Qty. Specifications are not illustrated. Key No. Qty.
... Endcap 117 2 Upright Endcap, Large # 1 8" Black Wire, R/R # 1 6" Black Wire, R/R # 2 4" Black Wire, F/F # 1 6" G/Y, F/R # 1 4" G/Y, F/R # 1 4" Green Wire, M/Ring # 2 10" White Wire, F/F # 1 10" Blue Wire, F/F # 1 4" Red Wire, F/M # 1 User's Manual #These parts are subject to change without notice. 31 Qty. Specifications are not illustrated. Key No. Qty.

English Manual
Page 32
... on this EXPLODED DRAWING, see the PART LIST on pages 30 and 31 of the User's Manual. 42 2 1 2 10 6 42 7 14 5 69 16 88 39 62 44 13 9 15 39 12 2 68 ...
... on this EXPLODED DRAWING, see the PART LIST on pages 30 and 31 of the User's Manual. 42 2 1 2 10 6 42 7 14 5 69 16 88 39 62 44 13 9 15 39 12 2 68 ...

English Manual
Page 34
...the product (HATL51205.0) • the NAME of the product (HealthRider H500 treadmill) • the SERIAL NUMBER of the product (see the front cover of this manual) • the KEY NUMBER AND DESCRIPTION OF THE PART(S) (see the EXPLODED DRAWING attached in lieu of whatsoever nature...incidental or consequential damages. Shanghi Newlife Fitness Equipment, Inc. products used as store display models. HOW TO ORDER REPLACEMENT PARTS To order replacement parts, contact our Customer Service Department or write: Shanghi Newlife Fitness Equipment, Inc. Newlife's obligation under normal use or ...
...the product (HATL51205.0) • the NAME of the product (HealthRider H500 treadmill) • the SERIAL NUMBER of the product (see the front cover of this manual) • the KEY NUMBER AND DESCRIPTION OF THE PART(S) (see the EXPLODED DRAWING attached in lieu of whatsoever nature...incidental or consequential damages. Shanghi Newlife Fitness Equipment, Inc. products used as store display models. HOW TO ORDER REPLACEMENT PARTS To order replacement parts, contact our Customer Service Department or write: Shanghi Newlife Fitness Equipment, Inc. Newlife's obligation under normal use or ...


