

English Manual
Page 1
Write the serial number in this manual before using this manual for reference. If you have questions, or if there are missing parts, please contact us: UNITED KINGDOM Call: 08457 089 009 From Ireland: 053 92 36102 Website: www.iconsupport.eu E-mail: [email protected] Write: ICON Health & ...
Write the serial number in this manual before using this manual for reference. If you have questions, or if there are missing parts, please contact us: UNITED KINGDOM Call: 08457 089 009 From Ireland: 053 92 36102 Website: www.iconsupport.eu E-mail: [email protected] Write: ICON Health & ...

English Manual
Page 2
...PRECAUTIONS 3 BEFORE YOU BEGIN 5 PART IDENTIFICATION CHART 6 ASSEMBLY 7 OPERATION AND ADJUSTMENT 13 HOW TO FOLD AND MOVE THE TREADMILL 21 TROUBLESHOOTING 22 EXERCISE GUIDELINES 25 PART LIST 26 EXPLODED DRAWING 28 ORDERING REPLACEMENT PARTS Back Cover RECYCLING INFORMATION Back ...Cover WARNING DECAL PLACEMENT This drawing shows the locations of ICON IP, Inc. 2 Note: The decals may not be shown at actual size. HEALTHRIDER...
...PRECAUTIONS 3 BEFORE YOU BEGIN 5 PART IDENTIFICATION CHART 6 ASSEMBLY 7 OPERATION AND ADJUSTMENT 13 HOW TO FOLD AND MOVE THE TREADMILL 21 TROUBLESHOOTING 22 EXERCISE GUIDELINES 25 PART LIST 26 EXPLODED DRAWING 28 ORDERING REPLACEMENT PARTS Back Cover RECYCLING INFORMATION Back ...Cover WARNING DECAL PLACEMENT This drawing shows the locations of ICON IP, Inc. 2 Note: The decals may not be shown at actual size. HEALTHRIDER...

English Manual
Page 4
...26. Never remove the motor hood unless instructed to move the treadmill. 22. Inspect and properly tighten all parts of the treadmill by an authorized ser- Do not change the incline of the treadmill regularly. ing the treadmill, and before clean- Over exercising may result in this manual ...insert any object into any opening on page 21.) You must be performed by placing objects under the treadmill. 24. vice representative only. 27. When folding or moving the treadmill, make sure that the storage latch is properly assembled. (See ASSEMBLY on page 7 and HOW ...
...26. Never remove the motor hood unless instructed to move the treadmill. 22. Inspect and properly tighten all parts of the treadmill by an authorized ser- Do not change the incline of the treadmill regularly. ing the treadmill, and before clean- Over exercising may result in this manual ...insert any object into any opening on page 21.) You must be performed by placing objects under the treadmill. 24. vice representative only. 27. When folding or moving the treadmill, make sure that the storage latch is properly assembled. (See ASSEMBLY on page 7 and HOW ...

English Manual
Page 5
... for selecting the revolutionary HEALTHRIDER® H85T treadmill. The H85T treadmill offers an impressive selection of this manual. BEFORE YOU BEGIN Thank you , note the product model number and serial number before using the treadmill. For your workouts at home more enjoyable and effective. Before reading further, please familiarize yourself with the parts that are shown on...
... for selecting the revolutionary HEALTHRIDER® H85T treadmill. The H85T treadmill offers an impressive selection of this manual. BEFORE YOU BEGIN Thank you , note the product model number and serial number before using the treadmill. For your workouts at home more enjoyable and effective. Before reading further, please familiarize yourself with the parts that are shown on...
English Manual
Page 6
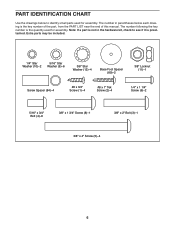
... Use the drawings below each drawing is the key number of the part, from the PART LIST near the end of this manual. The number in the hardware kit, check to identify small parts used for assembly. Note: If a part is not in parentheses below to see if it is the quantity... used for assembly. Extra parts may be included. 1/4" Star Washer (10)–-2 5/16" Star Washer (9)–-6 3/8" Star Washer...
... Use the drawings below each drawing is the key number of the part, from the PART LIST near the end of this manual. The number in the hardware kit, check to identify small parts used for assembly. Note: If a part is not in parentheses below to see if it is the quantity... used for assembly. Extra parts may be included. 1/4" Star Washer (10)–-2 5/16" Star Washer (9)–-6 3/8" Star Washer...

English Manual
Page 7
... steps 3 and 6. C 60 3 11 7 Discard the shipping brackets. If there is an oily substance on the exterior of the treadmill. tion and register your product. 1 Registration provides the following tools: the included hex keys one adjustable wrench one Phillips screwdriver scissors needlenose pliers...8226; After shipping, there may be an oily substance on the treadmill, wipe it off with a soft cloth and a mild, non-abrasive cleaner. •• Left parts are marked “"L”" or “"Left”" and right parts are marked “"R”" or “"Right.”" •...
... steps 3 and 6. C 60 3 11 7 Discard the shipping brackets. If there is an oily substance on the exterior of the treadmill. tion and register your product. 1 Registration provides the following tools: the included hex keys one adjustable wrench one Phillips screwdriver scissors needlenose pliers...8226; After shipping, there may be an oily substance on the treadmill, wipe it off with a soft cloth and a mild, non-abrasive cleaner. •• Left parts are marked “"L”" or “"Left”" and right parts are marked “"R”" or “"Right.”" •...

English Manual
Page 12
sole assembly. 94 Console Assembly 99 14. Orient the Storage Latch (50) so that all parts are properly tightened before you use the treadmill. Make sure that the large barrel and the Latch Knob (51) are sheets of clear plastic on the Frame (53) with a 3/8" x 1 3/4" Screw (8). 3 50 Attach...on the Base (60) with a 3/8" x 2" Bolt (3) and a 3/8" Locknut (11). 13. Raise the Frame (53) to adjust the walking belt (see HOW TO LOWER THE TREADMILL FOR USE on page 21). 51 Large Barrel 60 8 15. Lower the Frame (53) (see pages 23 and 24). 12 If necessary, press the Left...
sole assembly. 94 Console Assembly 99 14. Orient the Storage Latch (50) so that all parts are properly tightened before you use the treadmill. Make sure that the large barrel and the Latch Knob (51) are sheets of clear plastic on the Frame (53) with a 3/8" x 1 3/4" Screw (8). 3 50 Attach...on the Base (60) with a 3/8" x 2" Bolt (3) and a 3/8" Locknut (11). 13. Raise the Frame (53) to adjust the walking belt (see HOW TO LOWER THE TREADMILL FOR USE on page 21). 51 Large Barrel 60 8 15. Lower the Frame (53) (see pages 23 and 24). 12 If necessary, press the Left...

English Manual
Page 25
... to strengthen your heart rate is not a medical device. EXERCISE INTENSITY Whether your goal is to burn fat or to make exercise a regular and enjoyable part of regular exercise, you must perform aerobic exercise, which is intended only as an exercise aid in determining heart rate trends in your training zone...
... to strengthen your heart rate is not a medical device. EXERCISE INTENSITY Whether your goal is to burn fat or to make exercise a regular and enjoyable part of regular exercise, you must perform aerobic exercise, which is intended only as an exercise aid in determining heart rate trends in your training zone...

English Manual
Page 26
... Walking Platform Walking Belt Belt Guide Frame Cap Frame Spacer 1/4" x 1" Screw Drive Roller/Pulley Magnet Latch Cap Storage Latch Model No. HETL79812.0 R1112A Key No. PART LIST Key No.
... Walking Platform Walking Belt Belt Guide Frame Cap Frame Spacer 1/4" x 1" Screw Drive Roller/Pulley Magnet Latch Cap Storage Latch Model No. HETL79812.0 R1112A Key No. PART LIST Key No.

English Manual
Page 27
Description 101 1 102 1 103 1 104 4 105 1 106 1 107 1 108 6 Left Pulse Plate Access Door Key/Clip Handrail Cap Right Handrail Left Handrail Console Crossbar Console Clamp 109 2 110 4 111 1 112 2 113 1 114 1 * –- 5/16" x 1 1/2" Bolt #3 x 1/4" Screw Filter Motor Isolator Motor Plate Electronics Plate User’'s Manual Note: Specications are not illustrated. 27 Description Key No. Qty. For information about ordering replacement parts, see the back cover of this manual. *These parts are subject to change without notice. Key No. Qty.
Description 101 1 102 1 103 1 104 4 105 1 106 1 107 1 108 6 Left Pulse Plate Access Door Key/Clip Handrail Cap Right Handrail Left Handrail Console Crossbar Console Clamp 109 2 110 4 111 1 112 2 113 1 114 1 * –- 5/16" x 1 1/2" Bolt #3 x 1/4" Screw Filter Motor Isolator Motor Plate Electronics Plate User’'s Manual Note: Specications are not illustrated. 27 Description Key No. Qty. For information about ordering replacement parts, see the back cover of this manual. *These parts are subject to change without notice. Key No. Qty.

English Manual
Page 32
Please use recycling facilities that are authorized to conserve natural resources and improve European standards of environmental protection. Part No. 340541 R1112A Printed in municipal waste. ORDERING REPLACEMENT PARTS To order replacement parts, please see the PART LIST and the EXPLODED DRAWING near the end of this product must not be recycled after its useful... manual) •• the name of the product (see the front cover of this manual) •• the key number and description of the replacement part(s) (see the front cover of in China © 2012 ICON IP, Inc.
Please use recycling facilities that are authorized to conserve natural resources and improve European standards of environmental protection. Part No. 340541 R1112A Printed in municipal waste. ORDERING REPLACEMENT PARTS To order replacement parts, please see the PART LIST and the EXPLODED DRAWING near the end of this product must not be recycled after its useful... manual) •• the name of the product (see the front cover of this manual) •• the key number and description of the replacement part(s) (see the front cover of in China © 2012 ICON IP, Inc.


