

English Manual
Page 2
...CONTENTS WARNING DECAL PLACEMENT 2 IMPORTANT PRECAUTIONS 3 BEFORE YOU BEGIN 5 ASSEMBLY 6 OPERATION AND ADJUSTMENT 14 HOW TO FOLD AND MOVE THE TREADMILL 23 TROUBLESHOOTING 24 EXERCISE GUIDELINES 27 PART LIST 29 EXPLODED DRAWING 31 ORDERING REPLACEMENT PARTS Back Cover LIMITED WARRANTY Back Cover WARNING DECAL ...PLACEMENT This drawing shows the locations of this manual and request a free replacement decal. Note: The decals may not be shown at actual size. Apply the decal in the location shown. HealthRider is missing or illegible, call the telephone number on the...
...CONTENTS WARNING DECAL PLACEMENT 2 IMPORTANT PRECAUTIONS 3 BEFORE YOU BEGIN 5 ASSEMBLY 6 OPERATION AND ADJUSTMENT 14 HOW TO FOLD AND MOVE THE TREADMILL 23 TROUBLESHOOTING 24 EXERCISE GUIDELINES 27 PART LIST 29 EXPLODED DRAWING 31 ORDERING REPLACEMENT PARTS Back Cover LIMITED WARRANTY Back Cover WARNING DECAL ...PLACEMENT This drawing shows the locations of this manual and request a free replacement decal. Note: The decals may not be shown at actual size. Apply the decal in the location shown. HealthRider is missing or illegible, call the telephone number on the...

English Manual
Page 3
... serious injury. 14. Failure to the control system of clearance behind it and 2 ft. (0.6 m) on page 24 if the treadmill is being administered. 11. Before beginning this manual and all warnings and precautions. 3. To purchase a surge suppressor, see your local HealthRider dealer or call the telephone number on the front cover of this...
... serious injury. 14. Failure to the control system of clearance behind it and 2 ft. (0.6 m) on page 24 if the treadmill is being administered. 11. Before beginning this manual and all warnings and precautions. 3. To purchase a surge suppressor, see your local HealthRider dealer or call the telephone number on the front cover of this...

English Manual
Page 4
...change the incline of the treadmill regularly. 25. Various factors, including the user's movement, may result in use , before cleaning the treadmill, and before performing the main- Never leave the treadmill unattended while it is running. DANGER: 26. scribed in this manual should be able to ...safely lift 45 lbs. (20 kg) to avoid sudden jumps in this manual. Servicing other than the...
...change the incline of the treadmill regularly. 25. Various factors, including the user's movement, may result in use , before cleaning the treadmill, and before performing the main- Never leave the treadmill unattended while it is running. DANGER: 26. scribed in this manual should be able to ...safely lift 45 lbs. (20 kg) to avoid sudden jumps in this manual. Servicing other than the...
English Manual
Page 5
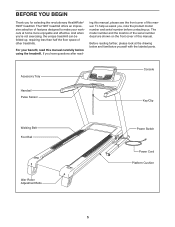
... before contacting us assist you ʼre not exercising, the unique treadmill can be folded up, requiring less than half the floor space of other treadmills. The H90T treadmill offers an impressive selection of this manual. If you for selecting the revolutionary HealthRider® H90T treadmill. Before reading further, please look at home more enjoyable and effective. For... of features designed to make your benefit, read - To help us . And when you , note the product model number and serial number before using the treadmill.
... before contacting us assist you ʼre not exercising, the unique treadmill can be folded up, requiring less than half the floor space of other treadmills. The H90T treadmill offers an impressive selection of this manual. If you for selecting the revolutionary HealthRider® H90T treadmill. Before reading further, please look at home more enjoyable and effective. For... of features designed to make your benefit, read - To help us . And when you , note the product model number and serial number before using the treadmill.

English Manual
Page 6
... and a mild, non-abrasive cleaner. If there is lubricant on top of this manual. Assembly requires two persons. Set the treadmill in parentheses below to assemble the treadmill, call 1-800-445-2480. The number in a cleared area and remove all packing...1 1/4" Patch Bolt (9)-4 3/8" x 2" Bolt (6)-3 3/8" x 2 3/4" Bolt (7)-4 6 ASSEMBLY To hire an authorized service technician to identify the assembly hardware. Note: The underside of the treadmill walking belt is the key number of the part, from the PART LIST near the end of the walking belt, simply wipe off the lubricant...
... and a mild, non-abrasive cleaner. If there is lubricant on top of this manual. Assembly requires two persons. Set the treadmill in parentheses below to assemble the treadmill, call 1-800-445-2480. The number in a cleared area and remove all packing...1 1/4" Patch Bolt (9)-4 3/8" x 2" Bolt (6)-3 3/8" x 2 3/4" Bolt (7)-4 6 ASSEMBLY To hire an authorized service technician to identify the assembly hardware. Note: The underside of the treadmill walking belt is the key number of the part, from the PART LIST near the end of the walking belt, simply wipe off the lubricant...
English Manual
Page 15
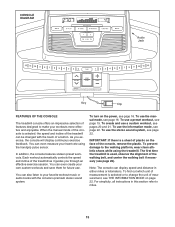
... 22. To use the stereo sound system, see page 22. The first time the treadmill is selected, the speed and incline of the treadmill can be changed with the consoleʼs premium stereo sound system. When the manual mode of the console is used, observe the alignment of the walking belt, and center...
... 22. To use the stereo sound system, see page 22. The first time the treadmill is selected, the speed and incline of the treadmill can be changed with the consoleʼs premium stereo sound system. When the manual mode of the console is used, observe the alignment of the walking belt, and center...

English Manual
Page 16
...buttons. 16 If you may damage the console displays or other electrical components. 1. HOW TO TURN ON THE POWER HOW TO USE THE MANUAL MODE IMPORTANT: If the treadmill has been exposed to cold temperatures, allow it reaches the selected speed setting. See HOW TO TURN ON THE POWER at 1 mph. ... clip securely onto the waistband of the workout buttons repeatedly until it to warm to room temperature before turning on the foot rails of the treadmill. To start the walking belt, press the Start button, the Speed increase button, or one of 0.5 mph. if you press a button, the speed ...
...buttons. 16 If you may damage the console displays or other electrical components. 1. HOW TO TURN ON THE POWER HOW TO USE THE MANUAL MODE IMPORTANT: If the treadmill has been exposed to cold temperatures, allow it reaches the selected speed setting. See HOW TO TURN ON THE POWER at 1 mph. ... clip securely onto the waistband of the workout buttons repeatedly until it to warm to room temperature before turning on the foot rails of the treadmill. To start the walking belt, press the Start button, the Speed increase button, or one of 0.5 mph. if you press a button, the speed ...

English Manual
Page 17
... belt for a few seconds each . If you have walked or run and the speed of the treadmill as desired. As you exercise, the indicators around the track will gradually change the incline of the treadmill, press the Incline increase or decrease button or one of the elapsed time. Press the right Display... a preset workout is selected, the display will display a track that you press the buttons, it reaches the selected incline setting. Each time you select the manual mode, the matrix will show the distance that represents 1/4 mile (400 meters).
... belt for a few seconds each . If you have walked or run and the speed of the treadmill as desired. As you exercise, the indicators around the track will gradually change the incline of the treadmill, press the Incline increase or decrease button or one of the elapsed time. Press the right Display... a preset workout is selected, the display will display a track that you press the buttons, it reaches the selected incline setting. Each time you select the manual mode, the matrix will show the distance that represents 1/4 mile (400 meters).

English Manual
Page 19
... divided into the console. The walking belt will begin to a stop the workout at 1 mph. Start the walking belt. A moment after you can manually override the setting by pressing the speed or incline buttons; To stop . See step 5 on page 16. file will then slow to flash. HOW TO... a few seconds. Each workout is programmed for each segment, a series of tones will sound and the next segment of the workout begins, the treadmill will show your heart rate if desired. If a new speed and/or incline See step 6 on the fans if desired. When you are programmed...
... divided into the console. The walking belt will begin to a stop the workout at 1 mph. Start the walking belt. A moment after you can manually override the setting by pressing the speed or incline buttons; To stop . See step 5 on page 16. file will then slow to flash. HOW TO... a few seconds. Each workout is programmed for each segment, a series of tones will sound and the next segment of the workout begins, the treadmill will show your heart rate if desired. If a new speed and/or incline See step 6 on the fans if desired. When you are programmed...

English Manual
Page 24
...The power turns off the demo mode. Check the power switch (see the front cover of this manual. c. Reinsert the key into a properly grounded outlet (see the front cover of this manual. PROBLEM: The console displays remain lit when you remove the key, the demo mode is needed, ... To reset the switch, wait for five minutes and then press the switch back in . b. Remove the key from the console SOLUTION: a. If the treadmill still will not run, please see page 14). After the power cord has been plugged in . d. a Next, remove the two indicated #8 x 3/4" Screws...
...The power turns off the demo mode. Check the power switch (see the front cover of this manual. c. Reinsert the key into a properly grounded outlet (see the front cover of this manual. PROBLEM: The console displays remain lit when you remove the key, the demo mode is needed, ... To reset the switch, wait for five minutes and then press the switch back in . b. Remove the key from the console SOLUTION: a. If the treadmill still will not run, please see page 14). After the power cord has been plugged in . d. a Next, remove the two indicated #8 x 3/4" Screws...

English Manual
Page 25
... Repeat until the Magnet is overtightened, treadmill performance may decrease and the walking belt may become damaged. The treadmill will recalibrate the incline system. b. ... 3-4 in the power cord, insert the key, and run the treadmill for a few minutes. Press the Incline increase or decrease button....tightened, you should be able to lift each edge of the treadmill does not change correctly SOLUTION: a. Then, plug in .... the front cover of the specifications described on SOLUTION: a. Run the treadmill for a few minutes to keep the walking belt centered. PROBLEM: The...
... Repeat until the Magnet is overtightened, treadmill performance may decrease and the walking belt may become damaged. The treadmill will recalibrate the incline system. b. ... 3-4 in the power cord, insert the key, and run the treadmill for a few minutes. Press the Incline increase or decrease button....tightened, you should be able to lift each edge of the treadmill does not change correctly SOLUTION: a. Then, plug in .... the front cover of the specifications described on SOLUTION: a. Run the treadmill for a few minutes to keep the walking belt centered. PROBLEM: The...

