

English Manual
Page 2
...this manual and request a free replacement decal. Note: The decal(s) may not be shown at actual size. ! (inside the frame covers) HEALTHRIDER is missing or illegible, see the front cover of ICON IP, Inc. 2 Apply the decal in the location shown. TABLE OF CONTENTS ...WARNING DECAL PLACEMENT 2 IMPORTANT PRECAUTIONS 3 BEFORE YOU BEGIN 4 PART IDENTIFICATION CHART 5 ASSEMBLY 6 HOW TO USE THE ELLIPTICAL 12 MAINTENANCE AND TROUBLESHOOTING 20 EXERCISE GUIDELINES 22 PART LIST 23 EXPLODED DRAWING 25 ORDERING REPLACEMENT PARTS Back Cover LIMITED WARRANTY Back Cover WARNING...
...this manual and request a free replacement decal. Note: The decal(s) may not be shown at actual size. ! (inside the frame covers) HEALTHRIDER is missing or illegible, see the front cover of ICON IP, Inc. 2 Apply the decal in the location shown. TABLE OF CONTENTS ...WARNING DECAL PLACEMENT 2 IMPORTANT PRECAUTIONS 3 BEFORE YOU BEGIN 4 PART IDENTIFICATION CHART 5 ASSEMBLY 6 HOW TO USE THE ELLIPTICAL 12 MAINTENANCE AND TROUBLESHOOTING 20 EXERCISE GUIDELINES 22 PART LIST 23 EXPLODED DRAWING 25 ORDERING REPLACEMENT PARTS Back Cover LIMITED WARRANTY Back Cover WARNING...

English Manual
Page 3
..., place a mat under age 12 and pets away from moisture and dust. The elliptical does not have a freewheel; Keep the elliptical indoors, away from the elliptical at least 3 ft. (0.9 m) of clearance in the front and rear of the elliptical and 2 ft. (0.6 m) on a level surface, with pre-existing health problems.... persons with at all parts regularly. Various factors may result in general. 13. Replace any exercise program, consult your elliptical. This is intended only as described in a garage or covered patio, or near water. 6. Reduce your back straight while using the...
..., place a mat under age 12 and pets away from moisture and dust. The elliptical does not have a freewheel; Keep the elliptical indoors, away from the elliptical at least 3 ft. (0.9 m) of clearance in the front and rear of the elliptical and 2 ft. (0.6 m) on a level surface, with pre-existing health problems.... persons with at all parts regularly. Various factors may result in general. 13. Replace any exercise program, consult your elliptical. This is intended only as described in a garage or covered patio, or near water. 6. Reduce your back straight while using the...

English Manual
Page 4
... assist you have questions after reading this manual, please see the front cover of features designed to make your benefit, read this manual. The H95 E elliptical provides an impressive selection of this manual. Length: 6 ft. 10 in. (208 cm) Width: 2 ft. 3 in the drawing below. For your workouts at home more... effective and enjoyable. If you , note the product model number and serial number before you for selecting the revolutionary HEALTHRIDER® H95 E elliptical. BEFORE YOU BEGIN Thank you use the...
... assist you have questions after reading this manual, please see the front cover of features designed to make your benefit, read this manual. The H95 E elliptical provides an impressive selection of this manual. Length: 6 ft. 10 in. (208 cm) Width: 2 ft. 3 in the drawing below. For your workouts at home more... effective and enjoyable. If you , note the product model number and serial number before you for selecting the revolutionary HEALTHRIDER® H95 E elliptical. BEFORE YOU BEGIN Thank you use the...

English Manual
Page 6
Attach the Rear Stabilizer (4) to prevent the elliptical from tipping until you complete all parts in a cleared area and remove the packing materials. Do not dispose of the packing materials until this product, ...;• To hire an authorized service technician to assemble this 1 step is resting on the Rear Stabilizer (4), press the Latch Button (67), and unfold the elliptical so that the Rear Stabilizer is completed. Next, hold the Folding Frame (2) to the Folding Frame (2) with two M10 x 95mm Screws (100).
Attach the Rear Stabilizer (4) to prevent the elliptical from tipping until you complete all parts in a cleared area and remove the packing materials. Do not dispose of the packing materials until this product, ...;• To hire an authorized service technician to assemble this 1 step is resting on the Rear Stabilizer (4), press the Latch Button (67), and unfold the elliptical so that the Rear Stabilizer is completed. Next, hold the Folding Frame (2) to the Folding Frame (2) with two M10 x 95mm Screws (100).

English Manual
Page 9
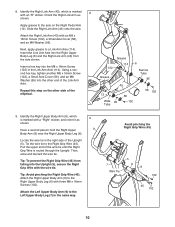
... M8 Washer (95). 6. Next, pull upward on the Latch (50) on the right Crank Arm (39). Make sure that the flat side is facing the elliptical. Press the Right Pedal Arm onto the Pedal Arm Sleeve (46). Apply grease to the axle on the Right Pedal Arm (12). Press the Ramp... (12). Locate the Pedal Arm Roller 6a (32) on the right Crank Arm (39). Set the Pedal Arm Roller on the other side of the elliptical. 6b 130 32 12 Grease 39 Flat 46 Side 50 95 113 121 7.
... M8 Washer (95). 6. Next, pull upward on the Latch (50) on the right Crank Arm (39). Make sure that the flat side is facing the elliptical. Press the Right Pedal Arm onto the Pedal Arm Sleeve (46). Apply grease to the axle on the Right Pedal Arm (12). Press the Ramp... (12). Locate the Pedal Arm Roller 6a (32) on the right Crank Arm (39). Set the Pedal Arm Roller on the other side of the elliptical. 6b 130 32 12 Grease 39 Flat 46 Side 50 95 113 121 7.
English Manual
Page 10
... 114 102 Grease 6 Narrow Tube 95 43 12 Wide 95 Tube 56 102 56 102 9. Locate the wire tie in the right side of the elliptical. 8. Slide the Right Link Arm (43) onto the axle. Next, apply grease to the Left Upper Body Leg (7) in the Link Arm Axle (114). Using...
... 114 102 Grease 6 Narrow Tube 95 43 12 Wide 95 Tube 56 102 56 102 9. Locate the wire tie in the right side of the elliptical. 8. Slide the Right Link Arm (43) onto the axle. Next, apply grease to the Left Upper Body Leg (7) in the Link Arm Axle (114). Using...
English Manual
Page 12
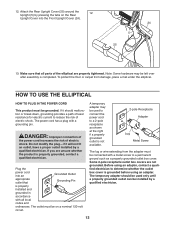
... whether the outlet box cover is not available. 2-pole Receptacle Adapter Lug Metal Screw The lug or wire extending from damage, place a mat under the elliptical. HOW TO USE THE ELLIPTICAL HOW TO PLUG IN THE POWER CORD This product must be connected with a metal screw to reduce the risk of the... elliptical are not grounded. The outlet must be grounded. Note: Some hardware may be left over after assembly is properly grounded, contact a qualified electrician. If you ...
... whether the outlet box cover is not available. 2-pole Receptacle Adapter Lug Metal Screw The lug or wire extending from damage, place a mat under the elliptical. HOW TO USE THE ELLIPTICAL HOW TO PLUG IN THE POWER CORD This product must be connected with a metal screw to reduce the risk of the... elliptical are not grounded. The outlet must be grounded. Note: Some hardware may be left over after assembly is properly grounded, contact a qualified electrician. If you ...

English Manual
Page 13
... Button Next, raise the pedal arms until they touch the handlebars; HOW TO MOVE THE ELLIPTICAL To move the elliptical to the desired position, and then lower it to the pedal arm sleeves. Carefully move the elliptical, first fold it locks into a vertical position. Then, lift the latches under each pedal...stand in place. magnets on the wheels. Pull on the pedal arm sleeves. Place your foot here 13 HOW TO FOLD AND UNFOLD THE ELLIPTICAL When the elliptical is not in use, the frame can be folded out of the wheels. Next, pull the pedal arms away from the handlebars. Pull ...
... Button Next, raise the pedal arms until they touch the handlebars; HOW TO MOVE THE ELLIPTICAL To move the elliptical to the desired position, and then lower it to the pedal arm sleeves. Carefully move the elliptical, first fold it locks into a vertical position. Then, lift the latches under each pedal...stand in place. magnets on the wheels. Pull on the pedal arm sleeves. Place your foot here 13 HOW TO FOLD AND UNFOLD THE ELLIPTICAL When the elliptical is not in use, the frame can be folded out of the wheels. Next, pull the pedal arms away from the handlebars. Pull ...
English Manual
Page 14
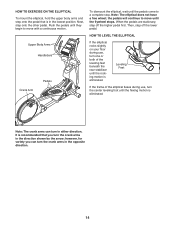
...shown by the arrow; the pedals will continue to a complete stop. Next, step onto the other pedal. Leveling Feet If the frame of the elliptical flexes during use , turn the center leveling foot until the rocking motion is eliminated. Push the pedals until they begin to move until the pedals... until the flywheel stops. It is in the lowest position. Then, step off the higher pedal first. HOW TO EXERCISE ON THE ELLIPTICAL To mount the elliptical, hold the upper body arms and step onto the pedal that is recommended that you can turn in either direction. Note: The crank ...
...shown by the arrow; the pedals will continue to a complete stop. Next, step onto the other pedal. Leveling Feet If the frame of the elliptical flexes during use , turn the center leveling foot until the rocking motion is eliminated. Push the pedals until they begin to move until the pedals... until the flywheel stops. It is in the lowest position. Then, step off the higher pedal first. HOW TO EXERCISE ON THE ELLIPTICAL To mount the elliptical, hold the upper body arms and step onto the pedal that is recommended that you can turn in either direction. Note: The crank ...

English Manual
Page 16
... main menu. 16 Each time you pedal, change the incline of the ramp as it calibrates. HOW TO TURN ON THE POWER IMPORTANT: If the elliptical has been exposed to cold temperatures, allow it to warm to select the desired display mode. 1. As you turn on the frame near the power...
... main menu. 16 Each time you pedal, change the incline of the ramp as it calibrates. HOW TO TURN ON THE POWER IMPORTANT: If the elliptical has been exposed to cold temperatures, allow it to warm to select the desired display mode. 1. As you turn on the frame near the power...
English Manual
Page 17
Time—-When the manual mode is selected, this , the electrical components on the elliptical may wear prematurely. Measure your hands excessively or squeeze the metal contacts tightly. If the pedals do not move your heart rate if desired. For ...
Time—-When the manual mode is selected, this , the electrical components on the elliptical may wear prematurely. Measure your hands excessively or squeeze the metal contacts tightly. If the pedals do not move your heart rate if desired. For ...

English Manual
Page 19
...the iFit Live module must have access to your audio cable into the jack on the side of the console and into a jack on the elliptical. Press the increase and decrease buttons next to the Enter button repeatedly to the Enter button and highlight IFIT TRAINING. The console features an ... music or audio books through the console sound system while you must be near or connected to adjust the contrast level of strides that the elliptical has been used. To select the information mode, press and hold down the Display button for a few seconds until the information mode appears ...
...the iFit Live module must have access to your audio cable into the jack on the side of the console and into a jack on the elliptical. Press the increase and decrease buttons next to the Enter button repeatedly to the Enter button and highlight IFIT TRAINING. The console features an ... music or audio books through the console sound system while you must be near or connected to adjust the contrast level of strides that the elliptical has been used. To select the information mode, press and hold down the Display button for a few seconds until the information mode appears ...
English Manual
Page 20
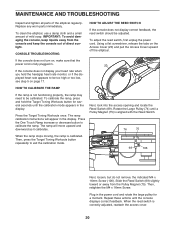
..., the reed switch should be too high or too low, see step 5 on the Access Cover (20) and pull the Access Cover upward off the elliptical. To adjust the reed switch, first unplug the power cord. Press the One Touch Ramp increase or decrease button to exit the calibration mode. 69... adjusted, reattach the access cover. 20 Slide the Reed Switch (69) slightly toward or away from the console and keep the console out of the elliptical regularly. When the reed switch is not functioning properly, the ramp may need to be adjusted. The ramp will appear in . 20 If the console...
..., the reed switch should be too high or too low, see step 5 on the Access Cover (20) and pull the Access Cover upward off the elliptical. To adjust the reed switch, first unplug the power cord. Press the One Touch Ramp increase or decrease button to exit the calibration mode. 69... adjusted, reattach the access cover. 20 Slide the Reed Switch (69) slightly toward or away from the console and keep the console out of the elliptical regularly. When the reed switch is not functioning properly, the ramp may need to be adjusted. The ramp will appear in . 20 If the console...
English Manual
Page 21
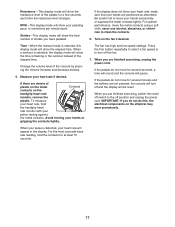
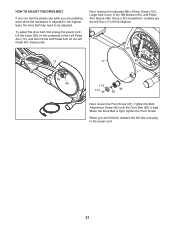
... the Pivot Screw. Lift the Latch (50) on the underside of the Left Pedal Arm (13), and then lift the Left Pedal Arm off the elliptical. 97 38 13 17 85 50 46 113 121 46 95 Next, loosen the Pivot Screw (97). When you are finished, reattach the left Pedal...
... the Pivot Screw. Lift the Latch (50) on the underside of the Left Pedal Arm (13), and then lift the Left Pedal Arm off the elliptical. 97 38 13 17 85 50 46 113 121 46 95 Next, loosen the Pivot Screw (97). When you are finished, reattach the left Pedal...


