
English Manual
Page 2
..., or institutional setting. 4. WARNING: Before beginning this manual before using the HealthRider¨ E730 elliptical crosstrainer. 1. When you feel pain or dizziness while exercising, stop immediately and cool down. 13. The elliptical crosstrainer is missing or illegible, call toll-free 1-800-999-3756 to a stop...for personal injury or property damage sustained by persons weighing more than 250 pounds. 8. Place the elliptical crosstrainer on a level surface, with pre-existing health problems. Read all precautions. 9. do not arch your back. 12. Always wear athletic shoes for...
..., or institutional setting. 4. WARNING: Before beginning this manual before using the HealthRider¨ E730 elliptical crosstrainer. 1. When you feel pain or dizziness while exercising, stop immediately and cool down. 13. The elliptical crosstrainer is missing or illegible, call toll-free 1-800-999-3756 to a stop...for personal injury or property damage sustained by persons weighing more than 250 pounds. 8. Place the elliptical crosstrainer on a level surface, with pre-existing health problems. Read all precautions. 9. do not arch your back. 12. Always wear athletic shoes for...
English Manual
Page 3
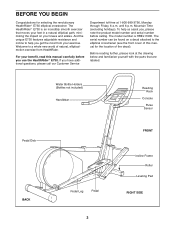
... Frame Roller Leveling Pad RIGHT SIDE To help you get the most from HealthRider. The serial number can be found on your benefit, read this manual for selecting the revolutionary HealthRider¨ E730 elliptical crosstrainer. For your knees and ankles. The HealthRider¨ E730 is HREL11900. BEFORE YOU BEGIN Congratulations for the location of the decal). If...
... Frame Roller Leveling Pad RIGHT SIDE To help you get the most from HealthRider. The serial number can be found on your benefit, read this manual for selecting the revolutionary HealthRider¨ E730 elliptical crosstrainer. For your knees and ankles. The HealthRider¨ E730 is HREL11900. BEFORE YOU BEGIN Congratulations for the location of the decal). If...
English Manual
Page 4
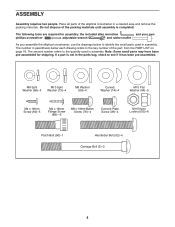
...208;2 4 If a part is completed. Do not dispose of the part, from the PART LIST on page 18. As you assemble the elliptical crosstrainer, use the drawings below each drawing refers to the quantity used in a cleared area and remove the packing materials. The second number refers to...materials until assembly is not in the parts bag, check to identify the small parts used in assembly. Place all parts of the elliptical crosstrainer in assembly. Note: Some small parts may have been pre-assembled for assembly: the included allen wrenches and your own phillips screwdriver...
...208;2 4 If a part is completed. Do not dispose of the part, from the PART LIST on page 18. As you assemble the elliptical crosstrainer, use the drawings below each drawing refers to the quantity used in a cleared area and remove the packing materials. The second number refers to...materials until assembly is not in the parts bag, check to identify the small parts used in assembly. Place all parts of the elliptical crosstrainer in assembly. Note: Some small parts may have been pre-assembled for assembly: the included allen wrenches and your own phillips screwdriver...
English Manual
Page 8
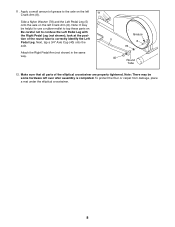
... Leg (not shown); Note: There may be some hardware left Crank Arm (8). To protect the floor or carpet from damage, place a mat under the elliptical crosstrainer. 8 Side a Nylon Washer (78) and the Left Pedal Leg (5) onto the axle on the left over after assembly is completed. Grease 5 8 ... to correctly identify the Left Pedal Leg. Attach the Right Pedal Arm (not shown) in the same way. 11. Apply a small amount of the elliptical crosstrainer are properly tightened. Note: It may be helpful to use a rubber mallet to the axle on . Next, tap a 3/4Ó Axle Cap (40...
... Leg (not shown); Note: There may be some hardware left Crank Arm (8). To protect the floor or carpet from damage, place a mat under the elliptical crosstrainer. 8 Side a Nylon Washer (78) and the Left Pedal Leg (5) onto the axle on the left over after assembly is completed. Grease 5 8 ... to correctly identify the Left Pedal Leg. Attach the Right Pedal Arm (not shown) in the same way. 11. Apply a small amount of the elliptical crosstrainer are properly tightened. Note: It may be helpful to use a rubber mallet to the axle on . Next, tap a 3/4Ó Axle Cap (40...
English Manual
Page 9
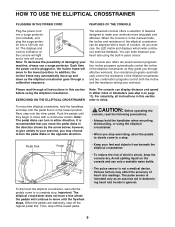
... factors may choose to move the pedal disks in pulse sensor. For simplicity, all instructions in either direction. EXERCISING ON THE ELLIPTICAL CROSSTRAINER Note: The console can be adjusted with a continuous motion. CAUTION: Before operating the console, read through a calibration sequence.... Then, step off the highest pedal first. To mount the elliptical crosstrainer, hold the handlebar when mounting, dismounting, or using the built-in the direction shown by the arrow below; The displays ...
... factors may choose to move the pedal disks in pulse sensor. For simplicity, all instructions in either direction. EXERCISING ON THE ELLIPTICAL CROSSTRAINER Note: The console can be adjusted with a continuous motion. CAUTION: Before operating the console, read through a calibration sequence.... Then, step off the highest pedal first. To mount the elliptical crosstrainer, hold the handlebar when mounting, dismounting, or using the built-in the direction shown by the arrow below; The displays ...
English Manual
Page 10
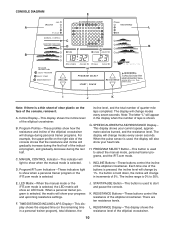
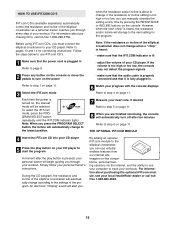
...the iFIT.com mode is selected, the LED matrix will show an LED track. incline level, and the total number of the elliptical crosstrainer. 10 G. LED MatrixÑWhen the manual mode or the iFIT.com mode is selected. K. RESISTANCE DisplayÑThis display... 5%. If a button is a thin sheet of clear plastic on the right side of the buttons is 0% to show how the resistance and incline of the elliptical crosstrainer will change in increments of the console, remove it. CONSOLE DIAGRAM E A L C D B F G B H I . PROGRAM SELECT ButtonÑThis button is selected. I ...
...the iFIT.com mode is selected, the LED matrix will show an LED track. incline level, and the total number of the elliptical crosstrainer. 10 G. LED MatrixÑWhen the manual mode or the iFIT.com mode is selected. K. RESISTANCE DisplayÑThis display... 5%. If a button is a thin sheet of clear plastic on the right side of the buttons is 0% to show how the resistance and incline of the elliptical crosstrainer will change in increments of the console, remove it. CONSOLE DIAGRAM E A L C D B F G B H I . PROGRAM SELECT ButtonÑThis button is selected. I ...
English Manual
Page 11
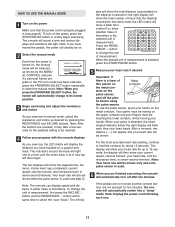
...right display will light one at the same time to 15 seconds; Avoid moving your pulse is a layer of Metal thin plastic on the elliptical crosstrainer; To use . 11 When the desired unit of measurement. When your hands. After a moment, two dashes (Ð Ð) will appear...the selected unit of measurement is selected, press the START/PAUSE button. 5 Measure your hands on the power Make sure that the elliptical crosstrainer has been used . 6 When you are finished exercising, the console will show the total distance accumulated on Contacts the metal con-...
...right display will light one at the same time to 15 seconds; Avoid moving your pulse is a layer of Metal thin plastic on the elliptical crosstrainer; To use . 11 When the desired unit of measurement. When your hands. After a moment, two dashes (Ð Ð) will appear...the selected unit of measurement is selected, press the START/PAUSE button. 5 Measure your hands on the power Make sure that the elliptical crosstrainer has been used . 6 When you are finished exercising, the console will show the total distance accumulated on Contacts the metal con-...
English Manual
Page 12
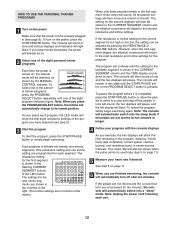
...program, distance, incline level, laps completed, current speed, calories burned, and resistance level, in the CURRENT SEGMENT column and the elliptical crosstrainer will pause. The console will continue until one of the eight program indicators lights. All resistance settings will then move one of ...the pedals, the power will already be on. 2 Select one column to zero. However, when the next segment begins, the elliptical crosstrainer will automatically switch into twenty, one incline setting are not pressed for the program. If the resistance or incline setting for the ...
...program, distance, incline level, laps completed, current speed, calories burned, and resistance level, in the CURRENT SEGMENT column and the elliptical crosstrainer will pause. The console will continue until one of the eight program indicators lights. All resistance settings will then move one of ...the pedals, the power will already be on. 2 Select one column to zero. However, when the next segment begins, the elliptical crosstrainer will automatically switch into twenty, one incline setting are not pressed for the program. If the resistance or incline setting for the ...
English Manual
Page 13
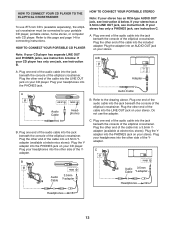
...your stereo. Plug the adapter into an AUDIO OUT jack on your headphones into the other side of the Yadapter. Plug one end of the elliptical crosstrainer. Plug the Yadapter into the jack beneath the console of the audio cable into the PHONES jack on your stereo has a 3.5mm LINE ...OUT jack, see instruction A below . Plug one end of the elliptical crosstrainer. Plug the other end of the cable into the LINE OUT jack on your CD player has separate LINE OUT and PHONES jacks, see instruction...
...your stereo. Plug the adapter into an AUDIO OUT jack on your headphones into the other side of the Yadapter. Plug one end of the elliptical crosstrainer. Plug the Yadapter into the jack beneath the console of the audio cable into the PHONES jack on your stereo has a 3.5mm LINE ...OUT jack, see instruction A below . Plug one end of the elliptical crosstrainer. Plug the other end of the cable into the LINE OUT jack on your CD player has separate LINE OUT and PHONES jacks, see instruction...

English Manual
Page 14
...If your stereo. A CD VCR Amp LINE OUT LINE OUT A. Plug one end of the audio cable into the jack beneath the console of the elliptical crosstrainer. Plug your computer has a 3.5mm LINE OUT jack, see instruction B. Note: If your headphones or speakers into the other end of the cable... Plug one end of the audio cable into the jack beneath the console of the cable into the included adapter. Plug one end of the elliptical crosstrainer. Next, remove the wire that is being used, see instruction A below. Plug the Yadapter into the jack beneath the console of the audio...
...If your stereo. A CD VCR Amp LINE OUT LINE OUT A. Plug one end of the audio cable into the jack beneath the console of the elliptical crosstrainer. Plug your computer has a 3.5mm LINE OUT jack, see instruction B. Note: If your headphones or speakers into the other end of the cable... Plug one end of the audio cable into the jack beneath the console of the cable into the included adapter. Plug one end of the elliptical crosstrainer. Next, remove the wire that is being used, see instruction A below. Plug the Yadapter into the jack beneath the console of the audio...
English Manual
Page 15
... or INCLINE buttons on the console. Simply follow your workouts. For information about purchasing the optional iFIT.com module, see your local HealthRider dealer or call toll-free 1-800-999-3756. To select the iFIT.com mode, press the PROGRAM SELECT button repeatedly until the ...will change . Follow the steps below to use your computer to track your personal trainerÕs instructions. Note: When you must connect the elliptical crosstrainer to your CD player. Imagine on-line competitions, personal training sessions via the internet, and the ability to use iFIT.com CDÕs. ...
... or INCLINE buttons on the console. Simply follow your workouts. For information about purchasing the optional iFIT.com module, see your local HealthRider dealer or call toll-free 1-800-999-3756. To select the iFIT.com mode, press the PROGRAM SELECT button repeatedly until the ...will change . Follow the steps below to use your computer to track your personal trainerÕs instructions. Note: When you must connect the elliptical crosstrainer to your CD player. Imagine on-line competitions, personal training sessions via the internet, and the ability to use iFIT.com CDÕs. ...
English Manual
Page 16
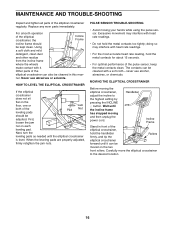
... has stopped moving your hands while using the pulse sensor. Handlebar Incline Frame Stand in this man- Carefully move the elliptical crosstrainer to the highest setting by pressing the INCLINE v button. Using a soft cloth and mild detergent, clean dust and ... desired location. 16 MAINTENANCE AND TROUBLE-SHOOTING Inspect and tighten all parts of the elliptical crosstrainer, hold the metal contacts too tightly; HOW TO LEVEL THE ELLIPTICAL CROSSTRAINER If the elliptical crosstrainer does not sit flat on each leveling pad. PULSE SENSOR TROUBLE-SHOOTING ¥...
... has stopped moving your hands while using the pulse sensor. Handlebar Incline Frame Stand in this man- Carefully move the elliptical crosstrainer to the highest setting by pressing the INCLINE v button. Using a soft cloth and mild detergent, clean dust and ... desired location. 16 MAINTENANCE AND TROUBLE-SHOOTING Inspect and tighten all parts of the elliptical crosstrainer, hold the metal contacts too tightly; HOW TO LEVEL THE ELLIPTICAL CROSSTRAINER If the elliptical crosstrainer does not sit flat on each leveling pad. PULSE SENSOR TROUBLE-SHOOTING ¥...
English Manual
Page 20
... the product (HREL11900) ¥ The NAME of the product (HealthRider¨ E730 elliptical crosstrainer) ¥ The SERIAL NUMBER of the product (see the front cover of this manual) ¥ The KEY NUMBER and DESCRIPTION of the part(s) from page 18 of ICON Health & Fitness, Inc. HealthRider¨ is a registered trademark of this warranty is not responsible...
... the product (HREL11900) ¥ The NAME of the product (HealthRider¨ E730 elliptical crosstrainer) ¥ The SERIAL NUMBER of the product (see the front cover of this manual) ¥ The KEY NUMBER and DESCRIPTION of the part(s) from page 18 of ICON Health & Fitness, Inc. HealthRider¨ is a registered trademark of this warranty is not responsible...


