
English Manual
Page 1
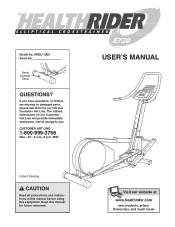
...! MST USERÕS MANUAL Patent Pending CAUTION Read all precautions and instructions in this manual before using this manual for future reference. ¨ Model No. Serial Number Decal QUESTIONS? The trained technicians on our Customer Hot Line will provide immediate assistance, free of charge to you have questions, or if there are missing or damaged parts, please call direct to our toll-free Customer...
...! MST USERÕS MANUAL Patent Pending CAUTION Read all precautions and instructions in this manual before using this manual for future reference. ¨ Model No. Serial Number Decal QUESTIONS? The trained technicians on our Customer Hot Line will provide immediate assistance, free of charge to you have questions, or if there are missing or damaged parts, please call direct to our toll-free Customer...
English Manual
Page 2
... using the elliptical crosstrainer. 2. The elliptical crosstrainer should not be used by or through the use of this manual before using the elliptical crosstrainer; TABLE OF CONTENTS IMPORTANT PRECAUTIONS 2 BEFORE YOU BEGIN 3 ASSEMBLY 4 HOW TO USE THE ELLIPTICAL CROSSTRAINER 9 MAINTENANCE AND TROUBLE-SHOOTING 16 CONDITIONING GUIDELINES 17 PART LIST 18 EXPLODED DRAWING 19 HOW TO ORDER REPLACEMENT PARTS Back Cover LIMITED WARRANTY Back Cover IMPORTANT PRECAUTIONS WARNING: To reduce the risk of heart rate readings. Do not use...
... using the elliptical crosstrainer. 2. The elliptical crosstrainer should not be used by or through the use of this manual before using the elliptical crosstrainer; TABLE OF CONTENTS IMPORTANT PRECAUTIONS 2 BEFORE YOU BEGIN 3 ASSEMBLY 4 HOW TO USE THE ELLIPTICAL CROSSTRAINER 9 MAINTENANCE AND TROUBLE-SHOOTING 16 CONDITIONING GUIDELINES 17 PART LIST 18 EXPLODED DRAWING 19 HOW TO ORDER REPLACEMENT PARTS Back Cover LIMITED WARRANTY Back Cover IMPORTANT PRECAUTIONS WARNING: To reduce the risk of heart rate readings. Do not use...
English Manual
Page 3
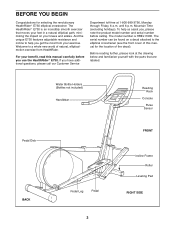
... Console Pulse Sensor Pedal Disk BACK Pedal Leg Pedal 3 FRONT Incline Frame Roller Leveling Pad RIGHT SIDE BEFORE YOU BEGIN Congratulations for the location of the decal). Mountain Time (excluding holidays). The model number is an incredibly smooth exerciser that are labeled. For your benefit, read this manual for selecting the revolutionary HealthRider¨ E730 elliptical crosstrainer. To help you get the most from HealthRider. And the unique E730 features adjustable resistance...
... Console Pulse Sensor Pedal Disk BACK Pedal Leg Pedal 3 FRONT Incline Frame Roller Leveling Pad RIGHT SIDE BEFORE YOU BEGIN Congratulations for the location of the decal). Mountain Time (excluding holidays). The model number is an incredibly smooth exerciser that are labeled. For your benefit, read this manual for selecting the revolutionary HealthRider¨ E730 elliptical crosstrainer. To help you get the most from HealthRider. And the unique E730 features adjustable resistance...
English Manual
Page 4
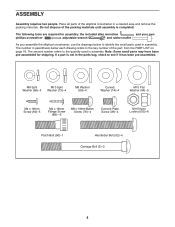
... Button Screw (76)Ð4 Console Plate Screw (39)Ð4 M10 Nylon Locknut (55)Ð6 Patch Bolt (90)Ð1 Handlebar Bolt (92)Ð4 Carriage Bolt (2)Ð2 4 The number in a cleared area and remove the packing materials. Do not dispose of the part, from the PART LIST on page 18. If a part is not in the parts bag, check to the key number of the packing materials until assembly...
... Button Screw (76)Ð4 Console Plate Screw (39)Ð4 M10 Nylon Locknut (55)Ð6 Patch Bolt (90)Ð1 Handlebar Bolt (92)Ð4 Carriage Bolt (2)Ð2 4 The number in a cleared area and remove the packing materials. Do not dispose of the part, from the PART LIST on page 18. If a part is not in the parts bag, check to the key number of the packing materials until assembly...

English Manual
Page 5
... through one end of an Incline Axle (15). Tighten the four M8 x 19mm Button Screws (76) used in this step and step 2. 2 Grease 15 89 85 V-shaped Groove 7 85 89 76 Tubes 76 3 1 Tubes 85 14 89 76 Motor Screw 85 76 89 91 7 5 1. Attach the Rear Stabilizer with the tubes on the Incline Frame (7) with two 55 Carriage Bolts (2) and two M10 Nylon...
... through one end of an Incline Axle (15). Tighten the four M8 x 19mm Button Screws (76) used in this step and step 2. 2 Grease 15 89 85 V-shaped Groove 7 85 89 76 Tubes 76 3 1 Tubes 85 14 89 76 Motor Screw 85 76 89 91 7 5 1. Attach the Rear Stabilizer with the tubes on the Incline Frame (7) with two 55 Carriage Bolts (2) and two M10 Nylon...

English Manual
Page 6
..., connect the two Console Plate Wires (106) to the two corresponding wires on the Console. Note: Either Console Plate Wire can be attached to the indicated hole in the Console Plate (101) with four M4 x 16mm Screws (60). Next, attach the ground wire to either wire on the Console (97). Secure the Upright by 4 tightening the Patch Bolt (90) into the indicated holes in the Console Plate (101). Console Wires...
..., connect the two Console Plate Wires (106) to the two corresponding wires on the Console. Note: Either Console Plate Wire can be attached to the indicated hole in the Console Plate (101) with four M4 x 16mm Screws (60). Next, attach the ground wire to either wire on the Console (97). Secure the Upright by 4 tightening the Patch Bolt (90) into the indicated holes in the Console Plate (101). Console Wires...

English Manual
Page 7
... inserted into the plastic posts. While another person, loosely attach the right side of the Handlebar (13) in the 8 position shown, connect the two Console Plate Wires (106) to the Upright (3) with two Handlebar Bolts (92), two Curved Washers (74), two Spacers (93...attached to avoid pinching the wires. Insert the three M4 x 16mm Flange Screws (88) about halfway into the Right Pedal Leg (6) and thread the Screws into the Handlebar (13). 96 13 106 96 106 9. Attach the Left Pedal (not shown) in the Right Pedal Leg. 8. Using a phillips screwdriver, tighten the three Flange Screws...
... inserted into the plastic posts. While another person, loosely attach the right side of the Handlebar (13) in the 8 position shown, connect the two Console Plate Wires (106) to the Upright (3) with two Handlebar Bolts (92), two Curved Washers (74), two Spacers (93...attached to avoid pinching the wires. Insert the three M4 x 16mm Flange Screws (88) about halfway into the Right Pedal Leg (6) and thread the Screws into the Handlebar (13). 96 13 106 96 106 9. Attach the Left Pedal (not shown) in the Right Pedal Leg. 8. Using a phillips screwdriver, tighten the three Flange Screws...
English Manual
Page 8
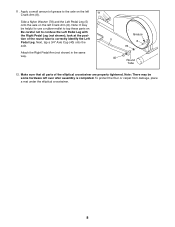
... left Crank Arm (8). Grease 5 8 78 40 Round Tube 12. Apply a small amount of the elliptical crosstrainer are properly tightened. Make sure that all parts of grease to correctly identify the Left Pedal Leg. Side a Nylon Washer (78) and the Left Pedal Leg (5) onto the axle on . Note: It may be helpful to use a rubber mallet to confuse the Left Pedal Leg with the Right Pedal Leg (not...
... left Crank Arm (8). Grease 5 8 78 40 Round Tube 12. Apply a small amount of the elliptical crosstrainer are properly tightened. Make sure that all parts of grease to correctly identify the Left Pedal Leg. Side a Nylon Washer (78) and the Left Pedal Leg (5) onto the axle on . Note: It may be helpful to use a rubber mallet to confuse the Left Pedal Leg with the Right Pedal Leg (not...
English Manual
Page 9
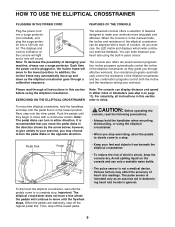
... from beneath the elliptical crosstrainer. ¥ To reduce the risk of heart rate readings. CAUTION: Before operating the console, read through effective workouts, four resistance programs automatically control the resistance of features designed to make your machine, always use only a sealable water bottle. ¥ The pulse sensor is plugged in the manual mode, the incline and resistance of the elliptical crosstrainer can even measure your workouts. In addition, the incline frame may affect...
... from beneath the elliptical crosstrainer. ¥ To reduce the risk of heart rate readings. CAUTION: Before operating the console, read through effective workouts, four resistance programs automatically control the resistance of features designed to make your machine, always use only a sealable water bottle. ¥ The pulse sensor is plugged in the manual mode, the incline and resistance of the elliptical crosstrainer can even measure your workouts. In addition, the incline frame may affect...
English Manual
Page 10
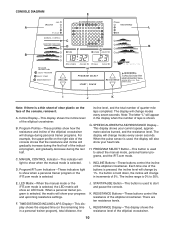
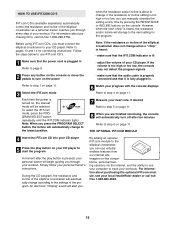
... LED track. A. LED MatrixÑWhen the manual mode or the iFIT.com mode is selected, the LED matrix will change during the first half of laps is shown. The incline range is 0% to start and pause the console. K. CONSOLE DIAGRAM E A L C D B F G B H I . If a button is held down, the incline will show how the resistance and incline of the elliptical crosstrainer will change in a personal trainer program), total distance, the J. SPEED/CALORIES/PULSE/RESISTANCE DisplayÑ This display...
... LED track. A. LED MatrixÑWhen the manual mode or the iFIT.com mode is selected, the LED matrix will change during the first half of laps is shown. The incline range is 0% to start and pause the console. K. CONSOLE DIAGRAM E A L C D B F G B H I . If a button is held down, the incline will show how the resistance and incline of the elliptical crosstrainer will change in a personal trainer program), total distance, the J. SPEED/CALORIES/PULSE/RESISTANCE DisplayÑ This display...
English Manual
Page 11
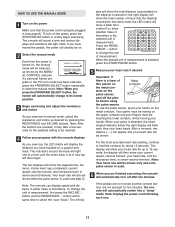
... TO USE THE MANUAL MODE 1 Turn on the power Make sure that the elliptical crosstrainer has been used; Your palms must be resting on the elliptical crosstrainer; The console will sound a tone and various displays and indicators will flash each use the pulse sensor, place your hands. The indicators around the track will display the distance you are finished exercising, the console will show your heart rate, and the resistance level, in either miles...
... TO USE THE MANUAL MODE 1 Turn on the power Make sure that the elliptical crosstrainer has been used; Your palms must be resting on the elliptical crosstrainer; The console will sound a tone and various displays and indicators will flash each use the pulse sensor, place your hands. The indicators around the track will display the distance you are finished exercising, the console will show your heart rate, and the resistance level, in either miles...
English Manual
Page 12
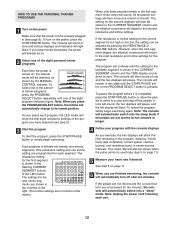
... elliptical crosstrainer will automatically switch into a ÒsleepÓ mode. The settings for the next seven segments are programmed for the program. A tone will sound, the two displays will adjust to the second resistance and incline settings. HOW TO USE THE PERSONAL TRAINER PROGRAMS 1 Turn on the power Make sure that the power cord is properly plugged in (see step 3). 3 Start the program To start the program, press the START/PAUSE button or simply begin exercising again. If the resistance...
... elliptical crosstrainer will automatically switch into a ÒsleepÓ mode. The settings for the next seven segments are programmed for the program. A tone will sound, the two displays will adjust to the second resistance and incline settings. HOW TO USE THE PERSONAL TRAINER PROGRAMS 1 Turn on the power Make sure that the power cord is properly plugged in (see step 3). 3 Start the program To start the program, press the START/PAUSE button or simply begin exercising again. If the resistance...
English Manual
Page 13
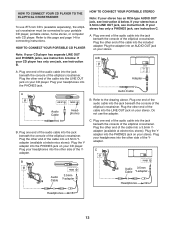
... the PHONES jack on your stereo has an RCA-type AUDIO OUT jack, see instruction C. A/B AUDIO OUT RIGHT LEFT Adapter Audio Cable B. Plug the adapter into the jack beneath the console of the Yadapter. Plug your stereo. If your stereo. C. Do not use iFIT.com CDÕs (available separately), the elliptical crosstrainer must be connected to your CD player has only one end of the...
... the PHONES jack on your stereo has an RCA-type AUDIO OUT jack, see instruction C. A/B AUDIO OUT RIGHT LEFT Adapter Audio Cable B. Plug the adapter into the jack beneath the console of the Yadapter. Plug your stereo. If your stereo. C. Do not use iFIT.com CDÕs (available separately), the elliptical crosstrainer must be connected to your CD player has only one end of the...

English Manual
Page 14
... computer. B PHONES Audio Cable 3.5mm Y-adapter Headphones/Speakers Wire removed from LINE OUT jack 14 Plug the other end of the RCA Y-adapter. Plug one end of the audio cable into the jack beneath the console of the cable into a 3.5mm Yadapter (available at electronics stores). A. Plug the adapter into the jack beneath the console of the elliptical crosstrainer. Next, remove the wire that is being used, see instruction B. If your...
... computer. B PHONES Audio Cable 3.5mm Y-adapter Headphones/Speakers Wire removed from LINE OUT jack 14 Plug the other end of the RCA Y-adapter. Plug one end of the audio cable into the jack beneath the console of the cable into a 3.5mm Yadapter (available at electronics stores). A. Plug the adapter into the jack beneath the console of the elliptical crosstrainer. Next, remove the wire that is being used, see instruction B. If your...
English Manual
Page 15
... using iFIT.com CDÕs, you through every step of your CD player. If the resistance or incline setting is about to step 4 on the console or move the pedals to track your personal trainerÕs instructions. Note: When you are finished exercising, the console will change when a ÒchirpÓ is heard: ¥ make sure that the audio cable is properly connected and that the power cord is plugged in . For information...
... using iFIT.com CDÕs, you through every step of your CD player. If the resistance or incline setting is about to step 4 on the console or move the pedals to track your personal trainerÕs instructions. Note: When you are finished exercising, the console will change when a ÒchirpÓ is heard: ¥ make sure that the audio cable is properly connected and that the power cord is plugged in . For information...
English Manual
Page 16
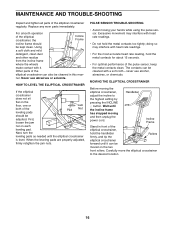
..., turn the leveling pads as needed until the incline frame has stopped moving your hands while using the pulse sensor. PULSE SENSOR TROUBLE-SHOOTING ¥ Avoid moving and then unplug the power cord. Handlebar Incline Frame Stand in this man- MAINTENANCE AND TROUBLE-SHOOTING Inspect and tighten all parts of the elliptical crosstrainer can be kept clean. Replace any worn parts immediately. Never use alcohol, abrasives, or chemicals. Excessive movement may interfere with heart rate readings...
..., turn the leveling pads as needed until the incline frame has stopped moving your hands while using the pulse sensor. PULSE SENSOR TROUBLE-SHOOTING ¥ Avoid moving and then unplug the power cord. Handlebar Incline Frame Stand in this man- MAINTENANCE AND TROUBLE-SHOOTING Inspect and tighten all parts of the elliptical crosstrainer can be kept clean. Replace any worn parts immediately. Never use alcohol, abrasives, or chemicals. Excessive movement may interfere with heart rate readings...

English Manual
Page 17
... exercise until your training zone in your training zone as you must be Òaerobic.Ó Aerobic exercise is near the middle of your heart rate is activity that a proper diet and adequate rest are listed according to burn fat, adjust the intensity of rest between 70% and 85% of your body uses easily accessible carbohydrate calories for exercise by using your exercise program. EXERCISE...
... exercise until your training zone in your training zone as you must be Òaerobic.Ó Aerobic exercise is near the middle of your heart rate is activity that a proper diet and adequate rest are listed according to burn fat, adjust the intensity of rest between 70% and 85% of your body uses easily accessible carbohydrate calories for exercise by using your exercise program. EXERCISE...
English Manual
Page 18
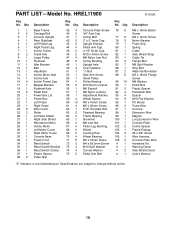
... 1 33 1 34 1 35 1 36 1 37 1 38 2 Description Base Frame Carriage Bolt Console Upright Rear Stabilizer Left Pedal Leg Right Pedal Leg Incline Frame Crank Arm Large Pulley Flywheel Idler Bracket Belt Handlebar Incline Motor Axle Incline Axle Incline Frame Cap Magnet Bracket Flywheel Axle Pedal Disk Power Box Lid Power Box Left Pedal Right Pedal Wire Cover Roller Left Side Shield Right Side Shield Resistance Motor Incline Motor Left Motor Cover Right Motor Cover Console Base Power Cord Reed Switch Reed Switch Bracket Reed Switch Clamp Plastic Spacer Pulse Grip Key No. PART LISTÑModel No.
... 1 33 1 34 1 35 1 36 1 37 1 38 2 Description Base Frame Carriage Bolt Console Upright Rear Stabilizer Left Pedal Leg Right Pedal Leg Incline Frame Crank Arm Large Pulley Flywheel Idler Bracket Belt Handlebar Incline Motor Axle Incline Axle Incline Frame Cap Magnet Bracket Flywheel Axle Pedal Disk Power Box Lid Power Box Left Pedal Right Pedal Wire Cover Roller Left Side Shield Right Side Shield Resistance Motor Incline Motor Left Motor Cover Right Motor Cover Console Base Power Cord Reed Switch Reed Switch Bracket Reed Switch Clamp Plastic Spacer Pulse Grip Key No. PART LISTÑModel No.
English Manual
Page 20
... freight damage, abuse, misuse, improper or abnormal usage or repairs not provided by ICON. ICON's obligation under normal use , costs of whatsoever nature. ICON HEALTH & FITNESS, INC., 1500 S. 1000 W., LOGAN, UT 84321-9813 Part No. 171682 R1100A Printed in workmanship and material, under this manual. LIMITED WARRANTY ICON Health & Fitness, Inc. (ICON), warrants this manual) ¥ The KEY NUMBER and DESCRIPTION of the product or damages with respect...
... freight damage, abuse, misuse, improper or abnormal usage or repairs not provided by ICON. ICON's obligation under normal use , costs of whatsoever nature. ICON HEALTH & FITNESS, INC., 1500 S. 1000 W., LOGAN, UT 84321-9813 Part No. 171682 R1100A Printed in workmanship and material, under this manual. LIMITED WARRANTY ICON Health & Fitness, Inc. (ICON), warrants this manual) ¥ The KEY NUMBER and DESCRIPTION of the product or damages with respect...


