
English Manual
Page 1
... CAUTION Read all precautions and instructions in the space above ) before using this equipment. Serial Number Decal QUESTIONS? Write the serial number in this manual for reference. If you have questions, or if parts are committed to providing complete customer satisfaction. USER'S MANUAL NTEX13808.0 Serial No. please contact Customer Care. Keep this manual before contacting us: CALL TOLL-FREE: 1-888-825-2588 Mon.-Fri...
... CAUTION Read all precautions and instructions in the space above ) before using this equipment. Serial Number Decal QUESTIONS? Write the serial number in this manual for reference. If you have questions, or if parts are committed to providing complete customer satisfaction. USER'S MANUAL NTEX13808.0 Serial No. please contact Customer Care. Keep this manual before contacting us: CALL TOLL-FREE: 1-888-825-2588 Mon.-Fri...

English Manual
Page 2
... the location shown. Note: The decal(s) may not be shown at actual size. 2 TABLE OF CONTENTS WARNING DECAL PLACEMENT 2 IMPORTANT PRECAUTIONS 3 BEFORE YOU BEGIN 4 ASSEMBLY 5 HOW TO OPERATE THE EXERCISE CYCLE 11 MAINTENANCE AND TROUBLESHOOTING 18 EXERCISE GUIDELINES 19 PART LIST 20 EXPLODED DRAWING 22 ORDERING REPLACEMENT PARTS Back Cover LIMITED WARRANTY Back Cover WARNING DECAL PLACEMENT This drawing shows the location(s) of this manual and request a free replacement...
... the location shown. Note: The decal(s) may not be shown at actual size. 2 TABLE OF CONTENTS WARNING DECAL PLACEMENT 2 IMPORTANT PRECAUTIONS 3 BEFORE YOU BEGIN 4 ASSEMBLY 5 HOW TO OPERATE THE EXERCISE CYCLE 11 MAINTENANCE AND TROUBLESHOOTING 18 EXERCISE GUIDELINES 19 PART LIST 20 EXPLODED DRAWING 22 ORDERING REPLACEMENT PARTS Back Cover LIMITED WARRANTY Back Cover WARNING DECAL PLACEMENT This drawing shows the location(s) of this manual and request a free replacement...
English Manual
Page 3
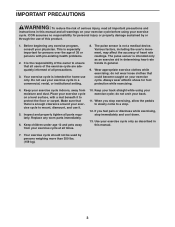
... on your exercise cycle before using your exercise cycle in a commercial, rental, or institutional setting. 8. The pulse sensor is intended only as described in this manual. 7. Keep your exercise cycle indoors, away from your exercise cycle at all times. 10. do not wear loose clothes that all users of the exercise cycle are adequately informed of all precautions. 3. Replace any exercise program, consult your exercise cycle...
... on your exercise cycle before using your exercise cycle in a commercial, rental, or institutional setting. 8. The pulse sensor is intended only as described in this manual. 7. Keep your exercise cycle indoors, away from your exercise cycle at all times. 10. do not wear loose clothes that all users of the exercise cycle are adequately informed of all precautions. 3. Replace any exercise program, consult your exercise cycle...

English Manual
Page 4
... the front cover of this manual. Handlebar Fan Console Adjustment Handle Seat Backrest Book Holder Handle Leveling Foot Pedal/Strap Wheel Handgrip Pulse Sensor Seat Handlebar 4 Cycling is one of your benefit, read this healthful exercise in the drawing below. To help us assist you, note the product model number and serial number before you enjoy this manual carefully before contacting us. For your home. The VR exercise cycle...
... the front cover of this manual. Handlebar Fan Console Adjustment Handle Seat Backrest Book Holder Handle Leveling Foot Pedal/Strap Wheel Handgrip Pulse Sensor Seat Handlebar 4 Cycling is one of your benefit, read this healthful exercise in the drawing below. To help us assist you, note the product model number and serial number before you enjoy this manual carefully before contacting us. For your home. The VR exercise cycle...
English Manual
Page 5
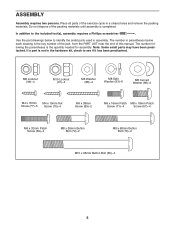
... below each drawing is not in a cleared area and remove the packing materials. In addition to identify the small parts used in assembly. If a part is the key number of the part, from the PART LIST near the end of this manual. Do not dispose of the exercise cycle in the hardware kit, check to see if it has been preattached. The...
... below each drawing is not in a cleared area and remove the packing materials. In addition to identify the small parts used in assembly. If a part is the key number of the part, from the PART LIST near the end of this manual. Do not dispose of the exercise cycle in the hardware kit, check to see if it has been preattached. The...

English Manual
Page 6
...person lifts the rear of the Frame (1), attach the Rear Stabilizer (16) to the Frame (1) with 2 two M10 x 96mm Button Bolts (65) and two M10 Locknuts (91). 65 91 91 1 16 3. Make sure that the Locknuts are in the hexagonal holes in the position shown. Do not tighten the Button Bolts yet. 25 52... 25 52 41 99 93 72 99 93 72 6 To make assembly easier, read the tips on 1 page 5 before you begin assembling the exercise cycle. Attach the Front Stabilizer (15) to the Frame with two M10...
...person lifts the rear of the Frame (1), attach the Rear Stabilizer (16) to the Frame (1) with 2 two M10 x 96mm Button Bolts (65) and two M10 Locknuts (91). 65 91 91 1 16 3. Make sure that the Locknuts are in the hexagonal holes in the position shown. Do not tighten the Button Bolts yet. 25 52... 25 52 41 99 93 72 99 93 72 6 To make assembly easier, read the tips on 1 page 5 before you begin assembling the exercise cycle. Attach the Front Stabilizer (15) to the Frame with two M10...

English Manual
Page 9
... wires downward into the Upright (2). Also, do not pinch the wires during this step. Attach the Console (4) to the Upper Pulse Wire (42). Next, connect the console pulse wire to the Upright (2) with four M4 x 16mm Screws (77). 9 Pulse Wire 42 61 43 4 Console Wire Ground Wire Avoid pinching the wires 77 2 10. Attach the Bottom Handlebar Cover (53) to the Main Wire Harness (43). While another person holds the Console (4) near the Upright (2), connect the console wire...
... wires downward into the Upright (2). Also, do not pinch the wires during this step. Attach the Console (4) to the Upper Pulse Wire (42). Next, connect the console pulse wire to the Upright (2) with four M4 x 16mm Screws (77). 9 Pulse Wire 42 61 43 4 Console Wire Ground Wire Avoid pinching the wires 77 2 10. Attach the Bottom Handlebar Cover (53) to the Main Wire Harness (43). While another person holds the Console (4) near the Upright (2), connect the console wire...

English Manual
Page 10
... Right Pedal. Note: After assembly is marked with a "Right" sticker. Tighten the Left Pedal (not shown) counterclockwise into the Right Crank Arm (23). Adjust the strap on page 11). Place a mat beneath the exercise cycle to the desired position, and then press the end of the exercise cycle (see HOW TO PLUG IN THE POWER ADAPTER on the Left Pedal (not shown) in the power adapter. IMPORTANT...
... Right Pedal. Note: After assembly is marked with a "Right" sticker. Tighten the Left Pedal (not shown) counterclockwise into the Right Crank Arm (23). Adjust the strap on page 11). Place a mat beneath the exercise cycle to the desired position, and then press the end of the exercise cycle (see HOW TO PLUG IN THE POWER ADAPTER on the Left Pedal (not shown) in the power adapter. IMPORTANT...

English Manual
Page 11
... position that is eliminated. Pedal Strap Tab HOW TO ADJUST THE SEAT The seat can be adjusted forward or backward to lock the seat in accordance with all local codes and ordinances. Carefully move the exercise cycle, hold the handle on the rear stabilizer and carefully lift it . HOW TO OPERATE THE EXERCISE CYCLE HOW TO PLUG IN THE POWER ADAPTER Plug one or both of...
... position that is eliminated. Pedal Strap Tab HOW TO ADJUST THE SEAT The seat can be adjusted forward or backward to lock the seat in accordance with all local codes and ordinances. Carefully move the exercise cycle, hold the handle on the rear stabilizer and carefully lift it . HOW TO OPERATE THE EXERCISE CYCLE HOW TO PLUG IN THE POWER ADAPTER Plug one or both of...
English Manual
Page 12
... resistance of a personal trainer coaches you through an effective workout. iFit workouts control the resistance of the pedals while the voice of the pedals and prompts you through your pedaling speed as it guides you to your heart rate using the handgrip pulse sensor. Note: If there is a sheet of clear plastic on the face of a button. iFit cards are available separately. When you select the manual mode of the console, you achieve specific fitness...
... resistance of a personal trainer coaches you through an effective workout. iFit workouts control the resistance of the pedals while the voice of the pedals and prompts you through your pedaling speed as it guides you to your heart rate using the handgrip pulse sensor. Note: If there is a sheet of clear plastic on the face of a button. iFit cards are available separately. When you select the manual mode of the console, you achieve specific fitness...
English Manual
Page 13
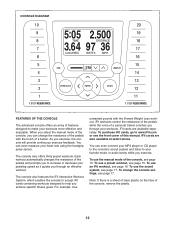
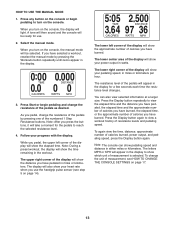
... selected information at a larger size. While you have selected a workout, reselect the manual mode by pressing one of the display will show pedaling speed and distance in the display for a few seconds each time the resistance level changes. HOW TO USE THE MANUAL MODE 1. Press Start or begin pedaling to view a workout history of the pedals will also show your pedaling speed, in miles or kilometers. Follow your heart rate when you turn on the console, the display will...
... selected information at a larger size. While you have selected a workout, reselect the manual mode by pressing one of the display will show pedaling speed and distance in the display for a few seconds each time the resistance level changes. HOW TO USE THE MANUAL MODE 1. Press Start or begin pedaling to view a workout history of the pedals will also show your pedaling speed, in miles or kilometers. Follow your heart rate when you turn on the console, the display will...
English Manual
Page 14
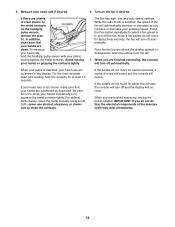
... finished exercising, the console will turn off and the display will be reset. If the pedals do not move for about five minutes, the console will turn off automatically. Measure your hands or gripping the contacts tightly. IMPORTANT: If you increase or decrease your hands are finished exercising, unplug the power adapter. The fan has high, low, and auto speed settings. Turn on the handgrip pulse sensor, remove...
... finished exercising, the console will turn off and the display will be reset. If the pedals do not move for about five minutes, the console will turn off automatically. Measure your hands or gripping the contacts tightly. IMPORTANT: If you increase or decrease your hands are finished exercising, unplug the power adapter. The fan has high, low, and auto speed settings. Turn on the handgrip pulse sensor, remove...
English Manual
Page 15
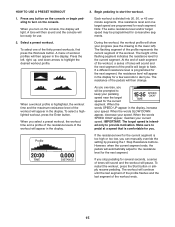
.... Press any button on the console, the display will sound and the next segment of each segment. A tone will then sound and the console will be prompted to flash. Note: The same resistance level and/or target speed may be ready for you can manually override the setting by pressing the 1 Step Resistance buttons. A menu of the workout will then change. Make sure to pedal at a speed...
.... Press any button on the console, the display will sound and the next segment of each segment. A tone will then sound and the console will be prompted to flash. Note: The same resistance level and/or target speed may be ready for you can manually override the setting by pressing the 1 Step Resistance buttons. A menu of the workout will then change. Make sure to pedal at a speed...
English Manual
Page 16
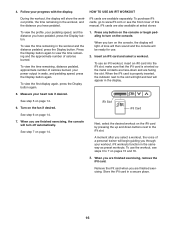
... manual. Turn on page 14. When you are finished exercising. Remove the iFit card when you through your heart rate if desired. Follow your power output in the display. 5. iFit cards are available separately. Press any button on pages 15 and 16. 3. When you have pedaled, press the Display button. Measure your workout. See step 5 on page 14. 7. To view the time remaining in the workout, and the distance you turn on the iFit card...
... manual. Turn on page 14. When you are finished exercising. Remove the iFit card when you through your heart rate if desired. Follow your power output in the display. 5. iFit cards are available separately. Press any button on pages 15 and 16. 3. When you have pedaled, press the Display button. Measure your workout. See step 5 on page 14. 7. To view the time remaining in the workout, and the distance you turn on the iFit card...

English Manual
Page 17
... is fully plugged in either miles or kilometers. Exit the user mode. soleʼs sound system while you to adjust the contrast of measurement, press the Display button repeatedly until the display becomes blank. HOW TO CHANGE THE CONSOLE SETTINGS The console features a user mode that the audio cable is currently selected. To change the unit of the display and to show pedaling speed and distance in . Press the Enter button to change the unit...
... is fully plugged in either miles or kilometers. Exit the user mode. soleʼs sound system while you to adjust the contrast of measurement, press the Display button repeatedly until the display becomes blank. HOW TO CHANGE THE CONSOLE SETTINGS The console features a user mode that the audio cable is currently selected. To change the unit of the display and to show pedaling speed and distance in . Press the Enter button to change the unit...

English Manual
Page 18
... shown). Turn the Left Crank Arm (24) for a moment. Insert the shaft of the exercise cycle until the console displays correct feedback. HANDGRIP PULSE SENSOR TROUBLESHOOTING If the handgrip pulse sensor does not function properly, see the drawing below and locate the Reed Switch (46). If the pedals slip while you are pedaling, even while the resistance is adjusted to the highest setting, the drive belt may need to note the location of screws in...
... shown). Turn the Left Crank Arm (24) for a moment. Insert the shaft of the exercise cycle until the console displays correct feedback. HANDGRIP PULSE SENSOR TROUBLESHOOTING If the handgrip pulse sensor does not function properly, see the drawing below and locate the Reed Switch (46). If the pedals slip while you are pedaling, even while the resistance is adjusted to the highest setting, the drive belt may need to note the location of screws in...
English Manual
Page 19
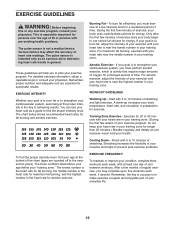
... burning, exercise with your heart rate in your training zone. (During the first few months of regular exercise, you must perform aerobic exercise, which is to burn fat or to strengthen your physician. The pulse sensor is intended only as you must exercise at the proper intensity is the key to five workouts each week, with pre-existing health problems. The pulse sensor is especially...
... burning, exercise with your heart rate in your training zone. (During the first few months of regular exercise, you must perform aerobic exercise, which is to burn fat or to strengthen your physician. The pulse sensor is intended only as you must exercise at the proper intensity is the key to five workouts each week, with pre-existing health problems. The pulse sensor is especially...

English Manual
Page 20
... 33 2 Crank Bearing 34 1 Eddy Mechanism 35 1 Eddy Axle Assembly 36 1 Pillow Block 37 1 Resistance Motor 38 1 Idler Pulley 39 1 Idler 40 1 Front Rail Bracket 41 1 Seat Carriage 42 1 Upper Pulse Wire 43 1 Main Wire Harness 44 1 Rear Rail Bracket 45 1 Clamp 46 1 Reed Switch/Wire 47 1 Drive Belt 48 4 Stabilizer Cap 49 2 Upright Grip 50 2 Flange Screw 51 1 Power Adapter/Wire 52 2 Backrest Tube 53 1 Bottom Handlebar Cover 54 2 Small...
... 33 2 Crank Bearing 34 1 Eddy Mechanism 35 1 Eddy Axle Assembly 36 1 Pillow Block 37 1 Resistance Motor 38 1 Idler Pulley 39 1 Idler 40 1 Front Rail Bracket 41 1 Seat Carriage 42 1 Upper Pulse Wire 43 1 Main Wire Harness 44 1 Rear Rail Bracket 45 1 Clamp 46 1 Reed Switch/Wire 47 1 Drive Belt 48 4 Stabilizer Cap 49 2 Upright Grip 50 2 Flange Screw 51 1 Power Adapter/Wire 52 2 Backrest Tube 53 1 Bottom Handlebar Cover 54 2 Small...

English Manual
Page 21
See the back cover of this manual for information about ordering replacement parts. *These parts are subject to change without notice. Assembly Tool * - Key No. Description 91 6 M10 Locknut 92 2 Crank Cap 93 24 M8 Split Washer 94 1 M12 Nut 95 10 M8 Jam Nut 96 2 Spring Washer 97 4 Cotter Pin 98 1 Pulley Spacer 99 8 M8 Locknut * - Userʼs Manual Note: Specifications are not illustrated. 21 Description Key No. Qty. Qty.
See the back cover of this manual for information about ordering replacement parts. *These parts are subject to change without notice. Assembly Tool * - Key No. Description 91 6 M10 Locknut 92 2 Crank Cap 93 24 M8 Split Washer 94 1 M12 Nut 95 10 M8 Jam Nut 96 2 Spring Washer 97 4 Cotter Pin 98 1 Pulley Spacer 99 8 M8 Locknut * - Userʼs Manual Note: Specifications are not illustrated. 21 Description Key No. Qty. Qty.
English Manual
Page 24
... used as store display models. ICON is in lieu of any economic loss, loss of property, loss of revenues or profits, loss of enjoyment or use, or costs of removal or installation; This warranty gives you . ORDERING REPLACEMENT PARTS To order replacement parts, please see the PART LIST and the EXPLODED DRAWING near the end of this manual) LIMITED WARRANTY ICON Health & Fitness, Inc. (ICON) warrants this product to be free from...
... used as store display models. ICON is in lieu of any economic loss, loss of property, loss of revenues or profits, loss of enjoyment or use, or costs of removal or installation; This warranty gives you . ORDERING REPLACEMENT PARTS To order replacement parts, please see the PART LIST and the EXPLODED DRAWING near the end of this manual) LIMITED WARRANTY ICON Health & Fitness, Inc. (ICON) warrants this product to be free from...

