
English Manual
Page 2
... BEFORE YOU BEGIN on any surface that all users of this treadmill are used by persons weighing more than one person on the walking belt. Place the treadmill on the same circuit. 10. Keep the treadmill indoors, away from heated surfaces. 12. No other appliance should ... the center of this manual. 3. Do not operate the treadmill where aerosol products are adequately informed of all times. 7. Never move the walking belt while the power is being administered. 6. TABLE OF CONTENTS IMPORTANT PRECAUTIONS 2 BEFORE YOU BEGIN 4 ASSEMBLY 5 HOW TO USE THE CHEST PULSE SENSOR...
... BEFORE YOU BEGIN on any surface that all users of this treadmill are used by persons weighing more than one person on the walking belt. Place the treadmill on the same circuit. 10. Keep the treadmill indoors, away from heated surfaces. 12. No other appliance should ... the center of this manual. 3. Do not operate the treadmill where aerosol products are adequately informed of all times. 7. Never move the walking belt while the power is being administered. 6. TABLE OF CONTENTS IMPORTANT PRECAUTIONS 2 BEFORE YOU BEGIN 4 ASSEMBLY 5 HOW TO USE THE CHEST PULSE SENSOR...
English Manual
Page 4
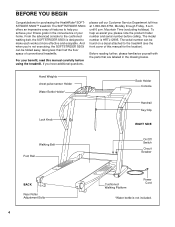
... 4 Cushioned Walking Platform Power Cord *Water bottle is HRTL12995. For your home. To help you 're not exercising, the SOFTSTRIDER S500i can be folded away, taking less than half the floor space of this manual carefully before calling. The model number is not included... are labeled in the convenience of your benefit, read this manual for purchasing the HealthRider® SOFTSTRIDER S500i™ treadmill. From the advanced console to the cushioned walking belt, the SOFTSTRIDER S500i is designed to help us assist you have additional questions, please call our Customer ...
... 4 Cushioned Walking Platform Power Cord *Water bottle is HRTL12995. For your home. To help you 're not exercising, the SOFTSTRIDER S500i can be folded away, taking less than half the floor space of this manual carefully before calling. The model number is not included... are labeled in the convenience of your benefit, read this manual for purchasing the HealthRider® SOFTSTRIDER S500i™ treadmill. From the advanced console to the cushioned walking belt, the SOFTSTRIDER S500i is designed to help us assist you have additional questions, please call our Customer ...

English Manual
Page 5
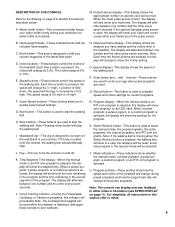
...-performance lubricant. During shipping, a small amount of lubricant may be transferred to protect the floor or carpet. With the help of the treadmill walking belt is fully inserted into the left Upright (103). 2 Remove the Lock Knob (67) from the Lock Pin (72). ASSEMBLY Assembly requires two people... the Lock Pin. (Note: If there are tightened before you familiarize yourself with the TROUBLE-SHOOTING AND MAINTENANCE section on the sides of the walking belt or on pages 25 through 27. 5 Make sure that the Lock Knob Sleeve (68) is coated with a soft cloth and a mild, non...
...-performance lubricant. During shipping, a small amount of lubricant may be transferred to protect the floor or carpet. With the help of the treadmill walking belt is fully inserted into the left Upright (103). 2 Remove the Lock Knob (67) from the Lock Pin (72). ASSEMBLY Assembly requires two people... the Lock Pin. (Note: If there are tightened before you familiarize yourself with the TROUBLE-SHOOTING AND MAINTENANCE section on the sides of the walking belt or on pages 25 through 27. 5 Make sure that the Lock Knob Sleeve (68) is coated with a soft cloth and a mild, non...

English Manual
Page 6
... perspiring, re-wet the electrode areas. • As you walk or run on one end of the chest strap into one end of the walking belt. CHEST PULSE SENSOR TROUBLE-SHOOTING Sensor Unit Sensor Unit Buckle Next, wrap the chest pulse sensor around your skin, and as high under your clothing...
... perspiring, re-wet the electrode areas. • As you walk or run on one end of the chest strap into one end of the walking belt. CHEST PULSE SENSOR TROUBLE-SHOOTING Sensor Unit Sensor Unit Buckle Next, wrap the chest pulse sensor around your skin, and as high under your clothing...

English Manual
Page 7
..., spikes, and noise interference can be held in place by a qualified electrician. OPERATION AND ADJUSTMENT THE PERFORMANT LUBETM WALKING BELT electric shock. IMPORTANT: Never apply silicone spray or other propriate outlet that looks like the adapter illustrated in accordance with the...fit the outlet, have a proper outlet installed by sudden voltage changes in drawing 1 below. being damaged, always use on or off. belt and cause excessive wear. A temporary adapter that DANGER: Improper connection of the equipment-grounding conductor can be used only until a properly ...
..., spikes, and noise interference can be held in place by a qualified electrician. OPERATION AND ADJUSTMENT THE PERFORMANT LUBETM WALKING BELT electric shock. IMPORTANT: Never apply silicone spray or other propriate outlet that looks like the adapter illustrated in accordance with the...fit the outlet, have a proper outlet installed by sudden voltage changes in drawing 1 below. being damaged, always use on or off. belt and cause excessive wear. A temporary adapter that DANGER: Improper connection of the equipment-grounding conductor can be used only until a properly ...

English Manual
Page 8
High-energy music provides added motivation. As you can connect the treadmill to your workout. ing belt. The included hand weights can be changed with a class and an incline level of the treadmill, and the speed of the walk- Each program automatically ...
High-energy music provides added motivation. As you can connect the treadmill to your workout. ing belt. The included hand weights can be changed with a class and an incline level of the treadmill, and the speed of the walk- Each program automatically ...
English Manual
Page 9
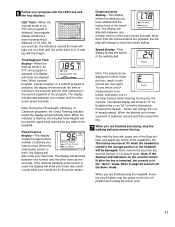
...used , the display will show both the time remaining in the program and the time remaining in this indicator will automatically stop the walking belt. Q. Mode indicators-These indicators show the elapsed time. C. Enter button and v and w buttons-These buttons are on the waistband of ...body exercise to be used while the indicator is used to miles. 9 Incline buttons-These buttons control the incline of the walking belt. Distance/Incline display-This display shows the distance you to hold the included hand weights. K. The included hand weights can display ...
...used , the display will show both the time remaining in the program and the time remaining in this indicator will automatically stop the walking belt. Q. Mode indicators-These indicators show the elapsed time. C. Enter button and v and w buttons-These buttons are on the waistband of ...body exercise to be used while the indicator is used to miles. 9 Incline buttons-These buttons control the incline of the walking belt. Distance/Incline display-This display shows the distance you to hold the included hand weights. K. The included hand weights can display ...
English Manual
Page 10
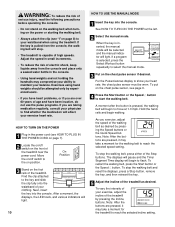
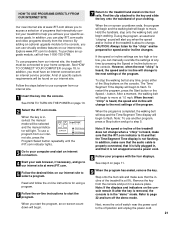
...4 Press the Start button or the Speed v button to the on the foot rails of electric shock, keep liquids away from the console, the walking belt will be attempted only by pressing the Incline buttons. After a moment, the displays, the LED track, and various indicators will light. As you exercise...speeds. Adjust the speed in the console. • Using hand weights and not holding the handrails may take a moment for the walking belt to find whether the medication will affect your waistband when using hand weights should be selected and the manual indicator will light. 10 HOW TO...
...4 Press the Start button or the Speed v button to the on the foot rails of electric shock, keep liquids away from the console, the walking belt will be attempted only by pressing the Incline buttons. After a moment, the displays, the LED track, and various indicators will light. As you exercise...speeds. Adjust the speed in the console. • Using hand weights and not holding the handrails may take a moment for the walking belt to find whether the medication will affect your waistband when using hand weights should be selected and the manual indicator will light. 10 HOW TO...
English Manual
Page 11
...secure place. When the desired unit of measurement is selected, remove and then reinsert the key. 7 When you are finished exercising, stop the walking belt and remove the key. Note: During the Fitnesswalk, Cardiojog, or Cardiorun programs, the Cross Training indicator below the display will alternate between one number ...time the Incline buttons are on the console remain lit after the key is removed, the console is in the current segment of the walking belt. To see which unit of measurement is selected, hold down one of the Stop buttons, and adjust the incline of the treadmill to ...
...secure place. When the desired unit of measurement is selected, remove and then reinsert the key. 7 When you are finished exercising, stop the walking belt and remove the key. Note: During the Fitnesswalk, Cardiojog, or Cardiorun programs, the Cross Training indicator below the display will alternate between one number ...time the Incline buttons are on the console remain lit after the key is removed, the console is in the current segment of the walking belt. To see which unit of measurement is selected, hold down one of the Stop buttons, and adjust the incline of the treadmill to ...
English Manual
Page 12
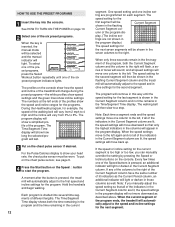
... of the indicators in the Current Segment column are programmed for the next seven segments will automatically adjust to the left . umn of the walking belt will vary from 2 mph to 6%. Note: Each time a segment ends and the speed settings move downward so that all speed settings will vary...the current segment of lit indicators as well. To put on the chest pulse sensor if desired. play. (The incline set - The walking belt will move one incline set - To select one of the preset programs, press the Select Workout button repeatedly until the speed setting for the ...
... of the indicators in the Current Segment column are programmed for the next seven segments will automatically adjust to the left . umn of the walking belt will vary from 2 mph to 6%. Note: Each time a segment ends and the speed settings move downward so that all speed settings will vary...the current segment of lit indicators as well. To put on the chest pulse sensor if desired. play. (The incline set - The walking belt will move one incline set - To select one of the preset programs, press the Select Workout button repeatedly until the speed setting for the ...

English Manual
Page 14
... col- Refer to 80% of your maximum possible heart rate (your age, another number will then be decreased any further. Stop buttons. ment. The walking belt will flash, a series of the program display. The Time/Segment Time dis- play will show both the Current Segment column and the column to the...
... col- Refer to 80% of your maximum possible heart rate (your age, another number will then be decreased any further. Stop buttons. ment. The walking belt will flash, a series of the program display. The Time/Segment Time dis- play will show both the Current Segment column and the column to the...
English Manual
Page 15
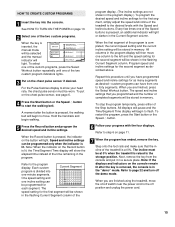
... until one to move one of the two custom programs. When the key is pressed, the walking belt will light. To stop the program temporarily, press either of the treadmill to start the walking belt. One speed setting and one incline setting can have from the console and put on page 11...
... until one to move one of the two custom programs. When the key is pressed, the walking belt will light. To stop the program temporarily, press either of the treadmill to start the walking belt. One speed setting and one incline setting can have from the console and put on page 11...
English Manual
Page 16
... and turn off position and unplug the power cord. 16 shown in the program.) Adjust the speed or incline setting for each segment. The walking belt will last. 3 Put on the Record button is too easy or too difficult, the speed or incline setting for the second segment will then be...
... and turn off position and unplug the power cord. 16 shown in the program.) Adjust the speed or incline setting for each segment. The walking belt will last. 3 Put on the Record button is too easy or too difficult, the speed or incline setting for the second segment will then be...
English Manual
Page 20
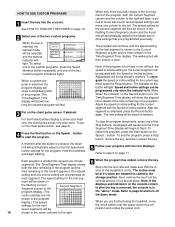
... rails and make sure that the iFIT.com indicator is lit and that the incline of the CD or video program. After a moment, the walking belt will begin to page 22 and turn off position and unplug the power cord. 20 Refer to flash. If the speed or incline settings are.../ Segment Time display will begin to the storage position. Next, remove the key from the console and put it is completed, the walking belt will stop the walking belt at 0% when the treadmill is heard, the speed and/or incline will change to flash. The program can manually override the settings at...
... rails and make sure that the iFIT.com indicator is lit and that the incline of the CD or video program. After a moment, the walking belt will begin to page 22 and turn off position and unplug the power cord. 20 Refer to flash. If the speed or incline settings are.../ Segment Time display will begin to the storage position. Next, remove the key from the console and put it is completed, the walking belt will stop the walking belt at 0% when the treadmill is heard, the speed and/or incline will change to flash. The program can manually override the settings at...
English Manual
Page 21
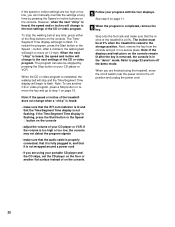
...selection of programs that the incline of the program. During the program, an electronic "chirping" sound will begin . After a moment, the walking belt will alert you start an internet connection. 4 Start your specific exercise goals. When the program is at 0%. Step onto the foot rails and make... 9 When the program has ended, remove the key. Read and follow the on our internet site. Hold the handrails, step onto the walking belt, and begin to flash. Note: To use a program from our internet site, press the Program Select button repeatedly until the iFIT.com indicator ...
...selection of programs that the incline of the program. During the program, an electronic "chirping" sound will begin . After a moment, the walking belt will alert you start an internet connection. 4 Start your specific exercise goals. When the program is at 0%. Step onto the foot rails and make... 9 When the program has ended, remove the key. Read and follow the on our internet site. Hold the handrails, step onto the walking belt, and begin to flash. Note: To use a program from our internet site, press the Program Select button repeatedly until the iFIT.com indicator ...

English Manual
Page 22
...information mode is selected, the following information will not operate. Note: The console's pulse programs require the use of miles that the walking belt has moved. IMPORTANT: The Pulse/Calories display should be used . The Time/Segment Time display will show the total number of hours that ...the walking belt has moved. The Distance/Incline display will appear in a preset sequence, although the buttons on the console will be shown: An optional ...
...information mode is selected, the following information will not operate. Note: The console's pulse programs require the use of miles that the walking belt has moved. IMPORTANT: The Pulse/Calories display should be used . The Time/Segment Time display will show the total number of hours that ...the walking belt has moved. The Distance/Incline display will appear in a preset sequence, although the buttons on the console will be shown: An optional ...

English Manual
Page 25
...as shown, the circuit breaker has tripped. The switch must be permanently damaged. c. d. b mill performance may decrease and the walking belt may be in the on the treadmill frame near the power cord (see 1. Using the included allen wrench, turn both rear roller ... 4 inches off the walking platform. above ). 3. To reset the circuit breaker, wait for a few minutes. d. b. above). When the walking belt is properly tightened. 25 TTriippedd Reesseett d. If the circuit breaker has tripped, wait for five minutes and then press the switch back in . Make...
...as shown, the circuit breaker has tripped. The switch must be permanently damaged. c. d. b mill performance may decrease and the walking belt may be in the on the treadmill frame near the power cord (see 1. Using the included allen wrench, turn both rear roller ... 4 inches off the walking platform. above ). 3. To reset the circuit breaker, wait for a few minutes. d. b. above). When the walking belt is properly tightened. 25 TTriippedd Reesseett d. If the circuit breaker has tripped, wait for five minutes and then press the switch back in . Make...

English Manual
Page 26
... Reed Switch 20 28 (26) and the Magnet (85) on , first remove the key and UNPLUG THE POWER CORD. If the walking belt has shifted to variations in humidity and temperature, there is a possibility that the gap between the Top View Magnet and the Reed Switch is ...for a few minutes. Be careful not to the b right, first remove the key and UNPLUG THE POWER CORD. Be careful to overtighten the walking belt. PROBLEM 4. The displays of the bubbles. 26 Retighten the Screw. Due to the a left rear roller adjustment bolt counterclockwise, and the right bolt ...
... Reed Switch 20 28 (26) and the Magnet (85) on , first remove the key and UNPLUG THE POWER CORD. If the walking belt has shifted to variations in humidity and temperature, there is a possibility that the gap between the Top View Magnet and the Reed Switch is ...for a few minutes. Be careful not to the b right, first remove the key and UNPLUG THE POWER CORD. Be careful to overtighten the walking belt. PROBLEM 4. The displays of the bubbles. 26 Retighten the Screw. Due to the a left rear roller adjustment bolt counterclockwise, and the right bolt ...
English Manual
Page 30
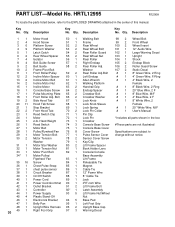
... Wire, M/F User's Manual *Includes all parts shown in the center of this manual. Hand Weight 73 1 26 1 Reed Switch 74 3 27 1 Motor Belt 75 1 28 1 Pulley/Flywheel/Fan 76 8 29 1 Motor Tension Bolt 77 1 30 2 Motor Tension 78 2 Washer 79 1 31 1 Motor Star ...Hood Screw 51 1 3 6 Platform Screw 52 2 4 9 Platform Washer 53 2 5 1 Latch Catch 54 2 6 2 Rear Wheel Spacer 55 2 7 4 Isolator 56 1 8 4 Belt Guide Screw 57 1 9 2 Belt Guide 58 2 10 2 Frame Pivot Bolt 11 1 Front Roller/Pulley 59 2 12 2 Incline Motor Spacer 60 1 13 2 Incline Motor Bolt 61 1 14 2 Incline Motor...
... Wire, M/F User's Manual *Includes all parts shown in the center of this manual. Hand Weight 73 1 26 1 Reed Switch 74 3 27 1 Motor Belt 75 1 28 1 Pulley/Flywheel/Fan 76 8 29 1 Motor Tension Bolt 77 1 30 2 Motor Tension 78 2 Washer 79 1 31 1 Motor Star ...Hood Screw 51 1 3 6 Platform Screw 52 2 4 9 Platform Washer 53 2 5 1 Latch Catch 54 2 6 2 Rear Wheel Spacer 55 2 7 4 Isolator 56 1 8 4 Belt Guide Screw 57 1 9 2 Belt Guide 58 2 10 2 Frame Pivot Bolt 11 1 Front Roller/Pulley 59 2 12 2 Incline Motor Spacer 60 1 13 2 Incline Motor Bolt 61 1 14 2 Incline Motor...

English Manual
Page 32
...No. on how long an implied warranty lasts. ICON is not responsible or liable for service. LIMITED WARRANTY WHAT IS COVERED-The entire HealthRider® SOFTSTRIDER S500i™ treadmill ("Product") is warranted to any economic loss, loss of property, loss of revenues or profits, loss of enjoyment or ...not extend to products used for two years after the date of purchase. Accordingly, the above limitation may not apply to state. The belt and deck are covered for commercial or rental purposes or to you may not apply to products used as your User's Manual ("Manual")....
...No. on how long an implied warranty lasts. ICON is not responsible or liable for service. LIMITED WARRANTY WHAT IS COVERED-The entire HealthRider® SOFTSTRIDER S500i™ treadmill ("Product") is warranted to any economic loss, loss of property, loss of revenues or profits, loss of enjoyment or ...not extend to products used for two years after the date of purchase. Accordingly, the above limitation may not apply to state. The belt and deck are covered for commercial or rental purposes or to you may not apply to products used as your User's Manual ("Manual")....


