

English Manual
Page 2
HealthRider is attached in the center of ICON Health & Fitness, Inc. 2 TABLE OF CONTENTS IMPORTANT PRECAUTIONS 3 BEFORE YOU BEGIN 5 ASSEMBLY 6 TREADMILL OPERATION 7 HOW TO FOLD AND MOVE THE TREADMILL 23 TROUBLE-SHOOTING AND MAINTENANCE 25 EXERCISE GUIDELINES 28 PART LIST 30 HOW TO ORDER REPLACEMENT PARTS 31 LIMITED WARRANTY Back Cover Note: An EXPLODED DRAWING is a registered trademark of this manual.
HealthRider is attached in the center of ICON Health & Fitness, Inc. 2 TABLE OF CONTENTS IMPORTANT PRECAUTIONS 3 BEFORE YOU BEGIN 5 ASSEMBLY 6 TREADMILL OPERATION 7 HOW TO FOLD AND MOVE THE TREADMILL 23 TROUBLE-SHOOTING AND MAINTENANCE 25 EXERCISE GUIDELINES 28 PART LIST 30 HOW TO ORDER REPLACEMENT PARTS 31 LIMITED WARRANTY Back Cover Note: An EXPLODED DRAWING is a registered trademark of this manual.

English Manual
Page 3
...switch to maintain your ability to the off . Never allow more than one person on page 23.) You must be on page 5 if the treadmill is UL 1449 listed as an exercise aid in determining heart rate trends in general. 17. Always wear athletic shoes. Do not attempt to ...ensure that is not working properly. (See BEFORE YOU BEGIN on the same circuit. 10. It is running. Exercises using the treadmill. 5. Athletic support clothes are used by experienced users. 8. Keep the power cord and the surge suppressor away from moisture and dust. Do not put ...
...switch to maintain your ability to the off . Never allow more than one person on page 23.) You must be on page 5 if the treadmill is UL 1449 listed as an exercise aid in determining heart rate trends in general. 17. Always wear athletic shoes. Do not attempt to ...ensure that is not working properly. (See BEFORE YOU BEGIN on the same circuit. 10. It is running. Exercises using the treadmill. 5. Athletic support clothes are used by experienced users. 8. Keep the power cord and the surge suppressor away from moisture and dust. Do not put ...

English Manual
Page 4
...commercial, rental, or institutional setting. Apply the decal in this or any time by an authorized service representative only. 26. The treadmill is not legible, please call our Customer Service Department toll-free at 1-800-999-3756 to change. WARNING: Before beginning this...Always unplug the power cord immediately after use only. Never remove the motor hood unless instructed to the next settings of the treadmill every three months. 24. Inspect and properly tighten all instructions before performing the main- SAVE THESE INSTRUCTIONS The decals shown below ...
...commercial, rental, or institutional setting. Apply the decal in this or any time by an authorized service representative only. 26. The treadmill is not legible, please call our Customer Service Department toll-free at 1-800-999-3756 to change. WARNING: Before beginning this...Always unplug the power cord immediately after use only. Never remove the motor hood unless instructed to the next settings of the treadmill every three months. 24. Inspect and properly tighten all instructions before performing the main- SAVE THESE INSTRUCTIONS The decals shown below ...

English Manual
Page 5
...you 're not exercising, the S700HRC can be folded away, taking less than half the floor space of this manual carefully before calling. The S700HRC offers an impressive array of your benefit, read this manual for purchasing the HealthRider® S700HRC treadmill. And when you , please... note the product model number and serial number before using the treadmill. If you achieve your fitness goals...
...you 're not exercising, the S700HRC can be folded away, taking less than half the floor space of this manual carefully before calling. The S700HRC offers an impressive array of your benefit, read this manual for purchasing the HealthRider® S700HRC treadmill. And when you , please... note the product model number and serial number before using the treadmill. If you achieve your fitness goals...
English Manual
Page 6
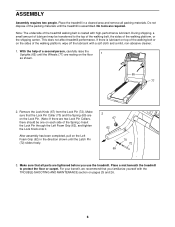
... person, carefully raise the Uprights (65) until the Wheels (77) are required. Make sure that you use the treadmill. Place the treadmill in the direction shown until the treadmill is coated with the TROUBLE-SHOOTING AND MAINTENANCE section on pages 25 and 26. 6 Remove the Lock Knob (67)... 65 77 2. Note: The underside of the walking platform, or the shipping carton. Place a mat beneath the treadmill to the top of the walking belt, the sides of the treadmill walking belt is assembled. For your benefit, we recommend that the Lock Pin Collar (70) and the Spring ...
... person, carefully raise the Uprights (65) until the Wheels (77) are required. Make sure that you use the treadmill. Place the treadmill in the direction shown until the treadmill is coated with the TROUBLE-SHOOTING AND MAINTENANCE section on pages 25 and 26. 6 Remove the Lock Knob (67)... 65 77 2. Note: The underside of the walking platform, or the shipping carton. Place a mat beneath the treadmill to the top of the walking belt, the sides of the treadmill walking belt is assembled. For your benefit, we recommend that the Lock Pin Collar (70) and the Spring ...
English Manual
Page 7
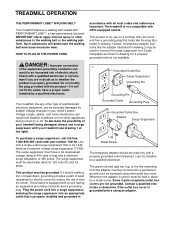
... rigid ear, lug, or the like extending from other appliances being damaged, always use on or off. TREADMILL OPERATION THE PERFORMANT LUBETM WALKING BELT Your treadmill features a walking belt coated with all local codes and ordinances. IMPORTANT: Never apply silicone spray or other ...other substances to a permanent ground such as a transient voltage surge suppressor (TVSS). Whenever the adapter is properly installed and grounded in your treadmill being turned on a nominal 120-volt circuit, and has a grounding plug that is used only until a properly grounded outlet (drawing ...
... rigid ear, lug, or the like extending from other appliances being damaged, always use on or off. TREADMILL OPERATION THE PERFORMANT LUBETM WALKING BELT Your treadmill features a walking belt coated with all local codes and ordinances. IMPORTANT: Never apply silicone spray or other ...other substances to a permanent ground such as a transient voltage surge suppressor (TVSS). Whenever the adapter is properly installed and grounded in your treadmill being turned on a nominal 120-volt circuit, and has a grounding plug that is used only until a properly grounded outlet (drawing ...

English Manual
Page 8
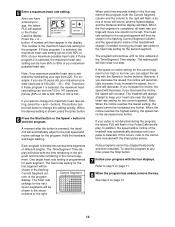
...the manual mode of the console, follow the steps beginning on page 10. High-energy music provides added motivation. FEATURES OF THE CONSOLE The treadmill console offers an impressive selection of features to help you through an effective workout. K Q L P C M B N R O A... ST Note: If there is a thin sheet of clear plastic on the face of the I J console, remove it guides you can connect the treadmill to your home stereo, portable stereo, or computer and play iFIT.com video programs (videocassettes are available separately). IFIT.com CD programs automatically control the...
...the manual mode of the console, follow the steps beginning on page 10. High-energy music provides added motivation. FEATURES OF THE CONSOLE The treadmill console offers an impressive selection of features to help you through an effective workout. K Q L P C M B N R O A... ST Note: If there is a thin sheet of clear plastic on the face of the I J console, remove it guides you can connect the treadmill to your home stereo, portable stereo, or computer and play iFIT.com video programs (videocassettes are available separately). IFIT.com CD programs automatically control the...

English Manual
Page 9
...and incline of calories you have burned. E. if a button is worn, the display will show your heart rate and the number of the treadmill will change during pulse programs. L. G. Waistband clip-This clip is pressed, the walking belt will change by 0.1 mph; P. Enter button ...holder-These compartments hold a book or magazine. M. OneTouch Speed buttons-These buttons allow you have walked and the incline level of the treadmill. U. The included hand weights can display exercise feedback in the current segment of the walking belt. The incline range is flashing to ...
...and incline of calories you have burned. E. if a button is worn, the display will show your heart rate and the number of the treadmill will change during pulse programs. L. G. Waistband clip-This clip is pressed, the walking belt will change by 0.1 mph; P. Enter button ...holder-These compartments hold a book or magazine. M. OneTouch Speed buttons-These buttons allow you have walked and the incline level of the treadmill. U. The included hand weights can display exercise feedback in the current segment of the walking belt. The incline range is flashing to ...

English Manual
Page 10
... position of the clip as needed. To vary the intensity of your clothes. Then, reinsert the key into the console. As you use the treadmill, inspect the alignment of the walking belt, and align the walking belt if necessary (see page 28). If the key is inserted, the manual... mode will be selected and the manual indicator will light. Note: After the buttons are using the treadmill. After a moment, the displays, the LED track, and various indicators will stop the walking belt, press the Stop button. On Position 3 Stand on ...
... position of the clip as needed. To vary the intensity of your clothes. Then, reinsert the key into the console. As you use the treadmill, inspect the alignment of the walking belt, and align the walking belt if necessary (see page 28). If the key is inserted, the manual... mode will be selected and the manual indicator will light. Note: After the buttons are using the treadmill. After a moment, the displays, the LED track, and various indicators will stop the walking belt, press the Stop button. On Position 3 Stand on ...

English Manual
Page 11
... in the current segment of 1/4 mile. When you have burned. Distance/Incline display-This display shows the distance you are finished using the treadmill, move the on the handrail as shown-avoid moving your hands on the Contacts metal contacts on /off switch near the power cord to ..." mode. Pulse/Calories display-This display shows the approximate number of measurement is selected. To use the hand- To change the unit of the treadmill. Time/Segment Time display-When the manual mode or the iFIT.com mode is selected, remove and then reinsert the key. 6 When you have...
... in the current segment of 1/4 mile. When you have burned. Distance/Incline display-This display shows the distance you are finished using the treadmill, move the on the handrail as shown-avoid moving your hands on the Contacts metal contacts on /off switch near the power cord to ..." mode. Pulse/Calories display-This display shows the approximate number of measurement is selected. To use the hand- To change the unit of the treadmill. Time/Segment Time display-When the manual mode or the iFIT.com mode is selected, remove and then reinsert the key. 6 When you have...

English Manual
Page 12
... When the speed settings move to the left ends of the profiles show how the speed and incline of the treadmill will be shown in the flashing Current Segment column and the treadmill will automatically adjust to change during the preset programs. The numbers at the left again and not all of... Current Segment col- HOW TO USE THE PRESET PROGRAMS 1 Insert the key into several time seg- The profiles printed on the right side of the treadmill is divided into the console. Each program is about to the speed and incline settings for the programs. The program display will show how long...
... When the speed settings move to the left ends of the profiles show how the speed and incline of the treadmill will be shown in the flashing Current Segment column and the treadmill will automatically adjust to change during the preset programs. The numbers at the left again and not all of... Current Segment col- HOW TO USE THE PRESET PROGRAMS 1 Insert the key into several time seg- The profiles printed on the right side of the treadmill is divided into the console. Each program is about to the speed and incline settings for the programs. The program display will show how long...

English Manual
Page 13
...the off the demo mode. The incline must wear the optional chest pulse sensor (see page 22). Note: If the displays and indicators on the treadmill. When you walk on the console remain lit after the key is removed, the console is shown, press the Enter button. See HOW TO TURN... compromise your ability to enter your age, press the + or - To restart the program, press the Start button or the Speed + button. Exercises using the treadmill, move the on/off switch near the power cord to the storage position. If you have heart prob- Press the buttons again to maintain your...
...the off the demo mode. The incline must wear the optional chest pulse sensor (see page 22). Note: If the displays and indicators on the treadmill. When you walk on the console remain lit after the key is removed, the console is shown, press the Enter button. See HOW TO TURN... compromise your ability to enter your age, press the + or - To restart the program, press the Start button or the Speed + button. Exercises using the treadmill, move the on/off switch near the power cord to the storage position. If you have heart prob- Press the buttons again to maintain your...
English Manual
Page 14
..., the maximum heart rate setting can be increased any further. If this occurs, refer to 161 beats per minute (65% of 190 is pressed, the treadmill will show both the Current Segment column and the column to the heart rate setting for the next seven segments will appear in the display... 13. 14 If you are 30 years old, your maximum possible heart rate is estimated by subtracting your age from 65% to 80% of the treadmill will change the maximum heart rate setting, press the + and - When the incline reaches the highest setting, the speed cannot be stopped temporarily and then...
..., the maximum heart rate setting can be increased any further. If this occurs, refer to 161 beats per minute (65% of 190 is pressed, the treadmill will show both the Current Segment column and the column to the heart rate setting for the next seven segments will appear in the display... 13. 14 If you are 30 years old, your maximum possible heart rate is estimated by subtracting your age from 65% to 80% of the treadmill will change the maximum heart rate setting, press the + and - When the incline reaches the highest setting, the speed cannot be stopped temporarily and then...
English Manual
Page 15
... segment is inserted, the manual mode will move one column to the left. tings are not shown in memory. When the first segment of the treadmill to the program display. Program speed and incline settings for the first segment, simply adjust the speed and incline of the program is pressed, the...
... segment is inserted, the manual mode will move one column to the left. tings are not shown in memory. When the first segment of the treadmill to the program display. Program speed and incline settings for the first segment, simply adjust the speed and incline of the program is pressed, the...

English Manual
Page 16
.... When only three seconds remain in - In addition, if the speed and/or incline of the program, first wait until the program is pressed, the treadmill will automatically adjust to the first speed and incline settings for the second segment. To increase the length of the... completed. The speed setting for the second segment will then be shown in the flashing Current Segment column and the treadmill will automatically adjust to the speed and incline settings for the program. To restart the program, press the Start button. The speed setting for the ...
.... When only three seconds remain in - In addition, if the speed and/or incline of the program, first wait until the program is pressed, the treadmill will automatically adjust to the first speed and incline settings for the second segment. To increase the length of the... completed. The speed setting for the second segment will then be shown in the flashing Current Segment column and the treadmill will automatically adjust to the speed and incline settings for the program. To restart the program, press the Start button. The speed setting for the ...
English Manual
Page 17
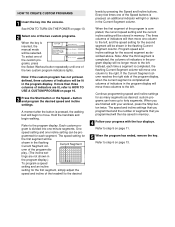
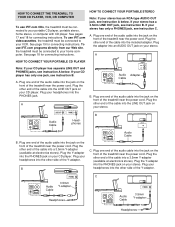
...OUT RIGHT LEFT Audio Adapter Cable B. B PHONES PHONES C. Plug one end of the audio cable into the jack on the front of the treadmill near the power cord. C Audio Cable 3.5mm Y-adapter Headphones Audio Cable PHONES 3.5mm Y-adapter Headphones See page 18 for connecting instructions. Plug... Plug your headphones into the jack on your stereo has a 3.5mm LINE OUT jack, see instruction B. Plug the other end of the treadmill near the power cord. See page 19 for connecting instructions. Plug the Y-adapter into the PHONES jack. A. Plug one end of the ...
...OUT RIGHT LEFT Audio Adapter Cable B. B PHONES PHONES C. Plug one end of the audio cable into the jack on the front of the treadmill near the power cord. C Audio Cable 3.5mm Y-adapter Headphones Audio Cable PHONES 3.5mm Y-adapter Headphones See page 18 for connecting instructions. Plug... Plug your headphones into the jack on your stereo has a 3.5mm LINE OUT jack, see instruction B. Plug the other end of the treadmill near the power cord. See page 19 for connecting instructions. Plug the Y-adapter into the PHONES jack. A. Plug one end of the ...
English Manual
Page 18
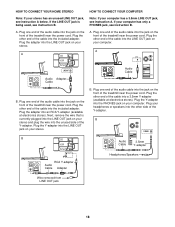
..., see instruction B. Plug one end of the audio cable into the jack on the front of the treadmill near the power cord. Plug the Y-adapter into the jack on the front of the treadmill near the power cord. Note: If your computer has only a PHONES jack, see instruction A. Plug... of the audio cable into the PHONES jack on your headphones or speakers into the included adapter. Plug your computer. Plug one end of the treadmill near the power cord. Plug one end of the Y-adapter. B. B PHONES B CD VCR Amp LINE OUT Audio Cable 3.5mm Y-adapter Headphones/Speakers ...
..., see instruction B. Plug one end of the audio cable into the jack on the front of the treadmill near the power cord. Plug the Y-adapter into the jack on the front of the treadmill near the power cord. Note: If your computer has only a PHONES jack, see instruction A. Plug... of the audio cable into the PHONES jack on your headphones or speakers into the included adapter. Plug your computer. Plug one end of the treadmill near the power cord. Plug one end of the Y-adapter. B. B PHONES B CD VCR Amp LINE OUT Audio Cable 3.5mm Y-adapter Headphones/Speakers ...
English Manual
Page 19
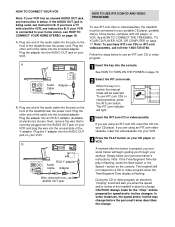
.... When the key is being used, see instruction B. The iFIT.com indicator will be selected. A moment after the button is about to change . The treadmill will not respond to your portable CD player, portable stereo, home stereo, computer with a built-in VCR, see instruction B. IN VIDEO AUDIO IN CH 34... OUT RF OUT AUDIO OUT RIGHT LEFT Audio Adapter Cable B. Plug the other end of the treadmill is pressed, your personal trainer will alert you when the speed and/or incline of the cable into the AUDIO OUT jack on the console...
.... When the key is being used, see instruction B. The iFIT.com indicator will be selected. A moment after the button is about to change . The treadmill will not respond to your portable CD player, portable stereo, home stereo, computer with a built-in VCR, see instruction B. IN VIDEO AUDIO IN CH 34... OUT RF OUT AUDIO OUT RIGHT LEFT Audio Adapter Cable B. Plug the other end of the treadmill is pressed, your personal trainer will alert you when the speed and/or incline of the cable into the AUDIO OUT jack on the console...

English Manual
Page 20
... go to move at any time by pressing the Stop button on your CD player or VCR. Note: If the speed or incline of the treadmill does not change to flash. If the Time/Segment Time display is flashing, press the Start button or the Speed + button on page 11. 6 When...
... go to move at any time by pressing the Stop button on your CD player or VCR. Note: If the speed or incline of the treadmill does not change to flash. If the Time/Segment Time display is flashing, press the Start button or the Speed + button on page 11. 6 When...

English Manual
Page 21
...next "chirp" is completed, the walking belt will begin to access basic programs, audio programs, and video programs directly from our Web site, the treadmill must have an internet connection and an internet service provider. After a moment, the walking belt will stop the walking belt at any time by ...Start your computer and start the program, an on -line instructions for the "chirp" and be selected. Note: If the speed or incline of the treadmill does not change . Additional options, such as on our Web site. See HOW TO TURN ON THE POWER on page 13. Find the clip attached...
...next "chirp" is completed, the walking belt will begin to access basic programs, audio programs, and video programs directly from our Web site, the treadmill must have an internet connection and an internet service provider. After a moment, the walking belt will stop the walking belt at any time by ...Start your computer and start the program, an on -line instructions for the "chirp" and be selected. Note: If the speed or incline of the treadmill does not change . Additional options, such as on our Web site. See HOW TO TURN ON THE POWER on page 13. Find the clip attached...


